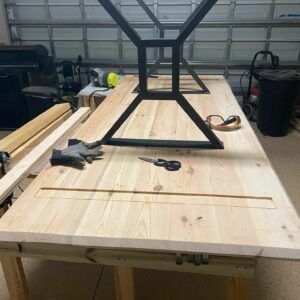
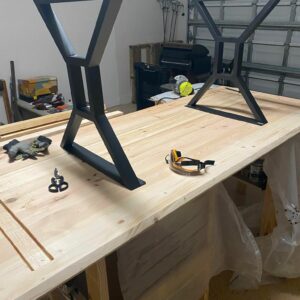
Building a table (currently unfinished), and the legs I received have an odd-shaped centerpiece that I had originally planned to slot with a 4×4 and drill into the legs to support from horizontal stress applied to the table. I’ve considered a few ways around this, listed below and I’m really looking for a low-effort solution that would give the best support. Open to suggestions or advice on why I should go with one solution over another or other recommendations.
1. Trim down 3 6×2’s to fit the gap and plane them to fit, wrapping each end in aluminum that I’d spray paint black to match the aesthetic.
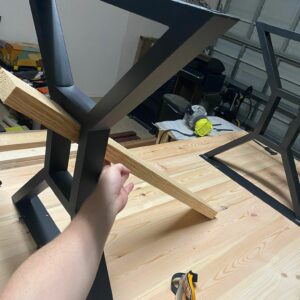
2. Cut 2×4’s or 4×4’s at an angle (picture) to meet in the middle of the table to disperse pressure or weight applied to the ends
3. Create a rectangle box (matched to the interior of the legs) and drill them in from the outside fastening with bolts.
More Context:
I’m pretty novice to intermediate at woodworking which is why I chose pine for this table as I wanted to learn from mistakes I assumed I’d make throughout this build. I ran each piece of 2″x6″x8′ through a joiner and planer, rounded the top edges, and used a 45-degree bevel cut along the underside of the table. I joined the table using 1/2″x3″ dowels, and wood glue. I’ve routed to add a c-channel at each end of the table to prevent movement and separation. I’ve already sanded 60grit, 120grit, and 220grit. I plan on finishing with wood conditioner, stain, and poly. I’ve considered attaching wooden feet (2″x4″x3′) to distribute the weight a little more evenly and tie in the wood to the metal legs.


Replies
If I understand #3 correctly, I really like it. I read that as a box cross section the size of the squares at the center of the leg X's that will span from leg to leg. I think that will complement the structure very nicely and provide the rigidity you need. I don't think the box needs a bottom however. Make the box to fit on the inside of the leg squares and protrude through a few inches and then screw it from the inside into the metal legs. Also, cap the ends so that the box appears as a large beam. Hopefully, the metal legs have enough thickness so that you can drill and tap holes for this. That way the bolts/screws would be hidden. If the legs are thin walled tubing, consider using rivet nuts like this;
https://www.amazon.com/EilxMag-Threaded-Assortment-Nutserts-Standard/dp/B09C5PKBXL/ref=sr_1_21?crid=2PBZS5TWV31RL&keywords=threaded+inserts&qid=1670282634&sprefix=threaded+inserts%2Caps%2C163&sr=8-21
I think the spacing shown is a bit too close. The proportions are off. Move the legs 4-6" closer to the ends.
Good looking table. Please show us some pictures when it's done.
Nice top, but that wood is going to expand with the seasons without any thought to the c-channel. Use it to hold the top flat if you think you need it by stretching the screw holes so the wood can move under the steel without tearing the screws free. The only screw in a round hole should be in the center of the top.
I like the idea of a box fitting inside that center detail. You could take it a step further and add a drawer at either end. Adding a third point of contact would improve stability a ton. Perhaps use the truss concept from #2 above the box from #3. They would angle from the inside of each mounting flange to meet at the center of the box. Cut shoulders at the joint so they meet on a flat and not a point.
This forum post is now archived. Commenting has been disabled