Hi,
I’m kind of DIY Carpenter, with not so much experience.
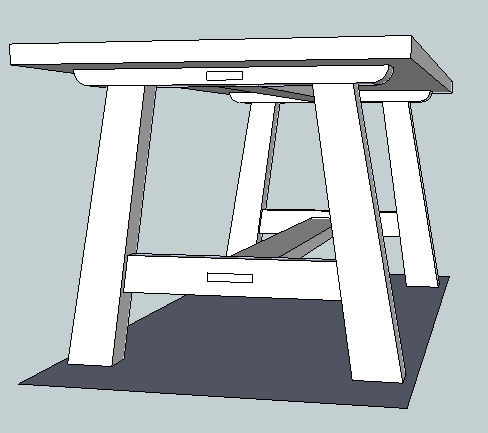
I’m designing a solid and beefy kitchen table that will have of course a solid thick table top. I’m trying to do old fashion, that means without fasteners, called screws and stuff like that. The table will be rectangular with 4 thick angled legs and two strechers (top and bottom).
My questions are:
1 – How do I attach the table top to the base without screws, is there any advice in joinery to do that?
2 – The legs have diferent thicknesses (bottom, up), I’m thinking to do tenons that connect the legs to the top “plate” strait up instead of following the angle of the legs, can anyone give me any advice in this matter? Should I do in any other way?
I’m attaching a picture of the sketch.

Thanks in advance,
Jony
P.S. – sorry if my english is not so correct.


Replies
How old is old?
The concept of the screw dates back to about 200 BCE, but they were hand-made until the late 1500s, with substantial improvements in mass production in the late 1700s. IIRC, the current gimmel point was added somewhere in the mid 1800s, a fact that is often used to date antique furniture. Before that date, wood screws had blunt points, about 1/3 to 1/2 the total diameter, requiring pilot holes.
Thus, unless you are building a Dark Ages table, it would be properly "old fashioned" to use wood screws to attach the top, IMHO.
Just be sure to drill an elongated hole for the screw to pass through in the support strut, so the top can move with seasonal moisture variations.
Alternatively, you could explore ancient Japanese joinery styles, or post-and-beam construction joinery that didn't require metal fasteners. These methods often use wooden pins to hold pieces together.
I'd attach the legs to the support struts with hand-cut mortice and tenon joinery, following the angle of the legs. You might also consider adding "draw bore" cross pins to further secure those joints.
Draw bore joinery
Thanks for the reply,
I planned to do the base using draw bore holes and dowels, with the holes of the tenon 1/32 out. I think that what you mean with the "draw bore" cross pins.
So you think I should do tenon/mortise following the angle of the legs. The reason I thought doing strait up, was because it would give a kind of 4 tenons over the support strut ,then I would recess the bottom of the table top to create a kind of mortises and finally I would try to hold that joint with the "draw bore" technic even if the dowel or pin had to be bored in an angle. (tell me if this sounds not a god idea)
If you would use screw, would you screw strait up from the support struts to the table top?
Thanks a lot!
Yep
brumas wrote:
I planned to do the base using draw bore holes and dowels, with the holes of the tenon 1/32 out. I think that what you mean with the "draw bore" cross pins.
Yes.
brumas wrote:
So you think I should do tenon/mortise following the angle of the legs. The reason I thought doing strait up, was because it would give a kind of 4 tenons over the support strut ,then I would recess the bottom of the table top to create a kind of mortises and finally I would try to hold that joint with the "draw bore" technic even if the dowel or pin had to be bored in an angle. (tell me if this sounds not a god idea)
I'm not sure that I'm following you here, but the top needs to "float" on the support struts, so only a small amount of friction would impede the seasonal expansion/contraction.
brumas wrote:
If you would use screw, would you screw strait up from the support struts to the table top?
Yes. Keeping things square will allow the top to move more freely. The average table top can expand as much as 1/2" or so with seasonal moisture changes, depending on wood species, etc. So, drill elongated holes (at right angles) in the support struts that will allow at least that amount of movement, and then elongated countersinks for flat-head screws. Alternatively, surround the elongated screw hole with a flat-bottomed elongated groove for use with pan head or round head screws. Just be sure the length of the screws allows for the amount of countersink, so the tips don't come too close to the upper surface of the top.
I think I'm going to use screws
Like I said I think Im going to use screws even thou I know that over here we don't have so much problems with moister. I live in Calgary, Canada and the weather here is prety dry even in the winter (snow powder).
Thanks a lot
Good idea
If it's "cheating" to use screws it would also be "cheating" to use glue.
Are you being sarcastic?
I comment on that article questioning if people cheat when they use jigs and other stuff. Is that why you came with "cheating" word?
This table is for my kitchen (kitchen and dinning table) so I was actually trying to do a more holistic work, everyone that will visit my house will see the table, thats why I was trying to attach the top without screws. But if it as to be, has to be.
Like a lot of people mention on that article, I'm having fun and a good piece of furniture will be placed in my kitchen and that's what matters.
Use all wood what the heck. Unless you are in a hurry.
My solutions are drill some dowel holes or use dovetails. I will elaborate in detale.
First let me say that if I spoke a second language, which I don't , I would be thrilled to be able to converse as well as you are doing.
Second, I like the rules you have set out for your project. Kind of a nice, large, three dimensional puzzle made from wood that is useful and beautiful when you are finished making it.
I can appreciate that.
I am making an assumption that the base does not depend on the connection to the top for structural rigidity. In any case you can design the base so it is a strong structure without depending on the top.
There is an extremely simple solution, which is often the hardest to arrive at, which is used in the best woodworking work bench I have ever come across. It is used not because it is labor saving to avoid doing the best quality work. It is used because it is all that is needed. For the work bench. You can decide if it is all that is needed for your table.
The solution is simply to bore two holes one in each of the top rails of the base. Centered on each rail. Put bullet shaped pegs sticking up into those holes, bore matching holes (an easy slip fit or even a loose slip fit) in the under side of the table's top. Then all you have to do is place the table top on the base and move it around until the points of the bullet shaped pegs slide into the holes in the under side of the top.
Obviously all this does is keep the top in alignment with the base. One can not pick up the table and move the whole table and base together to a new location. Depending on the weight of your table and base combined this may not be safe to do anyway.
Here is a link to the work bench
http://www.gorillaglue.com/Portals/0/pdfs/Project%20Plans/Project%20Plans%202/WJ102%20European%20Workbench%20FINAL.pdf
Page way down to page 21 and read "Finishing Touches"
Here is a book showing that work bench you may be able to check out from a library or glance through at a book store. I recommend buying the book if you want to build your own work bench.
http://www.amazon.com/The-Workbench-Book-Workbenches-Woodworking/dp/1561582700/ref=sr_1_1?ie=UTF8&qid=1358058476&sr=8-1&keywords=the+workbench+book
Here is another solution that would allow you to connect the base to the top and move them together.
See the photo bellow that I took of a quick drawing I made.
It is simplified to convey the basic idea. I realize your base tops are different than shown but you can make a double dove tailed key with the grain running lengthwise instead of the end of the leg shown or you can mortice a short version of the leg shown into the top rails of your base and glue and or draw bore that joint.
I looked for the photos of the keyed joint I am trying to describe but gave up. The article I am thinking of uses this joint to connect a top cabinet to a lower cabinet for a hutch for storing books or dinner wear etc.
Let me know if this does not make sense but to draw it may be more confusing to see than what I have provided.
I would suggest using quite a loose fitting joint so it is easy to assemble and disassemble. Apply some candle wax as well since you won't be gluing this table to key joint.
One way to make a go, no go test for joint fit is to make an exact match of your actual piece that is in your base but shorter and then cut the female part of the joint that is in the table top and try the go , no go test piece until it slides easily in the table top.
Those two methods seem a good aprouch
Thanks a lot roc,
So one the end of the day, maybe I will do it without screws.
I'm still far from going to the production phase, but this table is going to look good.
Thank you one more time
Since we are reviving old dovetail threads
While looking for another article for someone I ran across the one I wanted to find for your table here.
https://www.finewoodworking.com/how-to/article/housed-sliding-dovetails.aspx
How is your table coming along?
Thanks for the new tip
Hi Roc,
Sorry for just now reply, and thanks for the tip.
The Table is in stand by for now, I have been very busy and actually have to build some stuff for the business.
I hope I will not have a white bear when it comes the time to build the table.
Thanks a lot and see you around,
Jony
No fastner Joinery
Another question on fasting a slab top to legs.
I have some 2" x 20" x 5' slabs of Pecan & want to make a coffee table that can be taken apart easily.
Also want 2 supports / legs made from the same 2" stock. Plan to use 2 stringersbetween the legs that will provide tension to keep the assembly sturdy.
Wil a slot in the under side of the top shaped as shown be sound and sturdy enough?
Sorry about the poor sketch but I hope you get the idea.
And thanks for your feebdack.
Harvey
This forum post is now archived. Commenting has been disabled