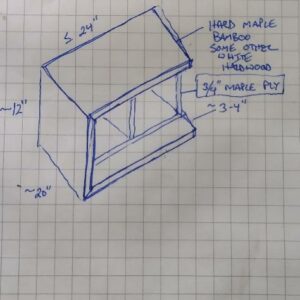
Attaching hardwood top to ply vanity
I’m not new to carpentry but very new to finer finish carpentry. After the hurricanes a few years ago I took a glass half full approach and started major renovations that would have been slowly took on with extensive prep/learning time. At this point now I’m getting into cabinets and built ins. Needless to say I’ve gained a ton of tools I never had a need for beyond the basics.
The question is about a wrap around waterfall top on a plywood carcass vanity. I toyed with an idea of a cleat system underneath that would allow cross grain movement but it seems it could be unnecessarily complicated (especially on 3/4 or 13/16 stock). Any suggestions for attachment to the plywood carcass inside?
The top wrap around ‘C’ will have the grain running along the long axis. The only wood stock that may be used in the glue-up wider than 5″ would be the bamboo if it matters. Thank you in advance for any ideas.


Replies
First off, you can just use screws from the inside of the plywood cabinet to attach the solid pieces. BUT your solid wood piece will expand and contract with seasonal changes in humidity while the plywood will not so you just need to account for that by making the holes you attach the top with slotted.
Typically for this I would want to "pin" the back of the solid wood to the plywood so that the movement is all towards the front of the cabinet. So in the back, just drill holes in the cabinet for the screws. Then towards the middle and front make slots perpendicular to the grain direction (perhaps 1/2" long) in the cabinet and when you screw from the inside make sure the screws are centered on the slots.
If you have a Festool Domino that is an extremely easy to make slots, if not just drill 2-3 holes and saw or file out between them to make a slot.
PS - this is assuming the cabinet is up against a wall, if not, you could "pin" it in the center and make the slots towards both edges - so allow wood movement towards front and back.
And dollars to donuts if you purchased that from a cabinet shop they wood glue it on with construction adhesive and call it a day!
It will be against a wall on the back side and the top will most likely be set off the side wall a few inches (the end grain edge) while the inner will be against both. I do not have a Domino but I can rout with my tracksaw guide or do the drill method. I really appreciate the detail on pinning the backside to direct movement to one direction.
With a sink drain penetration, I can only guess that it should just be made with an allowance for the movement also? And will having a vessel sink on top and plywood underneath cause any unforseen issues due to the sandwich effect? Could that be avoided, if it's even a thing, with a spacer system of say nylon washers or spacer plates between the two for air movement?
We have a prep sink in our 20 year old solid wood kitchen island without problems - just attach the sink to the wooden top rather than plywood and cut an oversize hole in the plywood to be certain no issues if/when it "moves". We used those metal cleats to attach the sink from below (I am assuming you are going undermount.)
By the way, we used Waterlox on our island top and it is constantly getting cleaned/spilled upon, etc... and holds up really well - just do a quick sand when it starts to look dull and reapply one coat. Love it.
It's actually a surface mount vessel sink. The lock collar on the drain assembly secures it to the surface underneath.
Thanks for the Waterlox suggestion, I've heard a bunch about it but my knowledge is pretty thin currently on when to use which of the various finishes.
Just skip the plywood? On such a small piece you could make the whole thing in solid wood that will move as a unit. You're 75% there already, just add the fourth side and center divider. What's the purpose of the inner box?
Dimensions are not set in stone and the inner box had a couple functions. First the left side has the water valves and supply lines hidden in a false back. It also would provide the primary support for the unit with a cleat on two sides(back and right side).
I very well may be overcomplicating it and that is what brought me here. Maybe simple is better, thank you.
As a side observation and not part of the OP, I would take another look at where the cabinet sits on the floor. As shown on your sketch the bottom of the "C" will get kicked, stepped on, and otherwise beat up unless you add a recessed toe kick area underneath it to raise it off the floor.
Sorry, the rough sketch was very crude. The bottom is about 16" above finished floor to put the sink top edge at 31" approximately.
This forum post is now archived. Commenting has been disabled