Attaching varying thickness strips to plywood
I’m building a storage bench soon and I’ve run into a bit of a problem solving opportunity.
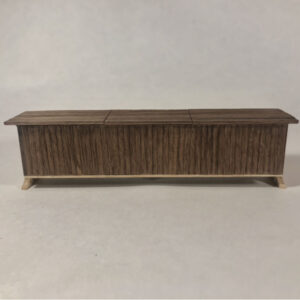
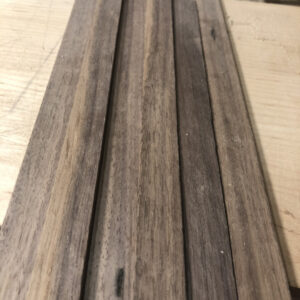
My plan for the front side was to veneer/attach 1” wide strips of varying thicknesses to create a sort of textured appearance. I’ve attached photos of the 1:10 model I made for the client as well as a little example piece of the texture.
I’m not sure the best way to go about achieving this. Since they will all have different heights, I would need to clamp them all with an individual caul if I used regular PVA glue. Since it’s going to be about 80” long, that could get very time consuming. I’ve made a test piece with hide glue using a sort of rubbed joint technique, but was having problems with the edges curling and it made me worry about longevity. Another thought was to use dabs of CA glue with PVA glue everywhere else so that I could press it down and let the CA glue hold it until the regular glue cured. I really want to avoid nailing any of them even though that seems like an obvious solution.
I’m also a bit concerned about wood movement. My thought is that since all the strips are not actually glued together as a panel and each one is quarter sawn and not very wide, that any seasonal movement will be absorbed by tiny gaps between the strips and nothing should crack. Since I haven’t seen this done before I’m not really sure. I know veneer should usually be no thicker than 3/32” but would that apply to a situation like this? I’d like to go up to maybe 3/16” for the thickest of the strips of people think that’s possible.
Any advice or experience doing something like this?


Replies
Contact cement? Roll one down, apply the next, roll it down, repeat?
I’ve never used it before, any recommendations? That sounds like a very efficient way to do it.
I've never used it on this sort of application before, so I really don't know. There is both water based and solvent based contact cement, but I'm no expert.
You mentioned a rub joint with hide glue. I'm guessing you used liquid hide? If so, you really can't do a rub joint with that. Rub joints work great with hot hide glue. The great advantage to that is hide glue will be invisible to stains or finishes when you are done assembling.
I did a coffee table last year using red oak top.
It was a modern design, an MDF core, with 1/4" rift sawn ply glued to the exterior, with mitered corners for continuous grain lines. I used contact cement to attach the plywood.
Then, I laid out a symmetrical design and glued each piece of the top in place also using contact cement. The table top was made up of 5/8 flatsawn red oak.
I rolled water based contact cement on with a relatively light nap roller. Trying to keep it still slightly damp, so I could make 100% sure it was positioned correctly. I got super tight joints, everything had been jointed and planed to the same size and thickness. I was also careful with the joints that would show on the table top... I spread as little on the edges of each piece as I could.
It turned out quite nicely. The client loves it. Her two children (baby and toddler) haven't destroyed it yet! So, i'm calling it a success.
Nice design. I would consider glueing and then pin nailing each strip in place. If the strips are ‘acclimated’ and only 1” wide, I don’t think wood movement will be much of an issue.
Maybe some really slow curing epoxy. Or a vacuum press/bag setup?
You shouldn't have any wood movement issues. I haven't done it, but I think your CA-PVA glue process may work. I would test it first. John C2's suggestion of using contact cement is also a good one.
Thanks. I’ve used the CA and Titebond combo with good results on small pieces, but I still need to test it with the actual dimensions for this piece.
Do you think going up to 1/4” for the thickest pieces is pushing it? Or should I stay with 3/16” and under?
I have used contact cement to glue teak strips on vinyl fabric to make roll up doors in the boat kitchen as well as on the back of a plywood door and it’s holding up well after 15 years. I used the most toxic one I could find.
It probably makes no sense. But I often feel the most toxic version of anything is the best.
I think hot iron/PVA glue is a good way to go on this.
Do not use contact cement. Do some research on veneering almost all will tell you not to use it.
You could go "belt and suspenders" by leaving a stub tenon sized to your thinnest slats on the ends of all of the slats and running a groove in the top and bottom surfaces to receive them. That'll also give you a place to pop a pin nail or two to hold them in place while you glue them to your substrate.
If you can get the spacing accurate enough you could use long cauls and glue them up in stages, with the first stage being the thinnest slats, followed by the next thickest and working "up" from the substrate.
There could be a curling issue adding that much moisture to one side of the (plywood?) panel, so you might consider adding a way to hold it flat until the glue is dry + a week.
Thanks everyone for so many ideas, really helped me consider some new things. Looks like I have a fair amount of test pieces ahead of me.
That's a very unique design. I love the idea.
I agree that wood movement is not a massive issue as most expansion will occur front to back if the strips are quarter-sawn.
Is there anything to stop you nailing the wood in from the back? That would provide ample fixing strength.
That having been said, this is being over-thought. PVA glue bonds pretty well even when it is not clamped. The joint is way stronger if it is clamped, but how much force are you likely to apply? It's a decorative front, not a road. I think that un-clamped PVA would likely hold far better than contact cement though that is an excellent alternative. It also takes a lot longer to apply contact cement.
About the only no-no would be polyurethane as that must be clamped in this sort of application, but otherwise I'd stick with good old PVA. Thick layer on the walnut only. Rub well against the ply and leave to set. Meanwhile do the next piece... Yes, you would get a stronger bond with a thin layer on both pieces, but it's still going to be way stronger than you need. Even a few dots of PVA will hold this until everyone who remembers you is dust.
CA glue on the wood with activator on the ply will also hold until the sun is a red giant and Earth a burnt cinder as there is no plausible torsional force to cause the pieces to come unstuck. I'd still use the PVA though as it is stronger, way cheaper and smells much better.
In this totally unscientific video, in an end-grain to end-grain situation, un-clamped elmer's glue failed at 43lbs of weight. Clamped was well over 100. I cannot envisage any circumstance that would place that much pressure on your piece. With side-grain adherence, I would expect it to be impossible to pry the pieces off intact once the glue sets, clamps or no.
https://www.youtube.com/watch?v=zziR_udr9f4
So if it were my piece, I'd just glue it and not bother with clamps, cauls, vacuum bags or toxic adhesives (even though those are the best, and most fun to use!) Just make sure that you have a means to ensure the first piece does not move - that one will need a clamp.
Yellow glue. No clamps. No stress.
Ok, you are not keen? I get it. If you really want to clamp it you can either hold or clamp the work for 10 minutes or so until the glue has begun to go off, then do the next one. Still no need for cauls or fancy methods of work. You could use small spring or trigger clamps and work them along the piece removing the oldest as you apply glue and fix the newest. Best of both worlds there...
You only need this to be strong enough to last a couple of millennia after all.
“That having been said, this is being over-thought.”
Haha I think this part here sums up all my decision making well.
Since posting this I made test pieces using hot hide glue (not the liquid version I had used before), as well as the CA and PVA combo. Both of them worked well enough for me so I’ll probably go with the hide glue just because I don’t need to deal with perfectly cleaning up the squeeze out. To calm my movement worries, I’m just leaving a little paper thickness gap between each strip so they can move freely on their own like flooring. I’m hoping to live another 50 years so if it can hold that long, I’ll be happy to not need to live through the shame of making a repair.
I think I just had to cycle through every possible option before ending up back on the simplest solutions.
Send us a picture when you're done!
Epoxy
This forum post is now archived. Commenting has been disabled