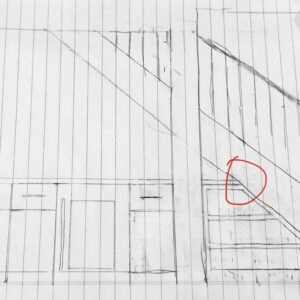
Hi all,
I’m trying to build an angled cabinet underneath my basement stairs. what kind of joinery would you recommend on the angled joints circled in the picture below?
Also, would you build the face frame to fit first and then the carcass? Thanks all!


Replies
What tools do you have for joinery? Do you have a work bench? What kind of work holding do you have (vises, clamps, etc.)? Do you have a drill press? Those angles make it challenging.
One of the simplest ways to attach the shelves to the sides would be battens and screws. Transfer the angle using a bevel gauge. Use whatever tools you have to cut the angle on one side of the batten. Bore pilot holes and counter bore them before installing the screws. Screws go both into the shelves and into the sides.
Glue and tack nail from the inside, screws when the glue is about half set up from the outside. Carcass first, build the faceframe after.
Alternate: Good spot to break out the domino if you have one.
Many questions arise with a post such as this, not the least of is as previously mentioned, what tools do you have available? what is your experience level? how will it be finished? Will it be a furniture grade finish on you main floor or a basement location painted with ordinary household paint?
Since you are asking the question I am going to assume you are more of a novice woodworker with a somewhat limited tool selection. With that assumption I will rule out Domino's, Biscuits, Mortise and Tenons, etc. All very viable solutions but probably not practical for you for one reason or another.
That leaves me with three suggestion two of which would require a modest investment in tools if not already owned. They would be dowels, which would require a simple dowel jig, and pocket hole screws which can be done with shop made jigs but a $20 Kreg jig would be easier, but my favorite would be (no laughing from the Master Craftsman Section) a simple half-lap.
A half-lap can easily cut with just a tablesaw, but also can be done with a router or even a good handsaw. The half-lap is an often overlooked joint that is ideally suited for both this project, and a beginners tool selection and skill set. Since I imagine the rails and stiles being less than 2" wood movement is negligible and can be ignored and the joint is self aligning, strong with plenty of glue surface, and if cut carefully furniture grade ready in this application.
Step by step direction would be involved but surfice it to say I would cut the half-lap joints on the left first, then using spacer boards in between to insure perfect spacing of the rails lay the angles stile on top at an angle equal to the stair stringer and carefully mark the edge of the rails then set my miter gauge to the equivalent angle and cut the shoulder on the front of the rails, remove the remaining waste, with a dado blade, multiple passes over the blade, router, etc. Reverse the angle on the miter gauge and cut the back of the stiles in a similar fashion.
PS. I would build the face frame first get it fitted properly then it would be easy to take measurements and built the cabinet to fit based off the face frame. Also are those drawers or open shelves?
Thanks. Yes my father in law actually has the Domino joiner so maybe I’ll just go that route. I also do have the Kreg K4 jig as well as a track saw, table saw, and compound miter saw.
Face frame first does make sense to me. So I’ll go with that. I guess getting the angles right will be the tricky part.
Thanks for your help
That's pretty easy. Clamp a board level across the stringer and use a sliding T bevel to measure the angle. Do a test cut or two and you're golden.
Consider,
Top red circle: Get a good dry fit and then glue and nail gun or screw-in from the top as that joint won't be load bearing. The very top panel will then cover up screw/nail holes.
Bottom red circle: fabricate an angled gusset to glue to bottom of the long angled panel. This gusset will provide a 90* edge joint for the very bottom carcasse panel.
Then build the face frame to conceal the angled gusset.
An article on Shaker Build-Ins addresses angles and shows use of face frames and note the use of battens to hold the shelving.
https://www.finewoodworking.com/2011/07/28/beautify-your-home-with-a-shaker-built-in
YFine Homebuilding's current issue #298 (April / May 2021) has an article "Built-ins for odd spaces" that is spot on for this.
https://www.finehomebuilding.com/2021/03/17/built-ins-for-odd-spaces
In my case, I first built a frame under the stairs and edge glued the front pieces together and nailed them to the frame.
Because this is in a very fixed space, I would use the existing structure to hold the parts, rather than rely on the joinery for your cabinet, as you would need to if it was freestanding.
I would definitely build the face frame last.
This forum post is now archived. Commenting has been disabled