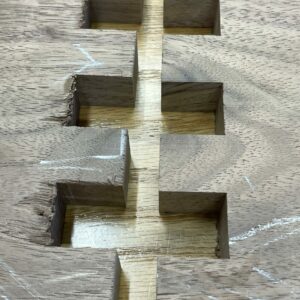
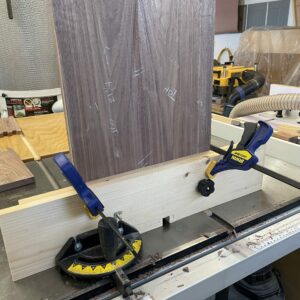
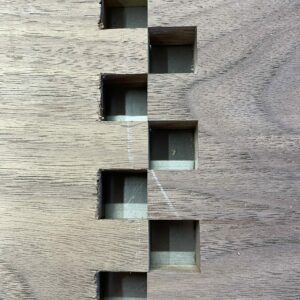
Help…looking for suggestions to minimize blowout on the back side of box joints. See photos. These are 3/4 X 3/4 finger joints in walnut. The tear out was really bad at first. I sensed that no matter how hard I held the work piece to the fence, it was bouncing around (and there might have been a slight bow in the piece). I then clamped the piece to the fence for each pass, and it minimized but did not entirely eliminate the blow out.
As you can see in the first photo, the front side of the cut (the piece on the right in the photos) is sharp and clean. But the cuts on piece on the left in the photos, the back side of the cut, are not very clean. The third photo demonstrates the improvement after clamping.
I realize that these are large cuts. Should I take smaller bites and make multiple passes? There is good support in the fence; the jig was freshly made exclusively for this operation. I’m using an infrequently used Freud SD208 set…the blades are in very good shape.


Replies
Try scribing a baseline with a marking gauge. Severing the fibers should reduce blowout.
Duh, thanks. I should have thought of that. I'm scribing lines elsewhere on the project where I'm chiseling.
Place a sacrificial backer board behind your jig covering the kerf hole, and refresh it when the edges of its kerf hole get rough.
and have it be the hardest wood you have (and keep using a clamp)
Both of those things - scribe a line and use a backer.I suppose cutting short and then recutting at full depth would also help but leaves a tedious extra step. I have a sled I made for that operation. I dadoed a slot into the fence about 1/4" deep and made up a little stack of 1/4" replacement backer pieces that I then just screw on. The fence is bolted to the sled with slightly over sized holes so that I can fine adjust it for indexing. You can have various fences for different widths of joints.
Make a sled. Most miter gauges struggle/wobble with tall parts & a sled takes the friction of the board's end grain out of the equation so the jitters go byebye. Just wax that puppy and go to town.
Sneak up on your perfect fit before you add the backer board. The up & down of seeking the fit can leave the slot in the sled overtall. Add the backer just before you go for the money cuts.
In addition to the other suggestions, make sure that the blades are sharp. You shouldn't get that much tearout with a sharp blade.
In addition to the above, try slowing down your feed rate. also, try applying some tape to the "blowout" side. Use tape with good stick. Masking tape is probably not enough.
It looks like where you have the blow out is at the top/back of the cuts - I am guessing you're backer board that your walnut goes up against had a cut higher than the height you are now cutting, so isn't providing any support. Try double stick taping a thin piece of plywood (1/8" if you can get it) to that backer board so you get full support on both sides AND top of your cut.
(I would echo making a sled instead of using a miter gauge - preferably one that rides in both miter slots to improve stability. )
If/when making and using a backer board, make it so that it presents end grain, not face grain, to the blade coming through the workpiece then biting into the backer board.
Face grain in the backer board may still splinter & break out along with the face grain of the workpiece. When the backer board presents end grain, splintering from the blade is greatly reduced. End grain gives a much cleaner and precise edge to the cutout in the backer board that's supporting the face grain of the workpiece as the blade goes through both.
It helps to use a timber for the backer board that has very fine & even grain; and is easy to cut cleanly. Lime/basswood is quite good, for example. Avoid timber for backer boards that is itself prone to splinter, has a large differential between late & early wood in the grain or contains knots, even pin knots.
Lataxe
This forum post is now archived. Commenting has been disabled