Hello,
I just joined the forum and I’m looking forward to learning new things. I started woodworking a year or so ago.
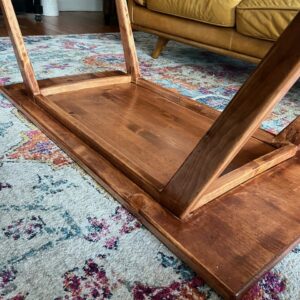
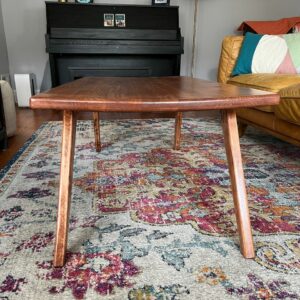
I made my first coffee table a few months ago. I love it, but some cupping started to arise a few days after I finished it. I planed each board prior to the glue up, and I planed the whole thing flat after the glue up.
Is there anything I can do to fix this? I’ve read about using hot towels, ironing, etc, but I’m wondering how effective that is, especially given the poly I put on the table.
Wood – 2x4s (fir I believe)
Stain – Minwax cherry (several coats)
Protection – water-based poly (several coats)
Joinery – pocket holes
Environment – built and finished in detached, cold garage (with a space heater which I kept on for most of the drying times)
Thanks,
Brian


Replies
I don't notice any cupping in the pictures. Maybe the tabletop as a whole, has a slight curve that is barely noticeable. I can't tell if the boards were flatsawn, riftsawn or quartersawn in the pictures. Flatsawn would cause cupping. How you oriented the end grain of the boards and clamped during the glue up could have caused the top to get out of square regardless of how the boards are sawed. Overall, it came out nice and looks like a good coffee table.
Thank you!
Not sure if the right word is "cupping" or "warping", but it definitely has a concave top that is driving me slightly nuts. :)
I used trigger clamps to clamp.
Maybe the pressure was too tight on the clamp? Is that possible?
I alternated the boards during the glue up.
I also have some parallel bar clamps I will try for the next one.
Is the wood construction 2 X 4’s ? Are the end aprons assembled to the top with means to allow the top to contract and expand with humidity variations ?
Yes, 2x4s that I ripped and planed to be narrower/slimmer.
Can you please elaborate on the end apron point? I'm not sure what you mean.
How is the top attached to the base?
2x construction lumber has way too much moisture content to use in furniture. Until it is thoroughly dried first. Air drying, I think I'd wait a year before planing it for use in furniture.
Wet wood will twist itself into all sorts of shapes as it dries.
As a hobby woodworker, where time is rarely pressing, even kiln dried lumber I like to sit for 6 months to a year before I use it. I now check with a moisture meter but when I started I didn't have one. Plus, it was nice to see wood for upcoming projects just waiting for me to transform them.
2x4s generally have a pretty high moisture content, as opposed to kiln dried lumber. Without knowing your procedure, I bet the wood was pretty wet, milled and then the table assembled and finish. Then put in a much drier climate and it's warping and moving.
Solution is to let the wood acclimate to room before construction or buy kiln dried lumber.
I can see it, but on the plus side, it looks relatively symmetric. I suspect the culprit is probably a combination of how the boards were sawn, combined with a higher-than-you-realized moisture content, and perhaps an induced tendency to concavity arising from uneven clamping pressure.
Now, this all having been said, I think I’d suggest calling it a feature, not a bug or defect, and living with it, at least until you decide to build another, using your hard-won experience and knowledge to defeat the gremlins that produced this that next time.
Also, FWIW, I like it.
Thanks! I think I'll live with the feature. :)
Tell everybody it's designed to capture spills before they damage the rug!
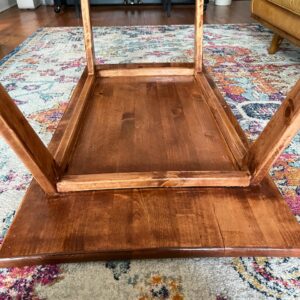
Looking at the pics, I suspect that you've glued that underframe to the top along all of the aprons. Is that the case?
If so, any differential expansion of the long grain of the short aprons and the top's boards, where they attach to those aprons, could cause unwanted effects - usually some sort of cracking but, alternatively, various kinds of warping. It may be that top has that upward cup in it because of such warpage effects.
It's a fundamental aspect of furniture making to understand design/construction techniques for handling the differential expansion & contraction rates of long grain and cross-grain. Typically the former expands or contracts around 1/3rd the expansion/contraction of cross grain movement for the same moisture changes in the surrounding atmosphere , for the same wood species.
With a table top, you generally find the top expands/contracts across the planks making it up 3 X the amount that the cross or short apron it sits on expands and contracts. You therefore need to attach a table top to the supporting aprons so that the top can expand/contract differentially.
If this differential expansion/contraction occurs in two glued-up parts, something has to give. Even a differential change in lengths of 1/8th of an inch can cause warps or cracks.
FWW and the web in general has lots of info about joinery techniques for allowing cross-grain parts to attach to long grain parts in ways that allow this differential expansion/contraction to occur by letting the parts slide against each other. The classic technique for attaching table tops to under aprons is to use buttons.
https://www.finewoodworking.com/project-guides/tables-and-desks/attaching-solid-wood-tabletops
Lataxe
I think you are right on. The gluing on one side with perpendicular grain will cause this problem. A sliding joint is needed.
This is the #1 issue with panels that every one of us has dealt with, so welcome to the club!!
Cupping is cause by differential moisture loss, the resultant cupping dictated by internal stresses and grain orientation. For example, face sawn lumber is much more likely than quarter sawn. Kiln dried lumber can be case hardened. In your case, the problem started with construction lumber, too high moisture content, and not enough time to acclimate.
As a general rule, you can never count on anything 100% until the piece lives in the house a few months and/or seasons. Wood is gonna do what its gonna do.
Good point about the battens, but if they were the problem it would have cupped the other way. That said, they should be attached with screws to allow for movement.
The fix, unfortunately is not an easy one to swallow, but it is the only way -- rip it apart and start over with rejointing and planing. Then sticker the wood inside the house for a few weeks, remill, immediately glue it up, place it in cauls and move it back inside to acclimate and any minor destressing.
Use the "face in/face out" method of jointing to any minor error off 90 in the fence gets cancelled out by complimentary angles.
Thanks! Do you think heating the wood would be a viable fix, or no?
If not, I'll likely leave it alone since I am not inclined to rip it apart.
Did you glue the short stretchers to each board? That creates a lot of unnecessary tension, each board fighting for hold.
Leave it be then, over time it will settle into where it wants to be. Until then, as JC2 said, maybe a long time. Do some work to see what it does and when to learn a bit. Put a straightedge across the cup at either end and measure the depth of the cup monthly over the next year. It might surprise you.
Once you know what it wants to be you can make a decision on a fix, or not. Anything you attempt right now would be guesswork. Nice table BTW.
I feel for you.
I'd live with it to be honest, and use it as a way to inspire you, rather than seeing it as a mistake. One day you will enjoy comparing it with a replacement and meanwhile, it's not a bad effort.
If you want to fix it, you could re-work the top after a few months of acclimation, but that will involve planing the boards again and re-jointing. You'll lose an inch of width and a fat eighth of thickness, but you'll have a flat top.
I am a wood hoarder. I buy what I think I will need for the next project but one and sometimes change my mind. If I see a useful board at a good price I'll nab that too. I will often go for a deeply end-checked board if the rest is pretty as the lumber yard doesn't charge for the cracked bit but I can get plugs and turning blanks from that part of the board.
When it comes to building with construction lumber, I only ever use treated timber and that really requires 6 months of drying, even if it is nominally kiln dried, so if I have the trailer at the box store I'll nab any nice clear 4x2 H3.1 treated pieces if they have any. These sit in storage acclimating until an outdoor project needs them.
About 6 years ago I was working in a scenic shop where we made sets for fashion photography. We just glued and nailed everything, never any real consideration for joinery. Well we had a bunch of overage on a job and I needed a dining table. So I edge glued six 36” 2x12 off cuts. Didn’t joint any edges, just popped em in clamps with glue and screwed pine crating across the bottom as a strap. It’s split all over and looks like hell, but it’s still table form and I eat off it still just as a reminder of the journey. Dunno how my wife puts up with it. Anyways, I’m sure this one is fine and your next will be even better. What everyone else said though, don’t use construction lumber unless its been properly dried!
I wonder if making the apron deeper might have helped. It would not negate the need to allow for expansion and contraction, fully dry wood, etc, but in the photo it appears that the apron segments are also curved, which seems to mean that they are not stiff enough to hold their shape against the cupping force of the top. Not much to be done about it this time, but maybe something to file away for a future project.
I don't know if there is any sort of rule of thumb such as "aprons should be such and such multiple of top thickness" but certainly it appears that on most tables I have seen aprons tend to be a bit deeper than what you've done here. Stiffness increases quickly with an increase in depth, so even a small adjustment of the dimension might help more that you would think. If memory serves, when you double the depth of the apron, the stiffness is cubed.
I think it's super interesting to see everyone's different points of emphasis. It just goes to remind us that even something as "simple" as a coffee table is actually a complex system of interactions that all need to work together to produce a result that's useful, attractive, and long-lasting.
And I love the spill-prevention angle on a cupped tabletop. It reminds me of how I justified a floor being out of level in one room of my house--if I drop something I always know where to look for it.
I'm not going to mince words.
Make a whole new table. Do not use 2x4 lumber. Use a proper kiln dried hardwood and a different design. Attach the top to the aprons/base with cabinetmaker's buttons or figure 8 clips.
If you have a book roughly titled "making furniture out of 2x4 lumber" throw it in the garbage.
Mullbr, heating it won't help. I'll get arguments, but once wood of a certain thickness cups, its over. The wood more or less "sets" and any attempts to correct it will fail 95% of the time.
Taun is telling you the truth ^^^.
Strategic cuts, looking at the pics, maybe 3 or 4 right through the middle of the maximum cup on each board (not necessarily on the glue line). If you're worried about loss of width use a thin kerf blade 4x3/32" = 3/8". Its not has horrible as you think, you will have to refinish.
That said, I do agree you need to give it 6 months to totally acclimate.
On a more philosophical note, isn't our work a reflection of our standards and craftsmanship? I don't see how "living with it" can even be an option!!
I get where you come from with 'not living with it' but it is what it is.
If I only kept pieces that were perfect, I'd have a big fire and an empty house!
I'm not saying perfect. But a big cup in a top? You gotta draw the line somewhere.
Or…hear me out…it’s good for lines…filling up your weekly pill thingy…fixing your glasses hinge with screws that have a measurement but no and no Walgreens is open…see…ok I’m done but I think it’s b e a utiful…think of the before picture and you did that with your hands…be proud and I’d love it and that rug
@mullbr, This common problem/issue is why "Breadboard ends" were invented. Check it out. There are quite a few articles in FWW discussing this "FIX". This in addition to some of the advice regarding moisture stabilization, grain patterns / direction, etc. But mostly "Breadboard" ends help prevent this from happening. Locking it down underneath with stringers helps, but you're going to like the effect breadboard ends produce. Good luck to you.
Great to see the support and feedback mentioned above.
A habit that will mitigate the level of table top movement in future is to alternate your boards:
When you look at the end-grain on a crown cut board, you'll see an "arc" shape in the grain pattern. Alternate/flip your boards so that these arcs face up/down/up/down etc.
This means that when your top contracts/ expands over the seasons, the cupping will make a subtle wavey-shape instead of a giant semicircle.
Hope this helps, good practise to get into!
(I would use KD stock also as mentioned above)
Alternating the growth rings does absolutely nothing to keep a panel flat. Nothing. It's just an old myth.
agree.
Me too. Grain matching is the only factor for me.
I have never paid attention to grain direction in gluing up panels.
+1
Pretty boring myth
“[Deleted]”
First, understand that moisture leads to cupping in the tabletop and you can flatten the top by restoring the original moisture balance. For this, some might suggest adding water slowly but that might not work. Instead, quickly adding moisture will flatten it. Then, you should re-dry it while holding it flat.
Don't know why this post turned up again a year and a half later but I'd be interested to know what you did and how it turned out.
One factor not mentioned is that making a coffee table top out of 2x4s would require a lot of boards, since after milling you would be lucky to get 3-1/4 wide. So seven or eight boards across the panel. Any variance in the edge jointing and you got yourself a warped panel. It would also be important the exact procedure used. I would glue up in small groups and then add them together. Too much chance otherwise for the stuff to move while under the clamps.
This forum post is now archived. Commenting has been disabled