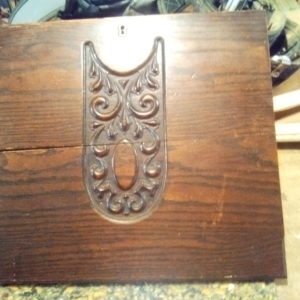
Attached is a pix of a door a friend of mine asked me to repair, i have done 1 for myself on a similar antique desk hinge down front in the past, but without the carving on the front. I need to keep the overall height to fit the way originally intended, but need to fix the crack, the top & bottom boards are still attached on the right, but need to close the gap. A pipe clamp wont do it. i thought about separating the 2 pieces & planing them & reattaching, but it would mess with the carving of course. My only other idea would be to squeeze gap closed as much as possible, put straps on the inside (or routed in butterflies) to hold it from coming apart & fill & stain the remaining gap. Any other ideas out there? Thanks in advance!
Discussion Forum
Get It All!
UNLIMITED Membership is like taking a master class in woodworking for less than $10 a month.
Start Your Free TrialDiscussion Forum
Digital Plans Library
Member exclusive! – Plans for everyone – from beginners to experts – right at your fingertips.
Highlights
-
Shape Your Skills
when you sign up for our emails
This site is protected by reCAPTCHA and the Google Privacy Policy and Terms of Service apply. -
 Shop Talk Live Podcast
 -
 Our favorite articles and videos
 -
E-Learning Courses from Fine Woodworking
-


Replies
I suggest a 3-step process that I have used to repair large checks in the past...
1: Rout out the back of the door to about half depth spanning about 1.5" on both sides of the crack. Glue in a large dutchman (patch) to stabilize the door.
2: Cut a chunk from a back edge of the door about 3/4" wide, half-thickness and a bit longer than the crack. Fill the gap created in the back of the door with another dutchman.
3: Rout a groove in the front of the door about 1/3 thickness and a bit narrower than the chunk from step 2. Cut the groove to just touch the edge of the carving and clean it square with the edge. Use the chunk as a dutchman to fill the routed groove.
There are 2 ways to go on the final patch. #1 is fill the groove and plane down to the surface, then try to match the finish. #2 is to preserve the surface finish on the patch and plane from the back for a flush fit before you glue it in.
Good luck!
This forum post is now archived. Commenting has been disabled