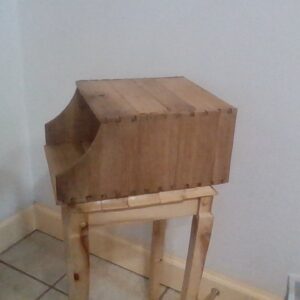
The picture shows the glued up sides and top of the desk top organizer. I see no bad effects from my cutting the top and bottom 9/16″ narrower (which was my mistake). Paper and envelops will fit in the shelf spaces. I have made the shelf panels a little wider and longer than the plan says and the divider. I measured and marked them to reality for sawing to length. I will wait until I have them dry fitted inside to mark the width. I still have to cut the dado in the upper shelf for the divider after I saw the shelf to width. I might have enough green ash to make all the parts, but if not I have some Cherry, Sycamore and sweet gum for drawer parts and the back.
Discussion Forum
Get It All!
UNLIMITED Membership is like taking a master class in woodworking for less than $10 a month.
Start Your Free TrialDiscussion Forum
Digital Plans Library
Member exclusive! – Plans for everyone – from beginners to experts – right at your fingertips.
Highlights
-
Shape Your Skills
when you sign up for our emails
This site is protected by reCAPTCHA and the Google Privacy Policy and Terms of Service apply. -
 Shop Talk Live Podcast
 -
 Our favorite articles and videos
 -
E-Learning Courses from Fine Woodworking
-


Replies
Very nice. I'm planning on doing a couple for next Christmas.
Here is a picture with the lower shelf, upper shelf, and divider installed.
Since the last post, I finished making the edging. I started working in the frame and panel back. I had to figure out a way to make the 1/8" wide groove on the inside of the rails and stiles. I did not want to buy a bit and try my router and build a hasty router table. I'm working on a back porch - no shop yet. I came up with making a scratch stock. I made a groove on some scrap. Using a fine tooth saw first and sawing two narrow kerfs, it made the scratching faster and easier to start the groove. The picture shows the scratch stock and the scrap piece. Keep your fingers crossed as I work on the stiles and rails. (Some day I will make more of these with table saws and other power tools.)
This is the shellacked, finished desktop organizer. I ended up mistakenly making a red oak drawer front, but the rest of the outside is green ash. Inside, the drawer sides and back are red oak, and the drawer bottom is sweet gum. It was fun to make and forced me to use a router for the first time (owned for 10 years). I had to make a hasty router table using the twin screw vise on the Jeff Miller style bench top bench I made. After making some errant grooves I figured out how to make it work. This project was fun, but would have been faster and better with a table saw, band saw and planer for sure.
Ecyor-
You have told a fascinating story of clever improvising to solve problems. This is the joy of woodworking in its purest form.
Your finished piece is wonderful. Making the drawer front from red oak by mistake is classic. You are an inspiration to those of us who are working to learn the craft like you, by just going at it and enjoying the experience.
Russ
Very nice.
Thank you all for your advice and encouragement.
This forum post is now archived. Commenting has been disabled