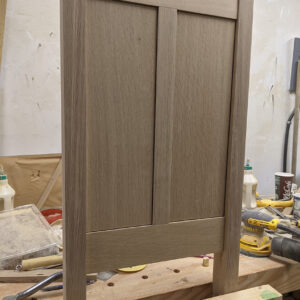
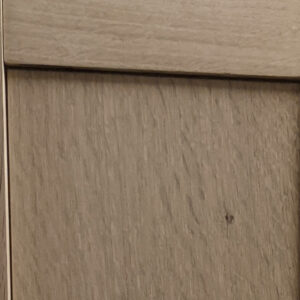
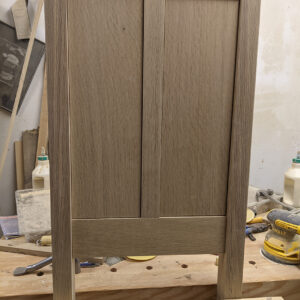
Fairly new to woodworking. I am currently building a dresser. The plans call for a 5/16″ tongue on the side panels and a 1/4″ notch on the Center Stile and legs. This leaves a 1/16″ reveal between the panel and stile and legs. the tongue then goes tight to the inside of stile and legs. Does this reveal allow for the expansion? Is it ok that its tight at the ends?
Thanks in advance!
Discussion Forum
Get It All!
UNLIMITED Membership is like taking a master class in woodworking for less than $10 a month.
Start Your Free TrialCategories
Discussion Forum
Digital Plans Library
Member exclusive! – Plans for everyone – from beginners to experts – right at your fingertips.
Highlights
-
Shape Your Skills
when you sign up for our emails
This site is protected by reCAPTCHA and the Google Privacy Policy and Terms of Service apply. -
 Shop Talk Live Podcast
 -
 Our favorite articles and videos
 -
E-Learning Courses from Fine Woodworking
-
-
 Fine Woodworking New England Event
 -


Replies
First. If your panels are plywood, it is OK to have them tight with no expansion space as you describe. If you panels are solid wood, then you will need to have expansion space on both edges. The total width of each panel, including tongue, needs to be about 1/8" narrower than the total distance from bottom to bottom of the grooves (notch). This allows 1/16" on each side for the panels to "float" with seasonal temperature and humidity changes. Obviously, you also don't want to glue your solid wood panels into the grooves.
Without seeing how the plans are worded and/or drawn, I wonder if they are actually calling for a 5/16" depth and 1/4" width for the grooves while calling for 1/4" plywood panels. Assuming your plywood is a full 1/4", this would be appropriate. If the panels are 1/4" thick solid wood, then the grooves would need to be 1/16" deeper or the panels 1/8" narrower.
We need some more info. Are the panels solid wood, and are they raised panels?
Solid wood. Pic attached of plans
Screenshots attached of plans
If I understand your description correctly, yes, the reveal is there in part to help deal with seasonal movement of these solid wood panels across the grain, but, no, it will not actually achieve that function if the additional width of the tongues is such that the edges of the panel are tight up against the mating faces of the grooves in the leg and stile. What you want and need is for the overall width of the panel including the tongues to be a little shy on each side of the actual available width, so that there is room for the entire panel to expand if that is what it seeks to do. In theory, exactly how much shy is a matter of various factors (panel width, wood species, how cut, moisture content), but most of us just work by eye and experience and I agree with the previous answer that something like 1/16 in. on either side is often a good answer with the materials and scales we mostly work at.
As far as the reveal, creating a panel with shoulders tight up against the leg and stile would present the same issue as the tongues, were the panel to seek to expand, so it does address that issue. But more to the point, a reveal of this size helps with the visual concern arising when the panel shrinks (as it very likely will, least part of the year). A deliberate 1/16 gap on both sides that reads as part of the design will still look OK even if it grows to 3/32 due to shrinkage, whereas a joint that was "meant" to be tight but opened up a 1/32 gap will read visually as sloppy.
PS: Nice work.
I suspect that the designer intended that the tongue on the panels should fit tight, leaving the 1/4 inch reveal top and bottom, then the sides should not be tight, allowing for movement. You need that wiggle room as mentioned above.
All things being equal, in most modern homes, the reveal will stay at 1/4 inch all the way round, but if you do get expansion or contraction, it will not be so obvious, there being a gap at the bottom too.
Or I might be completely wrong!
Anyway, it's looking really good right now.
First I will second the opinion based on your photos that your works seems to belie your claim to be a "new woodworker". Looks nice.
Second as someone who is fast approaching 50 years of making sawdust and a few worthwhile pieces along the way, I will pass on my opinions about plans such as yours. No designer who publishes such plans can know the environment you are working in or the wood you are working with, only you know that. If you are building with quartersawn oak in the middle of a very humid summer you should build to tighter tolerances because any movement if any will be shrinkage if you were to make it loose you could find the panels undersized when the furnace kicks on and the air drys out. On the flip side if you are using a wood known to have significant movement in a low humidity environment you should allow for more movement.
The environment of your shop versus the dresser's final home is also a factor in this thought process not to be ignored. So take such plans as a guideline and adjust as your situation dictates.
You are ahead of the game for questioning the plans, now take the next step and determine the right thing to do for your situation.
Well said.
The author's intent for the panels is that there's a narrow gap between frame and panel to create a shadow line. See the attached cross section. The tongues on the edges should be adjusted to leave appropriate space for seasonal movement. The dimension of the space is not specified in the plan because that varies depending on what you make the panel from, how it's cut, where it is being built and used, and the time of the year when it is being built.
The drawer fronts in this dresser are shown to be exactly the same size as the opening into which they fit for the same reason.
Agree to leave at least 1/16" expansion room at each side of the panel. The panel will not change length appreciably (especially compared to the stiles next to and enclosing it) so the ends can be tighter (I typically leave about 1/32" at least.)
Two tips: 1) Be sure to finish the panel before you glue up. There is nothing uglier than an unfinished stripe along the edges after the panel shrinks a bit.
2) After glue up, I center the panel in the frame and, from the back, put a 22 gauge pin nail in the center of the top and bottom rails thru the groove area into the tongue of the panel, to keep it centered. That way, any reveal visible on the front should stay about equal between the two edges. Before I had the pin nailer, I would drill a small hole and either put a brad or a small dowel in to catch the tongue and fix the panel.
Look up buying some space balls too, they work great.
This forum post is now archived. Commenting has been disabled