Getting a smooth finish on curved or shaped walnut
Hello All –
This is my first post, but I’ve been perusing the forum for a long time. I’m a pretty inexperienced hobby woodworker, but I have been building a few things here and there over the last couple of years…. simple things, a table top, some end grain cutting boards etc…
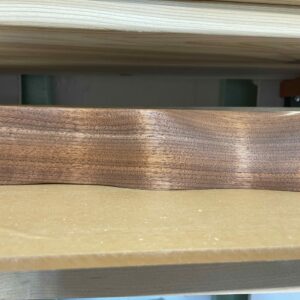
Anyway, one of the issues that I’m having is when I put curves in a thick chunk of walnut I end up with these marks at each peak and valley that I just seem to be completely unable to remove. You can see in the attached picture what it looks like when I put some water on it to show up the grain.
My method for shaping is using a jigsaw to do the main curves, then an angle grinder to do the shaping and initial sanding. I then go through the sanding grits (using sponge sanders) to try to get a smooth finish. Other than the tight peaks/valley bits it all works perfectly. I first thought its just deep gouges from the shaping and tried using a scraper to even out, then go through grits again, but it always ends up the same.
Longwinded way of asking if this is a common issue? Am I doing something very wrong that I end up with this…. is it just poor workmanship? And if so, can someone please direct me on how to fix it or do it the right way? 🙂


Replies
The angle grinder is probably what creates the waves, sanding and scraping will follow what is already carved. The best way to have a constant curve is to minimize sanding, one way to do this is to use a template and after rough cutting oversized with the jig saw, use a router with a guided straight bit to get to the final shape then minimal sanding will be required.
This would be an approach I would take, but this is more of a free form carve with a sort of live edge feel to it, so it's not a straight/flat end piece, it also waves in and out.
That is the grain of the wood where it "flattens out". Inside the curves is mainly end grain, but at each peak or valley you have a small section of long grain where you make the turn. In short, that's walnut.
I'm assuming the wavy edge is what you want.
Oh, this would be good... I mean, that its not my fault and it's the wood itself :)
Yes, the wavy edge is the design I'm looking for. As in the other reply, its not just a wave lengthways, I also have it random carved waves inwards and outwards along the length.
The closer you get to sharp peaks & valleys the thinner the "marks" will be. Zoom in on your photos and you'll see the grain changes.
I normally work with oil finishes, but I'm guessing that is just going to show up the different colors here even more.
What type of finish/stain would you suggest to end up with a more even finish?
MJ nailed it. If you want the wavy look (which you say you do), then one approach would be to leave the color change as it is because it emphasizes the curves. If you want the color more even, then you will probably need to use a seal coat of shellac or conditioner before adding color. Gel stain will probably result in a more even color than liquid stain. Or, you might try using a wood dye rather than stain. It may change color to a lesser degree.
Make a template and use a pattern bit and route the curves.
What you are seeing is sometimes referred to as "Chatoyance", commonly seen in Maple but also in other types of wood. The term comes from Jewel making where the artist creates inner and outer reflection on the facets of the stone. It's nothing more than light reflection based on the "hardness or softness" of the different parts of the grain. This normally shows up where the grain of the wood makes a turn or the surface is curved. Look at the grain closer and you will see the varying density of the grain. As said earlier "MJ" nailed it. Use it to your advantage to show off the real beauty of the wood and highlight those curves. By the way, nice work.
This forum post is now archived. Commenting has been disabled