Never had this happen before, so I thought I’d solicit opinions.
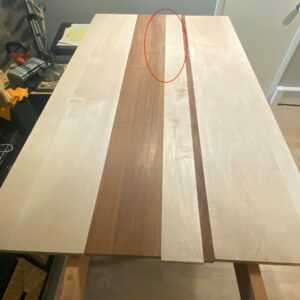
I have a 39 1/2″ x 72″ tabletop of alternating mahogany and maple boards I recently glued up that has a partially failed glue line. Used Titebond III. The failure occurred from one of the ends, between one of the mahogany and maple boards. Photo attached, with location of glue failure circled.
Obviously if the glue line had completely failed, or was failing, I’d just pull it apart, prep the edges and glue them back together. But the failure is only about 20″ down from the end. The rest of the joint appears solid.
What do you think? Any way to separate the rest of the glue line without damaging the boards? It’s not in my shop so I’m concerned that picking it up to move it might shred the wood along the rest of the glue line. Other solutions? TIA


Replies
Rip it down the glue line and glue it back together, this way it will be fixed otherwise once assembled in a finished piece it is likely to continue separating.
What Gulfstar said.
Add one more
I guess three’s a charm. I’ll get a hand carrying it back into the shop for ripping.
Thanks, folks
Four.
Five!
Update: Moved the top back into the shop and ripped it along the glue line with a track saw. I got a clean, perfectly square cut (thanks Big Green), so no need to re-joint the edges.
While I was out there, I added some biscuits, then moved the top back inside and re-glued the top. Will let it sit for a few days before taking it back out for sanding and finish.
It's remarkable how smooth the cut is, right off of that saw.
It really is. I use an Oshlun 36-tooth blade on my TS75 for ripping. Excellent quality cuts, especially if the blade is cleaned regularly. The TS75 is heavy but has plenty of power to rip through cuts without bogging or burning.
If you put extra glue in the biscuit slots maybe wait a bit longer. I have a maple table with little hollows over the slots because I flattened it while those spots were still a little swollen.
Interesting point. How long would you wait? #20 biscuit slots are centered in 1” thick board
The picture of the glued panel shows one clamp, I suppose this was taken before glue-up or after the glue had set and the other clamps removed ?
The latter, mostly. When I glue up panels I like to spring the joints and mark out 45 degree angles from the glue joint to the ends and overlap clamps accordingly. With narrower boards like the individual sections of this tabletop, I use cambered cauls along the edges to reduce to number of clamps needed.
Then I lay down packing tape over the edges because I hate glue cleanup, trim them with an exacto blade, spread the glue, then start clamping -- adjusting pressure while referencing flatness a straightedge. If I've gotten an optimal spring joint, this is very easy.
This re-glue used 3 parallel clamps and -- although the 45s I marked out indicated it wasn't necessary, I added 4 pipe clamps just for the heck of it. The top was supported during the glue-up by a handful of 3" tall boards -- a couple of which were wider than the top so they could support dowels to center the pipe clamp pressure. I took off the pipe clamps after, IDK 5 hours?, to peel away the packing tape.
I just haven't bothered yet to remove the parallel clamps because apparently I'd rather type out a TMI description of the glue-up than be tidy :)
I don’t think the additional pipe clamps were overkill, you need a lot of pressure to make a strong bond, FWW has a few articles on the matter and very few of us can achieve the recommended pressure.
No doubt. I remember FWW published an article ~15 years ago? "Get Serious about Clamping" (might be misremembering the title) which made an impression on me.
It was very scientific, replete with estimated clamping pressures for various species, quartersawn vs. plainsawn, and even some math.
I stopped trying to calculate the math but retained the accompanying principle of 45 degree pressure angles with overlap.
For years the biggest problem I had with pipe clamping wasn't sufficient pressure but that they would bow the piece. I never bothered to sandwich pairs of cauls to keep the panel flat.
I've found the dowel trick (which I encountered in another issue of FWW) works well to center pipe clamp pressure and resist bowing, with the caveat that I've had them dimple the edges of boards with too much torque.
This top is going to have boatsail curves cut and routed along the edges and ends so I wasn't worried about it here.
“[Deleted]”
“[Deleted]”
If you went heavy with the glue you may be able to feel it after a few days. That's a bunch of water sealed in and maybe 3/8" on either side. You could use a moisture meter on the underside.
After that project I went to cut off brads for alignment.
This forum post is now archived. Commenting has been disabled