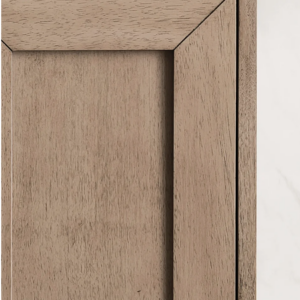
Hey everyone. First post here. Wannabe woodworker.
I’m looking to reproduce cabinet doors like the attachment to this post. I have a couple questions.
1. What is the wood species? Or how would I produce this type of finish? According to the website I found this on, this is considered “whitewashed walnut”. For some reason that doesn’t seem right to me. Thoughts?
2. How would I approach creating the miters? I would do a standard miter and then a very small router cut-out to create the gap?
Any help is appreciated.
Thanks everyone.


Replies
That is probably walnut with a light paint coat. Hence whitewash - I've never done that.
The gap is not really A Good Thing - it would generally be seen as an error. Likely the doors pictured are relatively cheap and the gap is the result of thrown-together construction.
Creating such a gap deliberately can be done by shaving a hair off the mitre - set your tablesaw blade to 1/8 to 1/4 of the wood thickness and use a mitre gauge with a stop to take 1/2 of your desired gap off the front face of each mitre. perhaps 0.75mm for a 1.5mm gap in total.
The key with gaps as features is consistency. Any variation in gap dimensions will show terribly. Careful setup and sneaking up on the fit will be your friends. Table saws are very good at doing this sort of thing. You can of course use a router as you suggested - any cutter will do the job as long as you can pass the wood past the cutter in the appropriate way.
Thanks for the feedback. This is definitely the look I'm going for. For reference, this attached pic is the vanity I'm basing this off of. I'm trying to build cabinets for my office that look like this.
A handsaw kerf creates the gap and then you can fill with tinted epoxy -- a thin black line. It's a look. Use a miter box - hand or powered. Hand might be a better idea. Knife both edges of the cut first regardless of what you use and set the depth stop.
The inside and outside corners are taped to create a dam for the epoxy.
Try this on a test corner or two first to make sure you have the full technique/protocol down pat before going to the live project.
Thank you for the feedback. Quick question (and again I'm a newbie). When you say "Knife both edges of the cut first", can you clarify what this means?
Thanks.
Knife the arrises of what will be the kerf made by your saw. You can skip this if you want to, it's a little tedious.
You can use a power tool to do all of this work. Just make sure however you decide to make it, you do trial runs. Things happen fast with routers and such. There's a reasonable path to recover if things go wrong with a hand tool. When things go wrong with power, you've usually ruined workpieces.
I would make a normal tight fitting miter, half lapped or with a spline for strength, and then come back with a router and veining or "V" groove bit to make the groove. Use a guide, of course.
I take knife both edges as meaning front and back (always a good practice).
Yep. If using a pretty fine saw, you might be able to skip the back side of the joint that won't show. Just clean the rag up with sandpaper around a block or maybe a cabinet scraper.
Just simple idea: build it as a regular frame and panel mitered door and then use a black sharpie to illustrate the gap. Unless you’re up close, it’ll prolly look exactly the same.
I threw up in my mouth a little bit over the sharpie idea.
Same here
The material looks like rift walnut. The color looks like a whitewash. For the door construction cut the miters to desired size. Then mark on each miter 1/16 cut down with your miter saw 1/8 deep. Sand the groove before connecting the stiles and rails. To connect miters you can cut a piece of 1/8 thick by 1 inch wide any solid wood will do. Then cut a groove in the end of inner edge of the miter 5/32 and 9/16 deep. Do not go all the way to the edge of miters. Add glue and the 1/8 piece into the dato and clamp stiles and rails together. Wait 1 hour and then sand any glue or imperfections always with the grain. Good luck.
This forum post is now archived. Commenting has been disabled