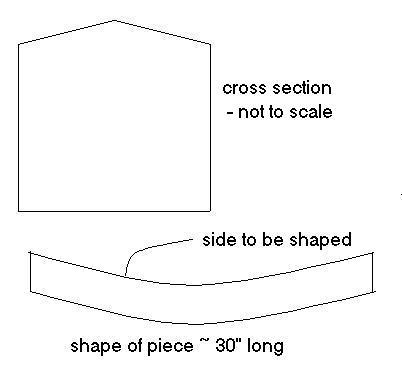
I need some suggestions on how to mill the following. The pieces would start out rectangular in cross section (maybe 2.5″ x 3″), about 30″ long, with a gentle curve to the length. I then want to mill the concave side to a point with an angle of maybe 130 to 150 degrees at the point. In other words, the cross section would be 5 sided when complete. I have attached a .jpg file of the shape. I do not have shaper but do have a 2 HP router in a router table. If I only needed one, I would do it by hand but I need a bunch and they have to match. I have seen vertical panel raising bits with a ball bearing guide that would work for cutting the first angle but then I could not do the second side since the material to support the bearing would be gone. Anybody know a technique for this sort of thing?
Thanks


Replies
I'd cut them using a template and notched template follower on a bandsaw with the table tilted to the angle then clean them up by hand.
John O'Connell - JKO Handcrafted Woodworking
The more things change ...
We trained hard, but it seemed that every time we were beginning to form up into teams, we would be reorganized. I was to learn later in life that we tend to meet any new situation by reorganizing; and a wonderful method it can be for creating the illusion of progress while producing confusion, inefficiency, and demoralization.
Petronious Arbiter, 210 BC
Recently. I made some arched raised panels. I didn't trust the starting pin and bearing approach. I made a router table fence in the shape of the arch. I drilled a hole and fed the bit through so that I had zero clearance around the bit. If your shape is not a true arch you can do something similar with the bit captured in a smaller circle instead of a long arched fence. You will have to be careful with the depth of cut when you flip the piece over. You won't want the bit to make a sizing cut or you will have snipe problems. I'd probably use a chamfer bit. They are available in a variety of angles.
Beat it to fit / Paint it to match
Hammer1,
I think you are on to something there. I suppose the closer I keep the radius of the fence to my tightest curve, the better off I would be. I do not completely understand your caution. I think you are saying that I should try to keep the section of the material being shaped perpendicular to the fence at the cutter.
The bandsaw idea is also good (and safer) but some of these profiles have to line up with each other and I am afraid that any hand work will compromise a good match.
Thanks
Bearcat,My suggestion is only for cutting the angled point on the inside of your shaped piece. You can cut the curved shape on the bandsaw. When it comes to the angled point, I would use the router table. If you have the chamfer, or whatever bit you choose to use, set to cut beyond the center of the piece, it will remove some of the material when you flip it over to run the opposite edge. Just like a jointer, the outfeed side of the fence will have to be set out for the extra material that has been removed. My caution is to avoid this by setting the depth so that the cuts from both sides will meet or nearly meet in the center of the piece.I couldn't tell if your pieces were a segment of an arch or if they were shaped more like a boomerang. If they are an arch, the arched fence will work well. If they are more of a V shape, you won't be able to use a fence. Instead you would use an arm just to create a bearing surface around the bit. The same principal applies with feeding the bit into the arm so that you have zero clearance around the bit and the bearing flush with the shape. This allows the piece to follow the shape without accidentally dropping into the bit a little deeper and cutting a little snipe on the end. The picture I showed was for a true arch segment. The bit pictured was a T&G beading bit, you will be using a different bit, obviously, and may not be able to use such a fence. These are the steps I would take in making your pieces. Mill you stock to be flat and square. While they are still a rectangular board, cut the end cuts. Cut the shape on the bandsaw. Set up the router table and cut the V on the inside curve. You will be running the piece flat on the table, cutting one side of the V, flipping it over and cutting the other side of the V so that you end up with your point. As you stated, you won't be able to just run up against a bearing since there won't be any material to touch the bearing after the first cut. What the fence or an arm will do is provide a surface that the piece can ride against regardless of the position of the bearing. In the Workshop section under jigs and fixtures, I posted a picture of my circle cutting jig, #22.1. If your pieces are an arch shape, you may find the arch carriage picture useful. It could be that I've totally misunderstood what you are trying to do. Here is a picture of what I thought you were asking about, more or less.Beat it to fit / Paint it to match
Hammer1, Yes, you have the general idea. My pieces will be thicker (1 3/4 to 2") and longer. They will not be part of an arch and there will be 3 different shaped curves - all fairly gentle curves (hopefully pleasing to the eye). I think your method will work. I do not completely understand how to bury the bit in the fence to get zero clearance, especially if I don't want to take all the material off in one pass but I think I can work that out. I will just have to move the fence or work out some type of removable shim for the fence (perhaps stuck on with double stick tape).
I thought of using a template and template guide but it's unlikely you will find a chamfer or panel raiser bit that will fit through a template guide. It would be a challenge to clamp your work and a template, especially if there are different radius arches. I don't trust double sided tape in a heavy cut situation and you may not want pin holes in the work.To make your fence, you could use the off cuts from the radius. One of the things I like about my no frills, shop made router tables is that I don't hesitate to drive a few screws or poke a hole when necessary. I wouldn't want to do that with an expensive store bought unit. The problem is that when it comes to special situations, the store bought units don't have the flexibility. A hole in a piece of melamine with a board clamped to it is all you often need.In feeding a bit through the fence, you should clamp a temporary waste piece to it so that you don't blow a chunk out of it. One of the reasons I used an arched fence is because of the reversing grain on an arch. I had to climb cut one half to prevent tear out. It was easy for me to just move the fence with incremental cuts. I don't think you will have to use any shims, just a combination of raising the bit or moving the fence as needed. If you use a bit with a bearing, you really don't need to, you will have to cut a notch in the fence for it, the bearing won't cut it's own space like the cutting edge will. I've run into the same situation when making hip rafters for a pagoda style cupola. The V cut would be fairly simple with a shaper, a rub collar and the correct shaped knives. You could screw a template to the back side and make it in one pass. If you only have a router, you have to be a little creative. Take some pictures and show us the finished product.Beat it to fit / Paint it to match
How are you cutting the curved shape initially? You didn't mention or maybe I missed it. If you're using a router template, could you just offset it from the edge of the stock after cutting the curve then use the same template as a guide for a chamfer bit with bearing? Then re-attach the template to the opposite side (again offset from the edge) and do the same?
If you build it he will come.
douglas2cats, I will bandsaw the basic shape and either finish them by drum sanding or using a router template (probably the later - so they will all be the same). I don't think your template idea would work for the milling operation since the bearing guide on these chamfer bits is on the end of the bit. If I could get a chamfer bit with the bearing on the bottom, your offset template method might work. I would have to be precise on the positioning of the template (probably have to have another template just to do the spacing - one for each of the 3 shapes). Thanks.
Yeah I was having a bit of a brain lapse. The bearing is usually on the point of the champfer bit but I think you could probably find one to put on the shank side if you checked around. The trick would be to find one with an outside diameter the same as the fat end of the champfer bit. My main reason for asking about shaping the curve was this: I like hammer's curved fence idea but if you're off a little by shaping the curve with a bandsaw and sanding is it going to give you good results shaping the vee if your curve shape isn't identical to the curve of the fence? Maybe it's not really a problem. My thinking was if you used the same template to shape the curve as guide the chamfer bit bearing it might be more exact. That's assuming you could find a bearing to use on the other end of the bit. You could probably just use some small spacer blocks to set up the offset, but I'm sure it would take some trial and error getting the spacers sized right.
Eagle has some bearings that might work if you can find one the right O.D. size
http://eagleamerica.com/product.asp_Q_pn_E_196%2D0810KIf you build it he will come.
This forum post is now archived. Commenting has been disabled