How to fix belt/pulley alignment – Craftsman 12″ Band Saw Two Speed 1 1/8hp
Hello folks,
I’ve recently picked up an old Craftsman band saw and I have an issue that I hope some other wrencher out there has already conquered. Even if you haven’t, my guess is that many of you are generally move savvy and can provide guidance.
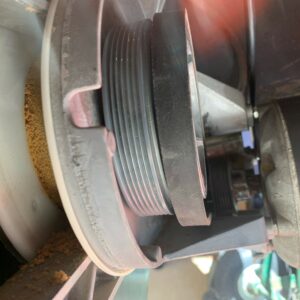
The drive belt keeps falling off upon startup. The pulley wheels just do not seem lined up. According to the manual, everything is positioned and installed to spec. I have taken the motor on/off twice to try and reposition and still no luck. I hope there is something easy I have overlooked. The machine has 2 speed options so each side has 2 sized wheels, neither is lining up for me. The only thing that is lined up is the wrong configuration of smallest and small wheels instead of largest/smallest or larger/small.
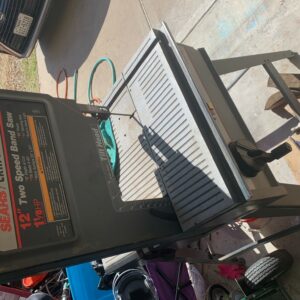
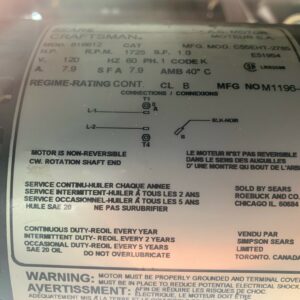
I’ve tried to include a photo of the mis-alignment and saw plus motor for reference.
Thanks for any help or tips you can provide!
Cole


Replies
It would appear your Sears Craftsman 12" Bandsaw is newer than my model number 113.24350. From the photos and your text it looks like their "Improvements" are a mixed bag; 1¹⁄₈ hp, 1725 rpm motor good - ribbed aluminum table less than good. Mine came with a ½ hp, 1725 rpm open frame motor that died shortly after I bought it used and a cast iron table. I replaced the motor with a Dayton 1 hp, 1725 rpm powerhouse that has a Totally Enclosed Fan Cooled [TEFC] housing. (No sawdust, moisture, etc intrusion.) It was, and still is, single speed as per the factory spec. sheet. Now, as to yours, it would seem there are a few possibilities, 1., your pulleys are simply misaligned; 2., one pulley is installed backwards on its shaft. Alignment is done with a straightedge (yard stick, etc) held against the outboard edges of both pulleys to assure they're aligned with each other in parallel vertically. (Straight up and down.) The other one is a matter of installing one pulley with the larger diameter half facing towards inside and the other pulley facing the opposite direction on the other shaft. (In other words, have the Large/small pulley on one shaft facing inwards and the small Large facing inwards on the other shaft.) The Dayton made a big improvement as I was able to resaw 6" thick slabs of freshly cut Black Walnut with a Timberwolf ½" x 80" resaw blade all day long for two or three days w/o any problems whatsoever. One other alignment problem that lept to mind is the fact that Sears has/had a habit of using "Universal" motor mounting plates. You may be using the wrong slots for the motor to wheel alignment. That you'll have to check by making certain that the lower wheel shaft pulley and the motor shaft pulley as mounted are perfectly lined up (coplanar) from one another vertically. Otherwise, as you've noticed, it will never work properly. (There, I think I may've found it.) Good luck.
Thanks for the feedback! (I had assumed this question would sit here and collect dust for either being too vague or just generally lame)
Got it, yes agreed that the pulleys seem to be backwards and that flipping lower or upper would work. I have not figured out yet how to pull them off as I did not perform original assembly. They don't budge based on my initial attempts even after pulling off tiny set screw w/ hex key.
I will keep tinkering with that and seek out some specific vid of pulling the wheel apart from motor mount. At that point it seems like it could work, assuming the larger side of lower wheel fits into the mounting plate area which reduces to allow for what 'should' be the smaller wheel. The assembly sheet shows them to currently be in correct spots, so that has me think your idea of universal plates not being so one-fit-all.
Flipping the upper wheels have plenty of room so pulling and flipping that set seems really possible if again I can figure out how. I've added a photo of the pin that mounts thru to other side of table connected to saw wheel. What tool is used to get that little guy off?
A new motor altogether would be last ditch effort, but I see that as an option if all else fails.
Last thought and general comment - this machine has been used by someone previously and clearly has sawdust in the exhaust and various nooks. How did they manage it before? My guess is that they installed a new motor and never got it to work after old motor died. That said, this is the model # listed for motor to saw as a match.
Oh the joys of buying estate sale tools and becoming a CSI detective.
Thanks,
Cole
shot from manual also attached to show model # w/ alignment specs
I didn't reply because there wasn't (Isn't) really enough information there. But two things come to mind.
One is the what user-7596380 said about alignment. My first thought was your belt was not straight but at an angle. If so that will pop it off fast.
"Alignment is done with a straightedge (yard stick, etc) held against the outboard edges of both pulleys to assure they're aligned with each other in parallel vertically. (Straight up and down.) "
Second is in that photo you belt is VERY LOOSE. I assume you are not trying to run it that way. If so it will never work, it needs to be tight.
As for removing the pulley they are often a LIGHT press fit on the shaft. That means you need to pull it off with a puller of some sort (most likely). If you can get a hammer in there and TAP it may come off. But usually there isn't enough room and you do not want to bend the pulley lip!
Can't see the motor pulley but looks like you have step pulleys. You want to small dia on the motor side toward the saw. Mate to the large dia on the driven side/saw to the small dia on the motor.. In other words the step pulleys are opposite. Small to large dia.
Thanks, yes to much of what you've said.
The pulley is certainly loose as seen in the photo. This is the only combo of alignment that is straight and occurs automatically after belt pops off. Without the tension of course - no worky!
When I try each of the other combos, the belt is forced into such an angle that it works off after just a few seconds of saw turning on.
If you see the manual for ref I've included, the currently assembled saw is exactly as shown there OTHER THAN the straight line of proper sized pulley to pulley.
I will try and pull a set of pulleys off somehow and flip them. If that is successful, I might be in the clear, if I cannot get them off.... I'm stuck and out of ideas for now.
Thanks,
Cole
This, " ... I will try and pull a set of pulleys off somehow ... ", has me worried. Especially if "Somehow" includes hammers, pry, or wrecking bars. Wheel Pullers are fairly inexpensive and widely available at Auto Parts and Big Box stores. ("If all else fails, read directions" not a good idea if you ruin the part in the process.)
wheel puller sounds like a great idea, I'll try to locate one and check to see if it functions for this application!
I've been able to remove motor in order to access the lower set of pullies. After that I used a wheel puller to slide lower pullies out 1/2 inch on the post. After a few tries, I was able to get the drive belt to stay on, albeit barely. The saw works for now, but still needs to be tweaked for finding that sweet spot. I do not anticipate being able to use both of the '2 speed' pulley sets as 1 is more prone to throw the pulley due to casting around wheels preventing enough space for wheels to slide any further out on post. All of that being said, man it was so satisfying to cut wood on the machine last night after 2 weeks of tinker-time.
I'm working on shaping wood blocks for smoking pipes. Last night I cut on mesquite, oak and pecan woods. I forced the wood some in a lack of patience and burned some portions of the wood. The blade itself is pretty old, so the new blades will go on by end of week, time allowing.
Currently it is a 1/4 6tpi steel blade. I have ordered 3/8 4tpi carbide to swap out with. Hoping that doesn't turn into a debacle all it's own! I consider all of this just a normal part of the learning curve, but I appreciate the helpful hints given by this group!
Thanks,
Cole
This forum post is now archived. Commenting has been disabled