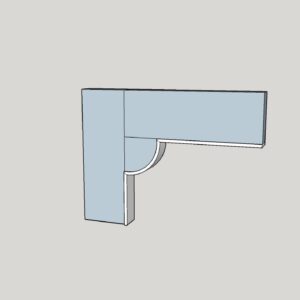
In the late 19th century cabinet makers would reinforce a door corner with a quarter round piece of wood. The inside of the door would have cock bead added which I’ve tried to draw below. I cannot fathom how those old masters created the rounded bead section which was mitered to the straight bead lengths and I’ve looked everywhere I could think of without success. Does anyone have any information or suggestions on how one could add this bead to a cabinet door?
Discussion Forum
Get It All!
UNLIMITED Membership is like taking a master class in woodworking for less than $10 a month.
Start Your Free TrialCategories
Discussion Forum
Digital Plans Library
Member exclusive! – Plans for everyone – from beginners to experts – right at your fingertips.
Highlights
-
Shape Your Skills
when you sign up for our emails
This site is protected by reCAPTCHA and the Google Privacy Policy and Terms of Service apply. -
 Shop Talk Live Podcast
 -
 Our favorite articles and videos
 -
E-Learning Courses from Fine Woodworking
-
-
 Fine Woodworking New England Event
 -


Replies
How tight the curve is dictates, you can only bend so tight, then it must be sawn out.
That’s the way I see it.
Sure it’s an added beading and not just part of the quarter round?
I'd use a scratch stock after assembly.
+1 with John's suggestion. RE needed for reinforcement: If those were M & T joints, there is no need for additional strength. Probably just applied as decoration.
That joint seems overly complicated and time consuming. Where have you seen it used and do you have pictures of it?
Trying to bend it seems impractical and cutting it would lead to very fragile shortgrain sections.
I would suggest as well that the corner piece is most likely purely decorative - in the same way "quarter wagon wheels" in corners- as a part of spandrel decoration were once popular.
It's a nightmare.
Were it me, I'd cut the rounded piece a little oversize and rout the profile into that. I have however had to create curved beading for a bed head. The process went like:
1. Create undersize negative template and full size positive template from original piece - used a 9mm flush trim bit.
2. Create full size negative template from undersize template - use same 9mm bit with 27mm bearing to copy the undersize template.
3. Use negative template to cut the side of the beading that will sit against the finished work.
4. Trim the beading to rough size.
5. Stick the beading to the full size positive template with masking tape and superglue.
6. Trim piece to size using oversize bearing on flush trim bit.
7. Apply fancy edge.
No idea how to do it without a router.
As for the mitres - that is also very hard. I understand that they are traditionally slightly radiused to ensure perfection. I estimated the meeting angle and divided by 2. Straight piece got this angle, then I snuck up on the fit using the table saw to cut the curved piece.
Even there, I had to accept imperfection. Hey ho.
Guys,
Thanks for all the helpful suggestions, a few of which I've already tried. Scratch beading doesn't work since half the cut is cross-grain and tears out the wood. The radius is too tight to bend the 1/8" beading without breaking it. I tried sawing it out, or using a hole saw bit, but one cannot sand or shape the bead because it is so brittle where the half the grain is not running with the bead.
In reply to esch above, I've added a couple of pictures of what I'm trying to create. Rob's approach is a good one and discussed in FWW's articles and on some You Tube videos but only for larger moldings, nothing so small as this piece. But I'm afraid after going to all the work with templates and routing, the rounded piece would likewise be so brittle it would break too easily.
After considering your suggestions, I'll try Robert E's suggestion of just milling it out of a solid piece, but I'm going to glue up the quarter round in to two halves, in a V shape miter so each portion of the curve does not have any end grain to work with. I'll let you know how it goes. Otherwise, any further thoughts would be very much appreciated.
Dale
After seeing the pictures, have you considered laminated veneer bending for the radius. You would need to hand shape the bead with spokeshaves and chisels but I think it could be done. Scratch beading may work as well since you will no longer be dealing with cross grain situations. I don't think I would try to miter the corners but instead square cut the radiused pieces and the cope the straight pieces to fit.
Much clearer with the photos. I think you could pretty easily bend straight pieces of the molding to that curve by soaking them and going with a hot pipe bending technique.
This forum post is now archived. Commenting has been disabled