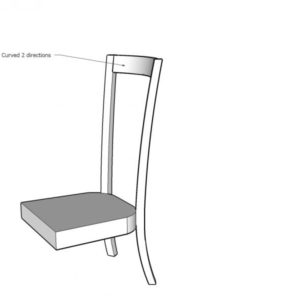
See attached. I saw a chair I really liked. Liked enough I said hey, I think I’ll make one. Oh, wait a sec. How am I going to do that top piece?
Ok, you could do it by hand. Rasp, plane, etc. But what if you wanted to do it repeatedly, like make a set of 6? This is out of where my brain functions tonight. The compound cuts I’m cool with. The mortises, all good.
But how to make the part, or more accurately, the jigs, to make the part and make it repeatable? Its curved in 2 directions. Someone thinks this is no sweat. I ain’t him, yet.
Real trucks dont have sparkplugs


Replies
RW ,
Some are steam bent , some are thin strips glued to a form then brought to final dimensions , and some may be band sawed from a larger timber .
good luck to you dusty
What are the two directions of the curve? the first is obvious: concave to fit a person's back. But is the second an arch? If this is the case it seems to me that you would want two templates: one for each curve. bandsaw one and probably hold those waste pieces in place while you bandsaw the second. Am I on the right track?
Why not laminate the concave back support - then bandsaw the arch?
Frosty
"I sometimes think we consider the good fortune of the early bird and overlook the bad fortune of the early worm." FDR - 1922
Those tenons and mortises are trickier than you think. You'll need to make a couple of jigs to do them well...
Methinks I'm not obvious enough . . .
The curve is 2 part, yes. One is the radius to fit ones back. The other is me thinking "wouldnt it be swell" to arch it a bit to exactly follow the face of the top of the chair. So from the side it curves, and as seen from above it curves. Not completely unlike a flower petal.
I've made straight curves before. Bandsaw, jig, shaper. Ba da bing.
Mebbe the answer is all handwork. I hate it when that happens.Real trucks dont have sparkplugs
RW,
What you are picturing is a section of a cylinder, which curves in one direction. The arches are just cuts through that cylinder. I have built a set of chairs with this shape, and I laminated the curve by bending laminates over a form. The six laminates were 1/8" thick and I used polyurethane glue. Springback was minimal.
The most difficult part of this project for me was the geometry of the mortise and tenon joint between the crest rail and the rear leg. The legs in your picture splay outward as they go upward. Because of this, the mating surface between these two parts is a compound angle. I developed a jig to trim the end of the crest rail on the table saw. The two angles are established with the tilt of the saw blade and a tilting back of the crest rail on the jig. Then I used a horizontal mortisor with clamping jigs to cut the mortises. This joint is a lot easier if the plane of curvature of the rear leg goes just front to rear.
I hope this is helpful. An explanation thorough enough to explain all of the details would be to long for this forum.Good luck, Tom.
This forum post is now archived. Commenting has been disabled