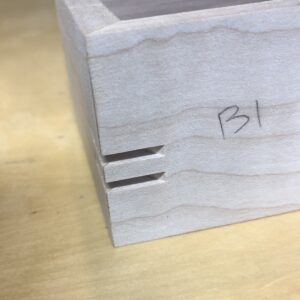
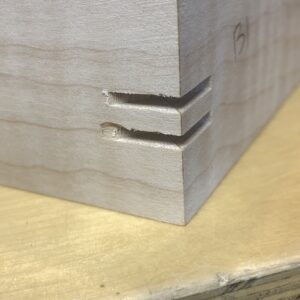
In my ongoing quest to build a box that I’m proud of (I’ve given up on perfection), the latest hurdle are miter key cuts that sometimes turn out fine, other times they look like these pics. Good on the entry side, bad on the exit side. I built a nice little zero clearance jig to cut these and feed the box through my flat tooth blade as consistently as I humanly can. It just seems like a crap shoot how they will turn out. Any suggestions on how to prevent this? Some woods are worse than others, like ash and white oak. Is that because of the grain?
My boxes are so small (4×6) by a couple of inches high, do I even need miter keys? They are a nice decorative accent but isn’t the glue is enough to prevent them from falling apart?
Happy new year!


Replies
PS - the reason they are positioned as they are is I'm not done. The top will be cut off and held in place with liners. That is the next challenge and I love it!
It looks to me like your zero-clearance setup does not support to the end of the cut. Try putting a fresh liner on the exit side and slow the feed a bit. You could also try an ATB blade and clean up the slot ends with a narrow chisel (undercut the splines in the middle).
A flat tooth blade at that exit angle can be pretty aggressive, like a straight knife planer vs a spiral cutterhead.
Multiple passes/ smaller bites could also do the trick.
The cause of your problem can only be speculated at given the information provided, but I will give you some things to check.
Was your zero clearance jig kerf cut with the blade you are using?
Is your blade sharp? Always start with the simple stuff.
Did you cut it deeper than needed? Your tearout seems to mostly inline with the kerf but if your jig kerf is deeper than truly needed it is not providing proper support at the critical exit point. If you did cut it too deep you can line your jig with some ⅛" hardboard and recut the kerf to the minimum depth.
Are you keeping firm downward pressure as you make the cut? Even a slight gap between the jig and box could allow tearout prone woods to break out.
To address your other questions.
Yes, some woods are more tearout prone than others.
Miter glues joints are primarily endgrain glue joints and conventional wisdom has always been that end grain joints are weak, although some recent tests may have shown that this perception is incorrect. The keys still offer a way to add some long grain gluing surface to an otherwise pure endgrain joint and could be the difference maker if the box is ever dropped or otherwise roughly handled.
After checking/re-checking all the suggestions in the previous comments, you could try to score the sides on the box with a knife where the keys exit. It really shouldn't be necessary with a tight fitting, zero-clearance setup, but maybe the grain for the wood you are using is highly susceptible to tearout.
For miter glue joints, check out the various articles about sizing the miter glue joints. I've been doing this with great success. One reference of many on this site: https://www.finewoodworking.com/2012/02/09/seal-miter-joints-before-glue-up
It is to bad that you have giving up on perfection....as my grandfather always told me "If you practice perfection ,it will always come natural"
It's only temporary!
Thanks for the feedback. Sure enough, the blade (clean and pretty new) I was using was a thin kerf, but the jig is for a full kerf blade. I wanted to try keys a little thinner. I'll add some hardboard to it and cut a new kerf because I do like the thinner look for these smaller sized boxes.
I try to be very conscious of how I hold the box on the jig, amount of pressure and feed rate. I want it to be as consistent as possible.
Despite these obstacles I run into, I see improvement too - I'm getting a little better everyday. Thanks again for your suggestions.
I do these with a jig on the router table.
I find that a 1/16" slot cutter bit on the router table gives a finer and cleaner kerf than a table saw blade. the limitation are that the kerf needs to be within 1 " of the top or bottom and the box stock can't be thick (or you cut to the inside of the box).
then the challenge is how to make the key stock!
Put a piece of well seated painters on the cutline of the box and use the zero clearance jig.
Try doing each cut in two passes. The first cut is at 60% of the height on the final height.
Throw some tape on before cutting. it can't hurt and takes 30 seconds.
It usually helps me a lot.
I find that the reversing grain on the curly maple you are using is more prone to tearing out than straight grain wood. Whether it's a handplane or a tablesaw, it's more apt to tear out,
The guy you're trying to help wrapped up his project almost 2 years ago.
LOL! Top comment!
A good backer is your friend. The zero clearance on a miter key jig will open up with wear. Replace the insert frequently. Inserts are cheaper than the time and material to repair a bad cut.
I'll second the tape suggestion. Get some blue painter's tape and tape the side the blade exits, put some pressure on it so it sticks well. This provides just enough support so the fibers don't tear out. Keep the feed rate pretty slow. Any operation I'm concerned about tear-out gets taped, even if I have a zero-clearance setup.
This forum post is now archived. Commenting has been disabled