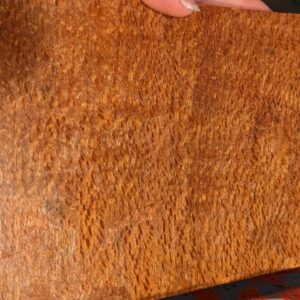
Recycling rare plane shavings as “veneer”
I looked at all the plane shavings from my precious precious wood, and wondered if I glued them all to a piece of wood, whether I might be able to use them kind of like veneer. (Rather like abalone you can buy in sheets).
The first time I did it I didn’t pay attention to making sure they were all up the right way and I didn’t like the effect, so I went over it with another layer trying to match them all, and it looks so pretty that I had to share! 🤩
Please ignore that one bit right in the middle that I got the wrong way up. 😅
Process was:
Dampen the wood that I’m planing between strokes of the plane (this makes the shavings less likely to fall apart)
Soak all the decently-sized shavings in warm water
Stain your surface a similar colour to the wet shavings using acrylic. (The wet colour will be most similar to the colour after applying a finish to the surface).
Uncurl/flatten/remove most of the moisture from the shavings with a low/warm iron, using a piece of wood as your “ironing board”. Press lightly from the back of the shaving (the convex side) to prevent burnishing the good side.
Sort out your pieces so they’re all right side up and running the same direction horizontally and vertically (look for the direction the wood “shines”).
Glue them to your surface using rabbit/hide glue. Don’t use PVA/wood glue as it resists finishes, and doesn’t draw tighter as it dries like protein glues. Overlap the shavings as you go. Try to leave “live edges” (not straight edges) topmost, in order to “blend” the joins.
Don’t stress if they curl up a bit at the edges at the moment. Just get it all on.
Add something non stick to the top (grease proof baking paper, a silicone mat, silicone coated fabric, silicone mylar, etc).
Place it under a board and some weight (e.g a few books), else put it into a veneer press/large vise to set up for a couple of hours, then it can dry in open air.
If you are gluing to thin material, it will curl as the moisture leaves the shavings. I didn’t do this here: but if you want to counter it: glue something thin to the other side. Kraft paper will probably work well, match the grain direction to the grain direct of the front (paper has grain and it matters most when gluing).
If you’re clever about it you can probably glue the backing on at the same time as the front and press then together.
Once it’s dry you can gently sand the high spots and finish it. I used a bit of linseed here.


Replies
Here's a video, it shows it off a lot better.
https://imgur.com/a/iPKLCkp
Using a thicker/layered coating (e.g shellac) would probably be better than oil, as it would let you even out the lumps and bumps a bit more than oil.
It's really nice to be able to recycle it! And to make veneers a lot bigger than the stock (which was about the size of a blackboard duster).
You could also probably wrap them around 3D forms, maybe using cling film instead of a press, while they tack up.
This was the first go where I didn't match direction, but it shows you the size of the pieces pretty well. The pieces were a bit smaller on the second try (only because I was taking off smaller bits from the stock as I shaped it, not for any reason relating to this veneering).
Cool!
Thank you! 🥰
This forum post is now archived. Commenting has been disabled