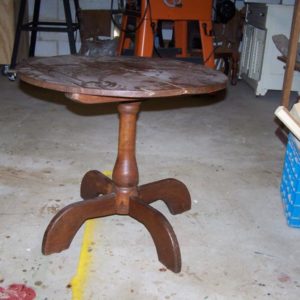
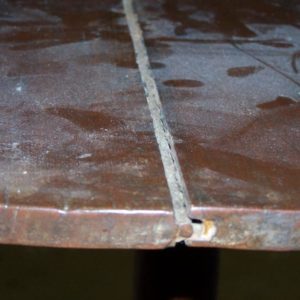
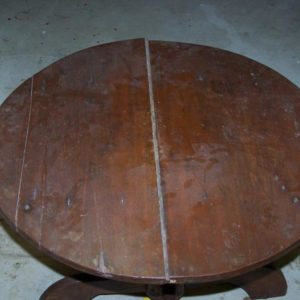
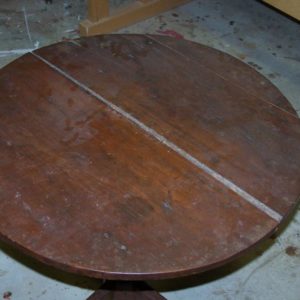
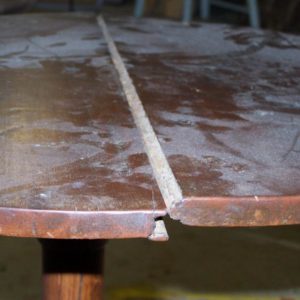
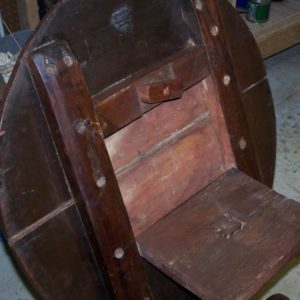
I have been brought a piece and asked the fix a crack developed in the top during a move. The piece while crude is a real 18th cent. piece from South Carolina (it has been in the family). As you can see from the pictures the tongue and groove joint in the top has been opened up. The mover sent it out to be repaired and that repair has opened up so I suspect I am going to have some modern glues to deal with as well. Beyond using hide glue, anyother ideas as to how to approach this repair. My thought is to take the top off and try to clean the old glue out as much as possible before making a final decision as to repair. The tongue is split, but apprears to be all present and my first inclination is to try to repair the tongue and then try to glue up the top and then replace using the existing screws. I don’t like the idea of doing sanding or anything else that will impact the surface. This is for a family member. Fell free to suggest any thing. The picture do not do it justice, but you can see the wear and age to the piece.
Discussion Forum
Get It All!
UNLIMITED Membership is like taking a master class in woodworking for less than $10 a month.
Start Your Free TrialCategories
Discussion Forum
Digital Plans Library
Member exclusive! – Plans for everyone – from beginners to experts – right at your fingertips.
Highlights
-
Shape Your Skills
when you sign up for our emails
This site is protected by reCAPTCHA and the Google Privacy Policy and Terms of Service apply. -
 Shop Talk Live Podcast
 -
 Our favorite articles and videos
 -
E-Learning Courses from Fine Woodworking
-
-
 Fine Woodworking New England Event
 -



Replies
The Real Problem
Dan,
The real problem is with the construction of the piece, the top's attachment to the cross braces underneath probably isn't allowing the top to expand and contract. Conditions during the move, such as the moving van sitting in the hot sun for days, or the climate in the table's new home, may have exposed it to dryer conditions than the table has experienced in the past.
The joint was probably never glued. It is also quite likely that the maker didn't worry about wood movement, which given the relatively mild climate of the Carolinas, and lack of central heat a century or two ago, made wood movement problems far less common than today.
If the table is glued up into one continuous board then some provision has to be made to allow it to move, which may be hard to do without changes that would damage the piece's value.
I would simply clean up the joint and get the tongue glued back onto the board it broke off of. Then reassemble the table, with no glue between the two halves of the top, with the screws through the brace that are nearest the center seam tight and all of the others a bit loose so the two halves can expand and contract without pulling apart the joint.
Took it apart....
I took it apart this morning. The srerws are not orginal and it looks like it was refinished sometime in the 1940's. Seem the AUnt that had it at the time had it 'restored'. I think the piece was painted or had some kind of wash on it orginally. It is mixed woods, with the legs being chestnut, the center post looks to be long leaf pine and the top looks like poplur. I am pretty sure they would not have done a natural finish with all the mixed woods. There is evidence the top was pegged to the cleats. That pegs would have failed and someone replaced them with screws at one time makes sense. The old glue is coming off pretty easy with a little heat gun work and a stiff brush. Not sure how I am going to reattach the top once I get it glued up.
Value judgements on antiques.
Market value as opposed to heirloom value is always part of "restoration" process. The removal of the paint and the other errors the previous worker did, destroyed most of the antique value of the piece, paticulary the removal of the paint. For the original owners this was just a table, but today because of the oldness, it is precious. It is part of family history so that a lot of people spend a lot of dollars for a "antique restorer" to make it wonderful again. (90% of the time it is an hacked up mess that costs an arm and leg. I have repaired a lot of antiques and depending on the value of the piece, went from that point in how far I would go in the repair process. Since you want to pass this on after you are gone, I would make the repair on this piece able to last for a long time, therefore I would use modern joinery and techniques to make this happen. I would rejoin the crack in the center and use modern glue, (biscuts if necessary for good alignment) and the cracked part on the side I would either fill or join as needed. You can enlarge the screw holes in the underside battens and use washers sold by Lee Valley so the top can move properly. Whatever else is loose remove it and reglue. A fine handplane or scraper on the top would not be out of the question if it is really badly damaged. Sign the bottom and date it for future users.
Understood...
I understand what you are saying and it makes complete sense to me. It also explains some of the past work that has been done on the table. I am going to proceed as you suggest. Many of the screw were not holding much is anything and I suspect the expansion/contraction explains that as well.
Dan,
I would second what John W said, and only add the suggestion that you enlarge (elongate) the screw holes near the ends of the battens to better allow for movement of the top.
If the screws are a later remedy for broken pins and splitting of the top, no further harm to the table's value will be done by invisibly making that remedy more effective.
Be very careful in doing this work that you do not affect the depth of screw penetration into the top, and be careful about replacing each screw into the hole from where it was removed, lest you run one of them thru the top of the top, which will definately have an impact on its appearance and quite possibly its value.
If the holes in the top are stripped, plugging with face grain plugs (1/4" or so) and redrilling pilot holes may be necessary. The caveat against drilling thru the top applies here as well, of course.
Ray
Interesting info...
I have put the top back together and I am thinking through how to attach it to the cleats that allow it to be tilt top. One thought I had was to make some u-shaped pieces to glue to the top while going over the cleats. This would hold the top in place, but allow it float. By using hide glue, they would be reversible. Like I said, I am still thinking this through before doing anything rash.
Dan,
Traditionally, screws in oversize holes are how the battens were attached to the top, even in the 18th century. Since the screws are already there in the cleats, nothing will be lost by using them, provided their holes are sufficiently elongated to allow for movement; nothing will be gained by attaching anything else to the top that was not originally there.
Ray
Info on screws...
Thanks for that information. I was not aware that screws were used that early. I think I can take a round rasp and work each of the holes enough to give movement to the top. I like the simple straight forward solution. It is interesting that the top was orginally attached with pegs. The piece was made on a farm near the Georgia line about 1790. My cousin knows the exact history of the piece. It was in the possession of a maiden aunt of his. He was given the piece by her when he purchased a 10 acre parcel from her that had the two story log house on it that was where the table was made. He has been restoring the log house for years and I doubt it will ever be really 'done'.
Interesting info...
I have put the top back together and I am thinking through how to attach it to the cleats that allow it to be tilt top. One thought I had was to make some u-shaped pieces to glue to the top while going over the cleats. This would hold the top in place, but allow it float. By using hide glue, they would be reversible. Like I said, I am still thinking this through before doing anything rash.
Repair advice
Dan,
Send these pics and info to Ben Hobbs, http://www.hobbsfurniture.com
Ben lives in Hertford, N.C., by Elizabeth City, Albermarle Sound area. He not only runs a jamb up furniture school, he is an authority on Carolina pieces, and has collected and restored many. I will bet that he can give you some really good advice on restoration and the area the piece was made in.
Pete Magoon
Another piece rescued
I really liked reading this thread, An obvious antique in need of some help. I like John's straight to the cause of the problem approach, lets fix the problem not the symptom. And all the advice that was based on not making the piece less valuable (in money or family value). I think it would be good to see more antiques in peril and discuss what can be done to restore them.
Robert.
When it is done....
I will post pictures when I am finished. I have been busy trying to make a living the last week or so and have not been able to get back to the project. My cousin left it here with me. The plan is now to not take it back to Hartford, Conn. but to take it down to his place near Savannah, Ga. We have plans to visit in the spring and will take it down with us then. So the pressure to get it done quickly went away. I have started opening the hole in the cleats from the bottom and with any luck will get that done today. It is taking some time because I can only get about 1/2 an inch of file/rasp on the hole. I cleaned the screws up and have waxed them to aid movement. I am pretty sure the screws are in fact 18th century and will reuse them. I hope I will get enough movement by elongating the screw holes from the bottem, but will not change how it looks.
Any pics of the repaired table?
Hey Dan,
Was wondering if you had been able to finish the repairs to the table. would be interesting to see the finished work restored.
Robert.
This forum post is now archived. Commenting has been disabled