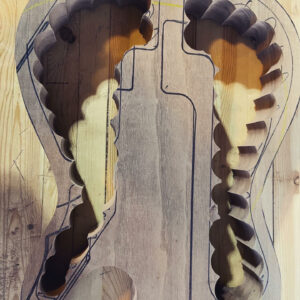
Run Boards with Gaps through a planner?
Can I run a board like this through my Dewalt Planner? Will the open parts create an issue or mess up my piece?
It’s nice walnut I don’t want to waste it but I noticed it’s not totally level, and I need it level before gluing the top and back on.
Any help is appreciated.


Replies
Yes and no. If it works it was an easy fix. If however you end up with a snipe or tearout your worse off than you are now, even possibly to the point of ruining the thing all together! Are you familiar with what I call butt planing? Running a piece of wood the same thickness as the piece your planing directly behind it to control snipe? Machine wise a stationary sander would be a better choice. Your safer with hand tools, probably safest with a card scraper..
It appears that your reinventing the guitar or something. Good luck with that. Your well passed any suggestions that I might make in that regard.
Thanks for the ideas, I could butt plane it. I'm not as worries about snipe as tearing it the piece if something caught weird on the blades. I might just go the slow way with a belt sander.
And yes I'm building a hollow body electric guitar and gluing laminated top and back to this hollowed-out piece.
I would not try it with straight knives... I might take a light test cut with a segmented cutterhead. Taking "butt planing" a step further, unn the piece through between two strips the same thickness as the workpiece and a foot longer on both ends, It will pick up the cutterhead in advance and set it down well after.
Even with the segmented head I would soak the surface with either mineral spirits or alcohol to soften it up slightly right before the pass. The drum sander approach is far safer.
Yeah, if I had a drum sander I would do that.
I should have run it through the planner before hollowing it, but you know.
Yes you can, but take very light cuts so that only the very highest point is shaved off first and then very gradually lower the cutting head.
If you have enough width, run some sacrificial strips through along each side of the work piece. These should be as thick as the thickest part of the workpiece to start and should extend past the work piece both ways by 4-6 innches. This will be easier to do and work best if you can temporarily attach them to the work piece with tape or hot melt glue.
I might use some double-sided tape, the strong stuff, and try this. It would take me hours to try and level with my other tools. Worst case I need to spend another $100 on a block of walnut. The pieces I'm gluing to it are worth $300-ish so I don't want to waste those.
How much do you need to remove?
Might be worth a few phone calls to find a shop near you with a sander that could handle this. Would be simpler and less expensive to do that, in maybe 15 minutes, than to try to machine plane it. It looks to me like you will barely fit it through your 13" Dewalt planer, so you may not have room for sacrificial pieces along side. Snipe on the bottom bow would really impair your plan for laminating front and back to the body. So you may be looking for a shop with a bigger planer anyway...
If the planer is well adjusted, it won’t be a problem.
Agree with Gulfstar!
Light passes, be sure it’s run thru perfectly straight. It’s still a bit risky, you never know what lies below the surface.
The safest alternative is sanding. If you don’t have a drum sander you can adhere several sheets to a flat surface and do it by hand.
Snipe can occur with sanders too.
I concur with the very light passes but you could reduce the risk of snipe a little by gluing it to a board and a lot by also adding support blocks fore and aft as previously suggested. It looks fantastic so some caution would be worth it.
I’ve run what I considered “risky” pieces through my dewalt and it was fine. Like they said, ensure it’s tuned up (newer blades) and take small passes.
I found this suggestion from Pantalones868 a good one. You need to do it right or you might ruin it altogether. Get a stationary sander or you can find one from a nearby shop. Good luck creating the guitar look you are intending to. Feels like it would look great when finished right.
This forum post is now archived. Commenting has been disabled