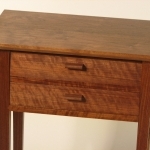
So Im close to glueing-up a modern media credenza in quarter-sawn cherry. The case has two partitions that divide the interior into three compartments. The partitions are recessed 2.25″ from the front of the case (allowing for 3 sliding doors on two grooves or “tracks”). In each compartment the is one set of adjustable shelf pins. I have and happen to like the simple Kreg shelf pin jig and usually use it after a case is assembled…so that I can register the jig to the bottom of the case (or a spacer sitting on the bottom of the case). If you have seen this jig…its got a fence than registers at either 1″ or 2″ from the edge of the stock, you clamp and drill. This method will work well on the one middle compartment (where the front edges of the partitions are equally set back from the front of the case and also on the back side of the outer compartments (where every thing is flush with the rabbet for the case back. But…here is the challenge I’m trying to sort out:
How to locate the 5mm hole on the front outer compartments where the fronts edges are not a good reference? I looked at Chris Gochnour’s great sideboard article–which has the same issue, but he doesn’t disclose.
Matt


Replies
You can register against the back of the cabinet using a spacer piece of plywood and take the fence of the Kreg jig. Measure how far from the back the front holes need to be, subtract the distance from the edge of the jig to the holes, and rip a piece of plywood that's that wide (and nearly the height of your cabinet). You can then register against that piece of plywood, the bottom of the cabinet, and then work your way up from there registering off the previous holes.
If you haven't already used the jig on the sides, forget it and try this one. It is fast, clean cutting and costs a few pieces of scrap. You can make any width and any spacing.
You need to set up a 5mm upcut spiral bit in a plunge router. Using a guide bushing a little larger than the holes, in this case a 13/16" bushing with 3/4" holes (this gives dust somewhere to go while keeping the bit centered with two points of contact).
Then simply seat the bushing in the half round slot and plunge, slide the router to the next one (you do not have to lift the router to move on) and repeat and so on. It is lightning fast compared with a drilling jig and and cuts a cleaner hole. Use it once and you will ditch the kreg.
This jig does require punching the holes prior to assembly, a more sensible approach IMHO.
Best of luck with your project.
Rob
Wow! Thanks for both of these responses! The router jig is pretty cool, but seems to really only make sense if the holes are bored before the case is assembled. Maybe not for this project, but I could see making this jig for others down the road. I think the Kreg jig without the fence may be a bit squirrelly.
After pondering this a bit more this afternoon, I decided to glue-up the case before boring. And I'm thinking I need to make my own drilling jig from MDF and some steel bushings.
MK
One other way is to create a reliable reference with a shim.
Interestingly the matter of drilling holes was discussed in the latest STL episode so worth a listen to that before you drill.
This forum post is now archived. Commenting has been disabled