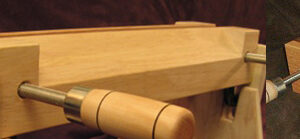
Hi All, I’ve been asked to produce a larger version of this handscrew used for binding paper (pic). How would you attack the inset sloped shoulders? To preserve function the squared ends have to stay. I’d prefer not to cut them off and glue them back.
Discussion Forum
Get It All!
UNLIMITED Membership is like taking a master class in woodworking for less than $10 a month.
Start Your Free TrialCategories
Discussion Forum
Digital Plans Library
Member exclusive! – Plans for everyone – from beginners to experts – right at your fingertips.
Highlights
-
Shape Your Skills
when you sign up for our emails
This site is protected by reCAPTCHA and the Google Privacy Policy and Terms of Service apply. -
 Shop Talk Live Podcast
 -
 Our favorite articles and videos
 -
E-Learning Courses from Fine Woodworking
-
-
 Fine Woodworking New England Event
 -


Replies
If I'm just doing one, I'd layout accurate lines. Use a backswing to make the two end cuts, then a series of similar cuts all the way along the bevel. Maybe every 3/4" to 1". These are stop cuts, and also depth cuts. It takes less time than typing this.
Use a bench chisel to knock out all the bits you've just sawn. Then use a wide chisel to clean up the bevel. It's pretty quick.
I just noticed your answer was the same as mine. Had I read more carefully I would have replied to this. I do agree it is very simple and quick.
I would start like John but clean out the center on the band saw set at 45 degrees .
The other alternative would be to cut the center with a bezel and glue the end blocks on (entire ends and not just the corners).
That’s likely the easiest way which means I would have to start by sharpening my chisels.
If you can secure it at a 45 from the the table saw bed (eg glued to angle blocks), crosscut using a sled and a dado stack. John's suggestion sounds safer and easier. If you have to make a bunch of these, though...
I'd go with JF1. Make a custom dado stack sled with a cradle and run 'em through. Consider starting with spacers to take small bites and then increase the cut depth.
I’d mark out lines, cut the ends with a handsaw then use a chisel to knock out the waste in between and then pair to the lines with a chisel. If you want to speed it up, you could make some stop cuts in the middle waste wood about 1” apart and knock out bigger chunks. I realize most folks want to use a machine but it really isn’t that difficult to do this my hand. Could also clean up the most of the angled surface with a bull nosed plane.
I agree - this is the most reliable way to achieve the end goal.
My second thought was a router jig. ;-)
This is exactly the same challenge I faced when building a Moxon vise for my workbench. As noted by others, using a handsaw and chisels is a simple way to add the chamfer. For a little elegance, I added lambs tongue ends. Credit to Luke Addington who provides a very nice tutorial on this whole process at https://imgur.com/a/AdOXB.
A lambs tongue is a very pretty little embellishment.
First time I saw them was in New Yankee Workshop and fell in love with them. About 6 years ago, I had the opportunity to visit the Shaker's Hancock village in MA. In the round barn on the timbes I saw lots of lamb tongues and smiled.
Hancock is a fantastic trip.
“[Deleted]”
In the end I did saw to the lines and chop out the chunks, but was unhappy with the amount or relief to get close to the jaws with my fingers. (the reason for the relief) To get a bit more space I built a jig to slide the parts sideways on the tablesaw "speed tenon" style to get a concave interior.
Thanks to all for the input!
Interesting choice.