The trouble with sanding edges of a shellac finish
Hey guys, my first post and happy to find a forum I think will really help me learn and grow in my woodworking adventure!
Most of what I do right now involves making side panels for vintage audio gear. So it’s inside and will not need to stand up to abuse, like a coffee table or bookcase. My favorite finishes at the moment are dewaxed shellac flakes (BT&C blonde), Watco Danish Oil (natural), and Deft spray lacquer (satin) … I don’t yet have a spray setup, so the rattle can is only for bookshelf sized speaker cabinets or side panels. I have used Formsby’s “Tung Oil” on Black Walnut and South American Black Walnut with good results. I like wipe-on finishes that penetrate.
My question today is on a set of South American Walnut side panels. Part of what took me off course was after the first coats of shellac, I had a couple of hairline splits on the end grain of the boards. To “fix” those, I used Titebond CA glue to strengthen. I ended up sealing the end grain by “wiping” the CA with a putty knife that allowed me to sand lightly and get a super smooth surface that looks nice. However, traces of the glue ran over the edge onto the the flat face. This required me to do some more sanding. I think this is where I created the problem.
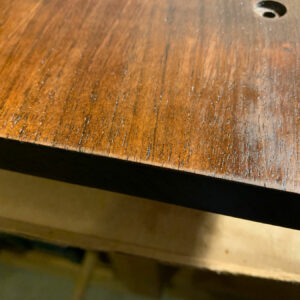
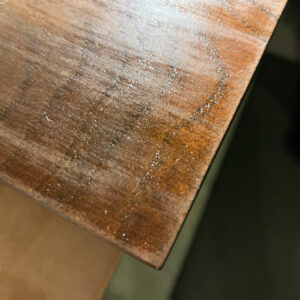
I think the problem is that when I carefully used 320 grit to smooth out the edges, I removed too much material with shellac and now I those areas are lighter. I hope the photos help communicate what I mean. The lighter areas look drier.
My brain tells me that I need to find a way to carefully wipe more shellac in those areas, but I am not so sure that is possible. The top/bottom/side edges of the board are all good. It’s just the flat face of the boards I need a little guidance on. So my questions to the group is:
#1) do I restart the shellac with a wipe down of just denatured alchohol?
#2) do I apply one or two more passes at 1:8 cut and hope those lighter edge “catch up”
#3) or something else …?
I have used synth #000 pad at this point to even out the finish. As you can see from the photos below, there are some areas of grain that are shiny. Those were before hitting with the #000.
For context, the finished look on these was originally to match the late 70’s JBL walnut cabinets, which for any of you that are familiar with, know how nice they were made. My plan for top coat is spray lacquer buffed out … or Briwax paste wax rubbed with #0000 steel wool or synth pad, buffed off with shop towel.
Okay, let me have it. Be gentle. This is my first post 🙂
By the way, I found some other very helpful threads on this website which moved me to order two books on finishes: Understanding Wood Finishing: How to Select and Apply the Right Finish, The New Wood Finishing Book: Completely Updated and Revised, and Wood Finishing Fixes: Quick Answers to over 175 Most Frequently Asked Questions. Many thanks!!
Matt


Replies
It looks like you have simply sanded through the shellac. Assuming no stain was used a couple additional coats of shellac should be all you need. Shellac like lacquer, and unlike polyurethane, dissolves itself with subsequent coats so they tend to blend into one continuous finish layer.
Yeah, quickest answer will be a coat of shellac. If there is another issue here, you'll find out after that. But most likely the problem will disappear.
I’d hit it with aerosol shellac.
Thanks guys ... I do know that shellac is self-wetting, so I'll give that a whirl.
I was going to follow with aerosol lacquer (Deft satin).
I have been varnishing and sanding two large stained hickory desktops today and taken special attention to not cut through the stain along the edges. When the sanding pad gets over the edge, the sanding pressure increases and more finish is removed resulting in a thiner coat along the edge where you would want a better protection. To overcome this I sanded up to 1/4 inch of the edge between coats with the ROS using 220 grit sandpaper and finished sanding with a pad using light pressure just to remove the sheen.
Maybe you already do this, but when using CA glue for small fills and repairs, I use blue painters tape to control where the glue will run. You can even use the tape like a dam to fill in a chipped edge. But also, I use medium glue most times, and spray with accelerator to keep it from running too far.
I normally use tape, but this once one of those times where the mind thinks "I can do this without tape this time" :)
Lesson learned.
Gulfstar, your idea is well taken. It's all part of continual learning for me.
This forum post is now archived. Commenting has been disabled