Help!
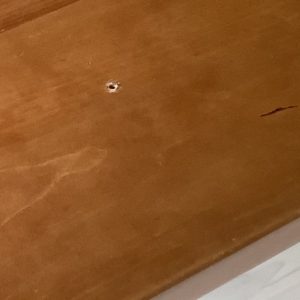
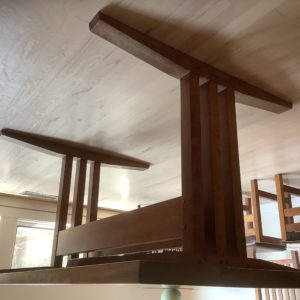
On a household relocation to Oregon, my movers detached the top of my Ths Moser inspired solid cherry trestle table to make it easier to pack on the truck. Double stretcher, Mortise and tenon, square peg joinery. My pride and joy. When reassembling, the top was inverted and placed on my dining room floor and then the driver attached the base by forcing THE WRONG SCREWS through my 1-1/2” table top and into the floor.
I have a disappointing settlement (thanks a lot!) but now am faced with making the repairs myself. Two screw holes.
Try a bowtie inlay?
Fill and texture?
Rip into three pieces and rejoin?
Ugh!
suggestions are welcome.


Replies
Can you afford to loose 1/2 inch in table width assuming the holes are aligned ?
No...The holes are not aligned. And Twice ripping a heavy top, and doing it solo, would be a serious challenge. No matter what, the top will need to be sanded and stripped then refinished. I’m leaning toward small inlays. Maybe i should do a symmetric four inlays? Me Not a happy guy.
That's awful - my sympathies!
'Twere me, I'd want to fill them but leave a visible reminder... Maybe frowny-face emoji veneer inlays?
“[Deleted]”
I like it!
Simple tapered plug cutter and some practice on scrap to get the depths perfect.. Use the screw holes to pilot a forstner bit about 1/4" deep and find close matching grain on th underside above the trestles to take the plugs from. Glued in they will be almost invisible.
Bury the movers in the woods out back.
Good idea! I like using the wood from the actual board that was damaged. Brilliant! Thank you so much!
MJ coming in HOT! Love that idea.
Very good idea, if you can't bring the top under a press drill, you could pre-drill a plank and clamp it over the top and use it as a guide so you drill square to the surface and avoid woble, the plug will then fit better.
I feel your pain. As our movers were unloading, I saw one kid rolling a 4 foot diameter table top (recently refinished) down the concrete sidewalk.
They'll never find the body.
That ranks up there with the many of unforgivable sins. Hope this helps -- best to you, your table, and a pox on the guilty.
Also a good idea. Thanks!
A plug to fill in the majority of the hole. But the neat round shape will still show up, even with a grain match.
The top of the plug (the part that shows) could be additionally covered by a Dutch Patch. This is a piece of thick veneer with as exact a grain & colour match to where you place it as possible. You cut it into an irregular shape, with a recess made over the plug location to exactly match that shape. This takes a bit of skill with the carving chisels; or you could use a router and a template made from the patch.
If you can successfully install such a patch, it's irregular outline with grain (and colour) match will tend to make it much less visible than the end of a round plug - especially if you're going to refinish the whole top. It's a very old technique used by restorers. I've made two, in the past (no photos unfortunately) and most who looked at them couldn't readily discern them.
It takes ages to get the patch to match the recess you make for it, though. :-)
Lataxe
I built a trestle table a few years ago and the only problem I had was a knot in the middle of one of the boards. I filled it with a mixture of sawdust and epoxy and black dye (pure black pigment from the paint store) and it has a nice dark matte finish and just looks like a pitch mark. In your case, I would recommend elongating the holes a bit so they look less like holes and then disguise them as pitch and re-finish the top. I would drill a couple of holes in a similar test board to try it and see if you like it.
Best of luck, it’s a gorgeous table!
Thanks for the compliment. Back in the day, ca1990, Ths Moser offered this design for $3000. It was a longer table than mine but the square pegs i added.
Do NOT veneer, plug, or whatever!!
Fill the hole with a tinted shellac stick. Match the colour, and it will never be seen again.
Regards from Perth
Derek
What Derek said. A round plug will ALWAYS stand out, no matter how perfect the match. Your eye will always see it. An irregularly shaped patch will always blend in, especially on something this small.
Shellac sticks are great, but can cost a bunch for a variety of shades to get it right. A little filler and a cheap artists set of oil paints, mixed to the right color, will simulate the color and grain perfectly.
I would not under any circumstances rerip and glue, or sand down the whole top -- unless it already needed it.
Noted and appreciated. Sounds like i need to practice a few techniques on a scrap board. I’ll try your suggestion as well.
I was thinking the same thing. Make up a tinted filler. Test till you match the top. Its reversible, so if it doesn't work no loss you can resort to more drastic measures..
The shellac stick may be the best compromise - but not for the whole hole. :-)
Shellac is brittle when dry. If you fill the whole screw hole with shellac, there's a chance it'll crack and fall or flake out. But a wooden plug in the screw hole, sunk a little beneath the surface, could be successfully covered with a thinner dollop of the shellac.
The shellac mending sticks used to be called "beaumontage". They were actually a mixture of shellac, wax, rosin and various other agents that not only gave colour and resilience (i.e. were hard enough to be sanded) but also had some elasticity. The elasticity stops the pure shellac from cracking and flaking, which it's prone to do in pure form.
I'm not sure what the Liberon "shellac sticks" (such as these):
https://www.axminstertools.com/liberon-shellac-filler-sticks-810471
contain these days. I have some bought a couple of decades ago that seem to have something in them other than the shellac, as they are semi-malleable despite drying hard & sandable once the heat goes out of the fill.
****
It's still not easy to get a good colour match. You might get one on the day you put the Beaumontage in but cherry (especially) changes colour with time and light .... but the shellac filler doesn't. Ask me how I know this. :-)
Lataxe
Look at it this way - you'll always see it, no matter what you do. The only way others will notice is if you point it out. There's nobody to point 'n giggle.
Mikaol
Sun and moon inlays for the two areas of damage. Or Earth and moon. Or how about a yin and yang that are separated and looking for eachother? Or all the Platonic solids, so you could add more inlays? All the planets, and then you could argue over Pluto. This could be fun!
Dang! That's horrible. If mine, I would love to get physical with the person responsible.
Anyway, before you do anything else, since you have to sand and refinish anyway (just the top I assume), try filling the holes with clear (not tinted and no sawdust or, at most, only a tiny bit) epoxy. Sand it smooth and when the new finish is applied, it will nearly disappear. If that does not work for you, you can always do something more drastic like plug them.
Aqua sparkly epoxy fill. Pinterest has the best ideas. Haha, sarc.
Have a furniture restorer fill and match it. A good restorer can fix that and no one else will know it.
Big difference between someone who can do the original finish and one who can fix it now.
Have you reached out to the Thomas Moser company about this? Given the quality (and price) of their products, I am sure that they would have an idea. It is probably not the first time it has happened.
https://www.thosmoser.com/contact-us/
I have also used professional restorers in the past as Vespid suggests and can't find the repairs years later, even though I know where they were.
I once had the same problem, save that I was the culprit. The tale is too long to tell, but the upshot was that the screws were just a shade too long, and they broke through the table top. My solution was to mix a little stain with some plain old wood glue and work it into the damage from the top. Then, with a piece of wax paper over top of the wound, I placed a smooth block of wood over the wound and placed a stout piece of wood over the block, long enough to clamp to the table top at each end, thus squeezing the wound down flat. After everything was dry, a little sanding, a bit of finish touch-up, and the damage had disappeared. Worked like a charm. (This won't work if any wood has actually broken loose from the table top and been lost.)
This forum post is now archived. Commenting has been disabled