This link …
http://www.inthewoodshop.com/Furniture/index.html
Scroll down to “Underbench Cabinet” (there are a lot if other builds – don’t get sidetracked!).
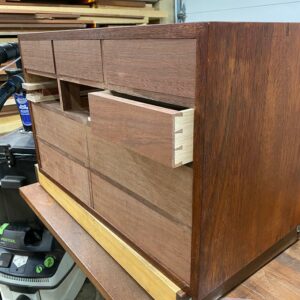
.. takes you to an ongoing build that is ostensibly about building a cabinet under my Roubo bench. It is really about the strategies in dovetailing a case and then fitting drawers – sliding drawer dividers, aligning drawer sides for squareness, and so on. It is not a how-to on dovetailing, per se.
At this stage – and I have yet to post the latest work – the basic drawers are all in … just minus the drawer bottoms and slips. Then comes the fun part of building the internals of the drawers, such as sliding trays. I am looking forward to that. It should be fun 🙂
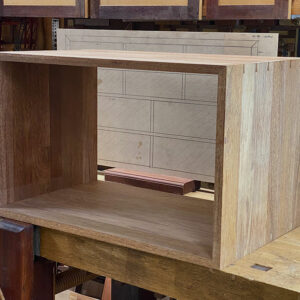
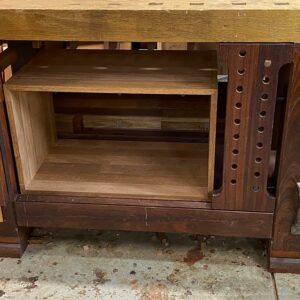
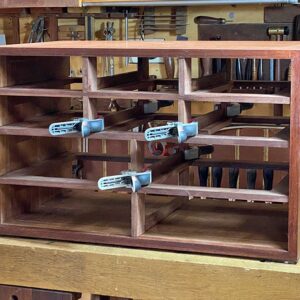
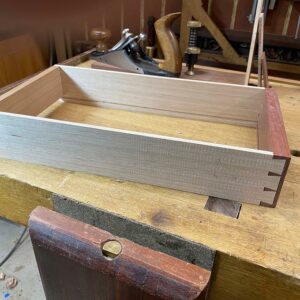
A few pics below of the mitred through dovetail case, and making the drawers.
Enjoy, and most importantly, I post to create discussion, so questions …
Regards from Perth
Derek


Replies
Derek,
A very fine project (as usual) with lots of features to explore! Mind, I confess that I wouldn't make an under bench cabinet so posh meself as I'd be using any scrap stuff I could find for such a utilitarian function; and making joinery that was all function and not much decoration. :-)
But I realise you're doing that cabinet as an exercise in design and skills as much as making a mere storage item for the workshop.
One question about the drawers.
As you may recall, I favour the NK style of drawer-making for most things. It's a lot stronger than traditional drawer joinery and less prone to jamming in the carcass if there's a lot of moisture changes - very possible in a garage workshop, normally unheated, in most climates.
Those drawers of yours are quite large and are going to have their bottoms retained by the traditional slip-in piece sitting in side and front grooves. My experience with such drawers (not made by me) is that heavy stuff like tools will likely knock such a bottom out of such a large drawer, given half a chance.
Will you use a stiff plywood for the bottom; and glue it in? If so, perhaps there'll be no issue. Anyroadup, don't use a bit of 1/8" hardboard a la IKEA. :->
Regards,
Lataxe
David, the items for this cabinet will be fairly light: chisels, cutting gauges, measuring tools, dividers, whisky ...
The drawers are narrow enough that the drawer bottom, at 5-6mm thick, is relatively stiff and strong. I will be using solid wood, not ply.
One incentive to building this is that we shall downside to a house with less upkeep, and I am already beginning to look at both reducing tools, and a way to transport and store them. I've only ever built shop furniture out of scraps, and it makes a nice change to do something nicer this time.
Regards from Perth (and I owe you an email ... BIG TIME!)
Derek
I have been enjoying looking through your website this morning. I am planning on building a under bench cabinet myself and may borrow some of your design points.
CC, please do mention your ideas here. It is great when we get to share such information.
Regards from Perth
Derek
Very nice.
Great work. Will you fasten it to the bench or use it kind of like a tool chest, removing it easily when you want? It looks like you could if you want and maybe even put casters on the bottom. Just an idea that might not be practical...
My plan has been to add shallow rubber feet, more as a non-slip. The cabinet can then rest on its own weight. With added contents, it will be solid and unlikely to move at all. So it will remain under the bench, as the aim is to save space.
Regards from Perth
Derek
Derek,
This remark at the beginning of the story of your cabinet build, on your website, is a fundamental design aspect of such a cabinet and worth underlining:
"The cabinet is deep - too deep for drawers. The plan is that the drawers will not be full length deep internally, but have full length sides through to the rear to create a full extension when siding out".
Long ago, when I build an under-bench cabinet to go under the classic workbench bench I'd just built, I made the mistake of failing to recognise how the storage spaces involved would be used. I not only made the drawers full-depth (making it a precarious matter to pull one right out to get at the rear-most compartment) but also included two full-depth cupboards.
The cupboards are the store for various tall tools, such as a drill in a portable drill-press, a circular saw, a router with a fence ready-attached and similar items. There's plenty of space in the cupboards to put such things ..... but getting out the item at the back of a cupboard is a right faff, as everything else must come out too.
The extraction involves kneeling on the floor, reaching into the cupboard at increasingly awkward arm-angles and scrabbling everything on to the floor to get at the thing in the back I last used a month a go. Cuh!
Not ideal, especially for my ole knees which don't care for kneeling on hard floors anymore. Also, I find the things in those cupboards tangle their wires and other parts, making them difficult to get out without dragging everything else out too.
And so forth.
Why didn't you give me your advice about full-depth drawers in under-bench tool cabinets 14 years ago, eh, eh? :-)
Lataxe
"Why didn't you give me your advice about full-depth drawers in under-bench tool cabinets 14 years ago, eh, eh? :-)"
David, that was one of the projects you did not mention at the time. :)
Many of these drawers can extend about 80% of the way. Just not 100%. There are some tools, such as Japanese slicks, which can use the full length, since they will be lifted in-and out from the front. For the rest, I will determine the usable area, and work with that. My thought has been to add sliding trays - slide back and out of the way, leaving the lower layer/section open to use, and then slide up to the front the upper layer ...
First I need to finalise what tools will go in the drawers, than decide how to arrange the insides of the drawers. This is the fun bit :)
Regards from Perth
Derek
I are been readin' your next stages in this project - making the cabinet rebate and then the grooves for the drawer dividers. Hopefully you'll post a bit about them.
But in advance of that, I have to ask you about that ancient Festo sander you sport. I too have an ancient 150 RO Festool sander but I'm all worried about where the next sanding pad is to come from. I currently have hard, medium and soft pads - all bought some time ago and beginning to show crumble in the white spongy stuff. ....
But I can't now find any replacement pads that will fit the ancient sander. The new Festool RO models have a slightly different engagement of pad to arbor and, wouldn't you know it, the new style pads seem unlikely to fit the old style arbor.
Have you found a source for old-style Festo RO pads, then, or are we both condemned to owning a perfekly good sander that we can't find sanding pads for, when the current pads eventually turn to white dust?
On the other hand, you being you, you'll invent a thingy to make something fit. I look forward to the details! :-)
Lataxe
David, I found replacement pads on Amazon. As far as I can recall - it is a while since I purchased a pad - our old dear takes the same pad as a 150/3.
https://www.amazon.com.au/Festool-202458-ETS-Soft-Sanding/dp/B073S9FRDF/ref=sr_1_1?dchild=1&keywords=festool+sander&qid=1615047329&sr=8-1
Regards from Perth
Derek
Derek,
That's the fitting for the newer models of the Festool RO 150/3 & 5 so I'd assumed the different shape wouldn't fit the old sander arbours - but do you have a pad with the newer arbour-hole shape that fits on the older-model arbour? If so I'll be greatly relieved.
******
Meanwhile I've been looking at the under-cupboard build on your website and become intrigued with your table saw jig mounted on the sliding platform of your Hammer TS.
http://www.inthewoodshop.com/Furniture/UnderbenchCabinet2.html
Now having no bandsaw, the notion of such a TS jig to rip large wonky or waney-edged planks in such a way does have an appeal. Just now, I have to strap on an already straight piece of timber to a wonker then run a portable circular saw down it's length; or use the electric hand plane to get a badly wonky edge into a safe condition for running it over the planer (jointer).
Your use of that jig to taper table legs also appeals. My usual tapering method is to use the planer (jointer) starting at the thick end of the taper (4 -6 inches down from the top of the leg) and taking several passes towards the thinner end of the taper (bottom of the leg). Once a TS jig something like yourn is made for my TS, tapering legs (and other things) using the jig would be a lot quicker.
Jig-making has become something of an obsession for me lately. I've just finished a drill press table festooned with a fence, hold-down gubbins, stop-blocks and a sanding drum arrangement. It even has wee drawers in it, filled with drilling stuff. :-)
Whatever next!
Lataxe
David, I have what you want ... sanding pad, man, sanding pad :)
https://www.ebay.co.uk/itm/1x-6-Sanding-Pad-For-Festool-RO1-ES150-ET2-ES-ETS-150-LEX150-17-Holes/254817280385?_trkparms=aid%3D1110006%26algo%3DHOMESPLICE.SIM%26ao%3D1%26asc%3D20201210111314%26meid%3Df17b4d93889d4a38b431c9ed6448364a%26pid%3D101195%26rk%3D9%26rkt%3D9%26mehot%3Dco%26sd%3D402728207955%26itm%3D254817280385%26pmt%3D1%26noa%3D0%26pg%3D2047675%26algv%3DSimplAMLv9PairwiseUnbiasedWeb%26brand%3DUnbranded&_trksid=p2047675.c101195.m1851
This is the part:
https://i.postimg.cc/13N9DcRZ/IMG-7868.jpg
https://i.postimg.cc/wTrqtbpV/IMG-7871.jpg
Here it is on my old Festo ...
https://i.postimg.cc/9fdCnmq8/IMG-7873.jpg
This should breathe life into the old boy!
More details on the table saw fixture: http://www.inthewoodshop.com/Powered%20Tools%20and%20Machinery/ParallelGuideForK3Slider.html
https://i.postimg.cc/JnVWx3Td/1.jpg
Regards from Perth
Derek
Here is an update on this project. It has moved on quite a bit.
I hope it provides some ideas for others.
The chest has 10 drawers. Four are now complete ...
There are a couple of photos of the bench and cabinet.
Drawer #1 has two trays. The upper tray holds two Starrett squares, a 300mm combination and a 150mm double square. The lower tray hold large squares: 2 x Chris Vesper and 2 x Colen Clenton. Plus a 2"x2" Bridge City saddle square.
Drawer #2 holds a set of Kiyohisa slicks (paring chisels) in the upper tray, and a set of Kiyohisa oire nomi (bench chisels) in the lower tray.
Drawer #3 holds the wheel cutting gauges I use most: 2 x Tite Mark and 2 x Veritas, along with one I made.
Drawer #4 has two trays again. In the upper tray are small joinery squares: Veritas sliding square, a Vesper small double square along with a similar Starrett. These are so useful for checking dovetail sockets. Below is my favourite double square, a 4" Moore & Wright, along with a 4" vintage Preston machinist square.
The lower tray has large and small Starrett dividers, and a vintage Starrett compass. There is also a place for rules.
Most of the drawers include french fitting. Details on my website:
Scan down to the bottom of this page: http://www.inthewoodshop.com/Furniture/index.html
Regards from Perth
Derek
Here are the photos of the other drawers ..
Derek
By now, the hoose is full of furniture and wooden fittings I've made. Although I do have a to-make list of some further items of furniture, my WW effort's have of late been directed at this sort of thing - stuff to improve the workshop. So far it's been wooden planes, marking gauges and various jigs of the oft-used kind such as a drill press table festooned with hold-downs and other such aids. There is a new tool cupboard, which is well designed and organised.....
My workbench (as you know) was made many years ago, along with an under-cupboard. The workbench is a fine standard design sporting two (two!) Veritas twin screw vises but the under-cupboard was not well-planned or designed. It's actually two cupboards , one each side of three drawers. None of their interiors are well designed for particular tools and are therefore under-utilized as well as quite awkward to use.
So this project of yours does push me in the direction of trying to rework my own under-bench cupboard into something like yours but to suit my own tool storage/access needs. I like those neat tool-shaped recesses and the apparent ease of getting the tool out to use.
The first thing to ponder is: can I rework the spaces of the existing arrangements of my cupboards & drawers in line with the design-principles your own cupboard follows? Whilst it would be a fine project to make a whole new cupboard, this would waste the exiting one.
It may be possible to take the doors off the two cupboards then insert draw runners or some other divide-the-space means to get more stored in the spaces, with much better accessibility. (At present, I have to pull lots of stuff out to get at the thing in the back of the cupboard).
It's on my list. I'll be perusing your arrangements as well as the various tool storage approaches found in FWW and similar resources. The Cotswold waterfall oak bookcase will have to wait a bit longer.
Lataxe
Very nice. Thanks for sharing.
I have not read all the comments and suggestions but have two observations.First each time I need something under my bench I have a big piece of lumber or plywood in the vice.Also if you dont resort to the dreaded full extension slides the thing you want will be in the back,blocked by those "small lightweight weight"things and you cant get the drawer to come out far enough without falling.Otherwise,enjoy.
This forum post is now archived. Commenting has been disabled