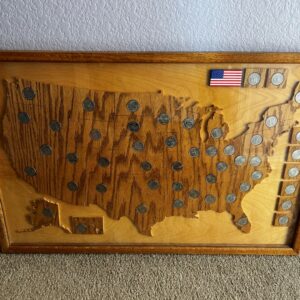
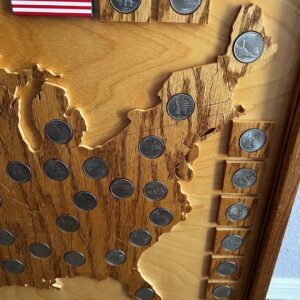
Thinking of tackling a new project. The general idea is to make something similar to this coin display I got as a gift (donation to a charity auction) that I think is great.
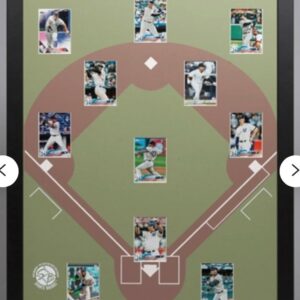
However, my plan is to make a baseball field, kind of like the 3rd picture attached, with spots for 11 graded baseball cards.
I’ve already got a 24″ x 32″ shadow box which has about a 2″ working depth and wanted the background to be wood.
What suggestions would this group have for required equipment to complete the project. Are there techniques I should study/practice to be able to do it well? More of a when I have spare time kind of thing plus learning some new skills.
Thanks in advance for any thoughts


Replies
I'm assuming you intend to set the cards into shallow recesses in the wood base. If that is indeed the case, I will also assume you do not have access to a CNC router, which means a small trim router and a template is probably the best solution with some careful chisel work to square the corners.
I find separate router guide bushings and a upspiral bit more predictable and controlable versus a top bearing bit but either could work. Size the template to be the card dimensions plus the outside diameter of the guide bushing minus the diameter of the router bit. A 1/4" will be best with a 3/8" or 5/16" OD bushing to minimize the chisel work in the corners. Double sided tape will hold the template in place while you route out the recess. Be sure to test and see if the base is wide enough to remain stable while you are routing out the center. If not replace it with an auxiliary base that provides the proper support.
It seems like a lot of work to recess something as thin as a baseball card, but I'm guessing you don't want to use any adhesive to mount the cards and are hoping for a press fit which could be tricky unless all the cards are exactly the same size. I would also be careful with your finishing material to insure it won't adversely react with the inks on the card and make sure it is thoroughly cured before placing a card in place. A thick film finish might also have some impact on the fit of card if you are trying to achieve a press fit.
One last thought is if you are thinking about preserving the card chiseling a small notch to permit a small screwdriver to pry the card out could prevent damaging the edges by trying to remove them without such an access point.
@esch is right. Again.
Lots of ways to do this. I favour sending the field work out to a print shop - they can print onto a lot of substrates and it's not too expensive. You'll get a nice colour field with every line where it needs to be.
To do it all in wood, you need inlays but there are lots of ways to achieve that.
CNC is the obvious choice but let's not for the sake of some fun.
Thinking minimalistically, you will need to achieve a few operations:
1. Prep a base board to dimension and thickness - Ryoba saw and a decent size hand plane - At least a No4 smoother. A marking gauge is almost essential. Sharpening equipment for the plane.
2. Mark accurate lines - rule and sharp pencil.
3. Cut slots for inlay - scratch stock made from old saw blade - this can ride against a fence if you design the holder to allow this. Clamps are needed to hold the fence in place.
4. Chisel - to complete and clean up the cuts.
5. Some means to cut inlay to dimension - the saw will do, as will a smaller smoothing plane, though a block plane is favoured.
6. Means to stick it all together: Glue.
7. Means to smooth it - already covered with the plane.
8. Alcohol (potable) - you will need lots of this. For after and when the tools slip and you have to start again...
All this is going to set you back IRO USD1000 if you are buying keeper tools.
Thing is, it's way more expensive to do with power tools, but you'll have the project almost completed before the hand tool guy has finished setting up his plane.
Power tool options to achieve the same at minimum are:
1. Thickness planer. Try to get a spiral head machine if you can. Ensure it can cope with enough width. If woodworking is a long term hobby and shop space or $$ are short then consider a planer/thicknesser. You can get really good combo machines.
2. Trim router with 1/8" carbide spiral upcut bit. Use this to cut exact dimension slots for inlays. GO CORDLESS unless you are desperate to keep costs down. Makita are the best IMHO but buy one that suits the batteries you already have.
3. Inlays can be cut in many ways. In descending order of preference: Table saw, band saw, ryoba hand saw, circular saw with edge guide. Others of course but not easy. If you have a block plane then cut 1/8 inch strong strips and plane to perfection. If not then thickness to perfection and cut the straightest strips you can from that - rough edges are going to get planed off later.
The machine tool route is going to set you back about the same as the hand tools at minimum and if buying new, you'll be getting poor quality if you try to keep it under $3000.
If you REALLY want to go fancy, you can cut the infield and outfield from different woods - probably more than a 1/4 inch router is up for unless you are REALLY careful and use thinner (half inch or less) wood. The hard bit is cutting out templates that match exactly for the complementary curves. As usual Stumpy has come up with a tutorial on this if you can stand the awful homophone. https://www.youtube.com/watch?v=fZmIMmdCTYA
A simpler approach might be to "float" the cards above the baseball field surface as opposed to embedding them. I don't know if your graded cards are incapsulated in some sort of acrylic but this technique would work well if they are. You could also stick some LED tape strips behind the cards which would give you a nice halo lighting effect. Of course you'd have to have access to an electrical outlet or a battery that could be hidden behind the box.
This will be a fun project, good luck!
Hmm. If it were me, I'd forget the shadow box and just make the cutouts in a regular mat board (from framing supplies) with the printed baseball field overlay. Frame like any other art work. Everything being flat, you don't need the 2" depth and a wood background wouldn't be seen with the baseball field overlay on top of it. A very thin shadow box, with two layers of rabbets would also work if you want some depth. It does take some skill and practice to make those mitered mat cuts, and the mat-cutting knife (Hobby Lobby).
Indeed I do not have access to a CNC router.
The cards are protected in plastic cases. Initially I was thinking of shallow recessed spots for each card, but I probably could get some sort of small L shaped brackets to hold them in place. I think getting the field area right is where I'll put most of my focus.
Digging a little looks like there is a makerspace nearby I might have to see if they've got something like a CNC router I could get access to.
Thanks for the ideas!
If your thoughts for making the field was to use different woods to define the the different areas, that can easily be done with veneers without any special equipment. I don't feel qualified to give advice on marquetry but that is really what you would be doing. Maple dyed green for the grass, cherry for the infield, maybe basswood for the baseline and bases. I could see a couple of hardboard templates to define the infield areas and a sharp razor knife getting the job done nicely.
This forum post is now archived. Commenting has been disabled