(Yet Another) Question about sharpening a chisel
I have read more than once that you control the square/skew of a chisel while sharpening using finger pressure on the back of the blade, but I haven’t found out exactly what that means in the real world.
I assume that the issue of “finger pressure” doesn’t involve rocking the chisel on the stone, but instead refers to keeping the chisel flat on the stone while applying more pressure on one or the other of the corners?
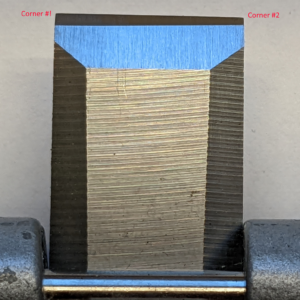
In the attached figure of the topside of a chisel I’m currently honing, using a honing guide, you can see that the secondary bevel at Corner #1 is wider than the secondary bevel at Corner #2. I’m getting a wire burr on the back that starts at Corner #1 but doesn’t make it to Corner #2.
It seems logical to me that when I put this chisel back on the stone that I’d apply more pressure on Corner #2, but I’m not sure that’s correct. Is that in fact the case?


Replies
First things first have you checked that the primary bevel was square to the sides of the chisel?
I'm also guessing you are using an Eclipse style honing guide which can leave a little bit to be desired. They often aren't cast particularly well and need some tune-up with a file to square and true things up. They also have a narrow wheel which makes it easy to rock the chisel as you push it. So keeping even pressure in the center is critical to success.
Last the chisels you picture don't seem to be a premium brand given how coarse the grind marks are. The extremely large side lands also be speak to a lower line chisel, since most, not all, high quality chisels have little to no side land to better facilitate cleaning out dovetails. These tall lands also could impact how the honing jig grabs and holds them. I only mention this because lower quality chisels are less likely to leave the factory properly ground in the first place. I almost want to say looking at the picture that your honing may be closer to being correct and square to the side than the factory grind.
On some chisels it's not unheard of to find the back and top face to non-parallel with each other. The good news is most of that doesn't matter as long as you keep the edge perpendicular to the sides so keep checking this with a square you trust.
Also I hope you have flattened the back before beginning to hone the bevel. If not do that now. Until you have at least 1/2" of the back polished to a mirror shine all the way up to the cutting edge.
First, check the edge with a square. If it's close to 90 to the sides, don't worry about it being a little out of parallel to the primary grind. It won't matter.
To answer your question, yes, you put more pressure on the higher side.
I prefer the Veritas guide for chisels. It has a wider roller which helps keep everything square.
Even though your secondary is not even, there should still be a burr all the way across the back given the size of the secondary you've created (even at its narrow end).
Something is amiss. I'd go back to the grinder and put the hollow back in until the secondary is barely visible, then hone freehand ON THE GRIND, which means at the same angle from the grinder. Try this. It won't take many strokes. Hone just until you get an even, bright line across the bevel of the chisel. If you're still not getting a burr from edge-t0-edge the back probably has a belly in it near the cutting edge which you'll need to address. The back needs to be flat enough that the burr can be flipped back and forth before finally being honed/polished off.
The back needs to be polished near the edge, and flat. The secondary bevel should be square to the sides, but honestly, if it's a wee bit out, it doesn't matter.
The primary bevel is only there to get a bunch of steel out of the way so that it's easier to hone the secondary bevel. It would take an hour to polish that entire bevel. So use a grinder, a belt sander, really coarse stone or a cinder block to get that primary bevel down. Make it ugly, hollow, crooked, whatever. It doesn't cut anything.
Then polish a nice secondary bevel. It's all that matters, besides the polished rear.
This forum post is now archived. Commenting has been disabled