Curved Dividers for Glass Doors
Add Federal-style muntins using a plywood template as a jig and a guide
Synopsis: The graceful and elegant curved muntins used on Federal furniture take time to make. But when executed well, they can transform a piece. Richard Oedel has devised a method that uses a plywood template. This template guides him while cutting an assembling the ribs, attaching the muntin faces, and tying the muntins into the door frame. Follow Oedel step-by-step through the process and see if you can make your own divided-light glass doors.
From Fine Woodworking #190
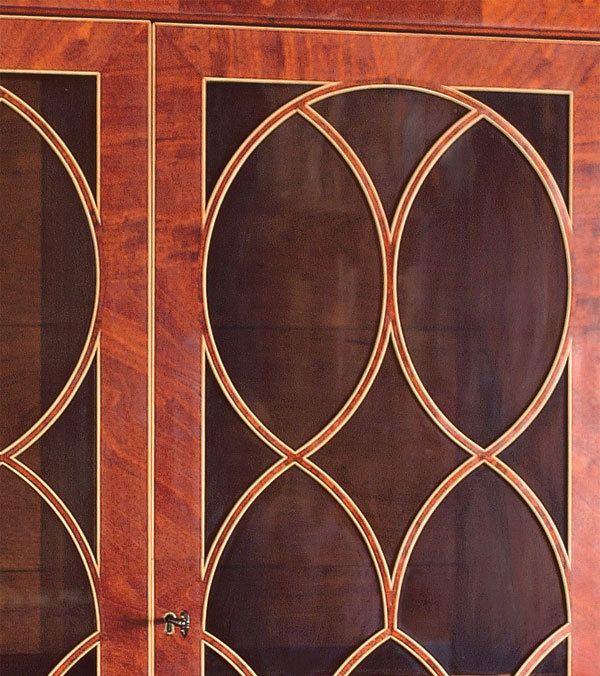
American use of glass-paned doors with curved dividers, known as muntins, first appeared in the 1750s. These early muntins were thick and chunky, like exterior window panes. However, by the beginning of the Federal period, the muntins on furniture were graceful and elegant, influenced heavily by the designs of Sheraton and Hepplewhite.
Making these doors has always been a time-consuming task, but when executed well they elevate any piece. My method is centered on a template. It acts as a jig when cutting and assembling the ribs; it serves as a guide when attaching the muntin faces; and it is used to tie the muntins into the door frame. This method works for any design, so go ahead and create your own unique divided-light doors.
Multipurpose Jig Start with a full-size drawing of the doors. Life will be much easier if all the muntins are the same radius. Next, build some strong door frames. Mine are 3/4 in. thick by 1 3/4 in. wide with mortise-and-tenon joints. Cut a piece of ½ -in.-thick plywood the same size as the inside of the frame, and mount it (using dowels an inch in from the corners) on a backer board of 3/4 -in.-thick plywood that is just larger than the outside of the frame.
1. Build the template for the muntins
Lay out the template. Draw the design onto the 1/2-in. plywood, making sure to mark the center points of the arcs. Some of these points are off the main panel, so you will have to clamp on side panels.
Rout a groove. Place the door frame onto the template assembly. Place 1/4-in. shims under the 1/2-in. plywood to bring it flush with the frame. Use a laminate trimmer on a radius jig with a brad inserted the correct distance from the center of a 1⁄8-in.-dia. straight bit (Onsrud #52-244). First cut 1/4 in. deep, cutting into the frame where the ribs will go (left). Then remove the door frame, attach the side panels, and cut the grooves whose center points are off the main panel. Next, number the template sections and connect each one to the backer panel with dowels before routing through the 1/2-in. plywood. To create a recess for the muntin faces, cut a channel 1⁄8 in. deep with a 3⁄8-in.-dia. bit straddling the existing groove (right). Last, on the router table, cut a 1⁄8-in.-sq. rabbet on the straight edges of the jigsaw pieces that adjoin the frame. This will accommodate the overhang of the frame’s face veneer.
For the full article, download the PDF below:
Fine Woodworking Recommended Products

Dubuque Clamp Works Bar Clamps - 4 pack

Stanley Powerlock 16-ft. tape measure

Blackwing Pencils


Log in or create an account to post a comment.
Sign up Log in