How to Break an Edge
How you break the edges can make or break your projects
Some tasks in woodworking are so basic and crucial that they apply to virtually every piece of wood in a project. Basic milling and surface preparation come to mind, but for me, breaking edges is just as vital. I use sandpaper or a block plane to relieve every edge of just about every part of my furniture. It’s quick work, but it needs to be done systematically. Do too little, and your furniture won’t look or feel finished. Overdo it, and your heavily rounded edges will look like unskilled factory work.
Not all furniture should get the same edge treatment, however. Contemporary furniture, for example, usually wants crisp edges, which work fine if relieved adequately. Arts and Crafts goes to the other extreme with rectangular parts broken with sensible—sometimes bold—chamfers.
The process calls for two skills that take a little practice but aren’t at all hard to master: the cleanly planed chamfer and the lightly sanded roundover.
|
For long chamfers, guide the plane with both hands. Align the plane’s body roughly lengthwise with the corner you’re chamfering. Ride a knuckle on the stock to help steady the plane at a consistent angle. |
|
Tip: A block with a V-shaped notch helps support square work at a convenient angle for breaking edges. |
|
Get the right angle on end grain. Skewing the iron to the plane’s line of travel lowers the cutting angle and pushes the fibers downward, creating a cleaner chamfer at the end of a piece. |
Chamfers create a strong visual impression
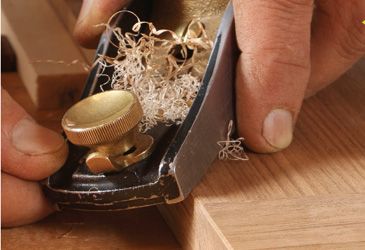
I like the visual effect of chamfers so much that I typically cut a light chamfer into all the visible edges of a piece. I do this with a block plane rather than a router because this is light work; to effectively break an edge, a chamfer doesn’t need to be more than about 1⁄32 in. wide. The block plane is also easy to maneuver one-handed, works well in tight quarters, and leaves an attractive flat and polished cut.
Set up the plane for a light cut, with a narrow throat opening. A well-tuned plane will often chamfer an edge flawlessly, regardless of grain direction, but if you’re getting resistance or small tearouts, turn around.
Align the plane’s body lengthwise with the corner you’re chamfering. Tilt the body with the blade centered on the workpiece edge. Keep a standard grip on the plane but, if possible, ride a knuckle or the tip of your thumb on the stock to help maintain a consistent chamfer angle. Skewing the plane, on the other hand, lets you cut cleaner chamfers in end grain and work deeper into inside corners.
Break most edges before assembly—On almost any project, you can simplify the task of breaking edges by doing some of the work before assembly. On a table, for example, all the edges can be worked beforehand. This includes the legs and the bottom edges of the aprons, inside and out. The tabletop edges can be done before or after assembly, but you’ll find them easier to work as long as you can run around all four edges at once. Even with an underbeveled edge, you’ll need to break the edges on this bevel with sandpaper or a light chamfer.
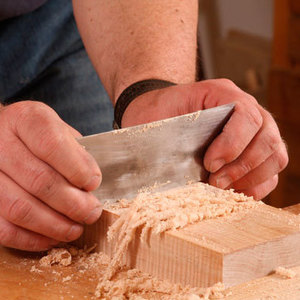
A frame-and-panel door is another good example. I chamfer the inside edges of the stiles and rails before putting the frame together. These edges are harder to reach once the panel is in place. To avoid creating a gap at the end of the rails, be sure to stop well short of the joinery when chamfering the inside edges of the stiles. After glue-up, use a paring chisel and a rabbet plane to carry these chamfers into the corners. Now chamfer the outer edges.
Work carefully on the top and bottom areas where the long grain of the rails joins the cross grain of the stiles. Giving the plane a healthy skew as you come onto the cross grain should leave a polished facet there. Finally, give the inside of the closing stile an extra pass or two, to ease this area of potential wear.
|
Most edges are easiest to access and work before assembly, but some must wait. Also, be sure to complete surface preparation before breaking edges, as sanding and smoothing can erode the chamfers you’ve created. |
|
Advance work. The bottom edges of a table apron are easily chamfered before glue-up, as are the table’s legs. Assemble the leg and apron after cutting the chamfers. Cutting these chamfers after assembly would be next to impossible because the adjoining parts obstruct the work. |
|
Doors are trickier |
|
The easiest way to chamfer the edges on a door frame is to treat the inside edges before assembly. But you’ll need to finish off the inside corners after the frame is glued up. The outside edges must wait until the door is assembled, trimmed, and sanded. |
|
Mark the stiles. With the frame dry-fitted, mark the stile at the point where the mating rail will meet it. |
|
Don’t go too far. If the chamfer on the stile goes beyond your reference line, it will create a gap in the joint with the rail. |
|
The rails are easier. Because the rails die into the adjoining stiles, the chamfers can continue to the end of the workpiece. |
|
Finish after assembly. Use a chisel to carry the chamfer into the corner on the inside of the stile. |
Rounded edges are quick and comfortable
The simplest way to break an edge is to round over the corner with fine sand paper (P220-grit, then P320). This technique is quick and effective. And it’s perfect for preserving wood’s wonderful tactile quality, softening sharp, sometimes fragile corners and making them easier to handle for builder and user alike.
I tend to use the roundover technique primarily on less-visible parts like drawer sides (guides and runners, too) and the inside edges of table aprons. Out of sight as they are, these areas still get handled and require protection from wear and tear.
Sanding freehand can make it challenging to get a consistent shape on all of your edges, especially when working into corners. You’ll improve your results by supporting the sandpaper with some type of backing that gives a little and lets you control the shape you’re creating. Woodworking suppliers sell foam or cork sanding blocks, but I find it simple and effective to attach sandpaper to a narrow scrap of 1⁄4-in.-thick softwood or a scrap of leather.
The sandpaper also makes it simple to control the size of the roundover you’re creating. If a few passes aren’t enough, keep going. Stop when the edge feels comfortable and fits your design.
Again, some of this work is easier done before the piece comes together. On a drawer, for example, I lightly round the inside edges of the drawer sides and both top edges of the back before assembly. I do the rest after the drawer is together, using a file or chisel to hit the corners on the back of the drawer front. I use a block plane to chamfer the visible front edges of the drawer front.
|
Some woodworkers prefer light roundovers throughout their projects. Sandpaper is quick and effective, but it needs some kind of backer for consistent results. |
|
Out of sight but not out of hand. Hack uses a gentle roundover on parts like drawer sides that will be handled but not often seen. He supports the paper with thick leather. |
|
Use a common mill file to get into tight corners, skewing it as you push it along the edge. |
|
A heavier roundover is great for edges that are prone to damage, such as tabletops or the top edges of drawer sides. Another example is the bottom inside edge of table aprons, where you’ll grip when moving the table. |
|
Start with a block plane. When you want edges more rounded than you can achieve quickly with sandpaper alone, start with a block plane and use sand paper to turn the facets into a roundover. |
For more check out these other articles:
Fine Woodworking Recommended Products

Bahco 6-Inch Card Scraper

Dubuque Clamp Works Bar Clamps - 4 pack

Bumblechutes Bee’Nooba Wax


Log in or create an account to post a comment.
Sign up Log in