The Shopmade Tool Series: Starting Your Collection
Just getting started in woodturning and haven’t emptied your piggy bank on tools yet? Stop; consider this article before you decide. Tool selection can be perplexing and expensive given the number on the market today. To compound the problem, the process of determining what suits your style and/or sharpening techniques will typically increase your expense. Consider, at least initially, addressing these issues by making your own tools. This can help you determine the types of tools you will prefer as you develop your turning skills, can provide inexpensive tools to develop your sharpening skills, can reduce your initial investment, and can produce skills to make that one-off tool that you may need in a special circumstance.
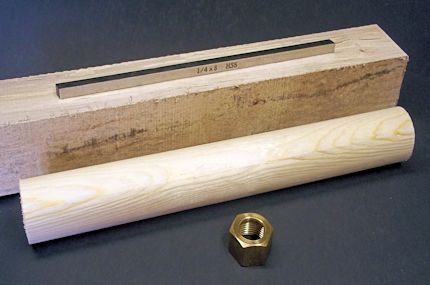
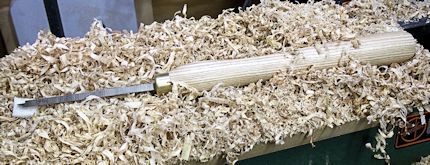
Many industrial machine tool companies carry an assortment of high-speed steel (HSS) blanks that are suitable for use at the wood lathe. To get started, acquire the items in photo 1 – I will assume you already have a Jacobs chuck and bits for drilling on the lathe or a drill press in your shop. You will first need to make a temporary tool to complete the first “permanent” tool for your collection. The tool I have selected for our purposes is the drop-nose chisel, see photo 2, developed by Myron W. Curtis for his unique style of spindle turning. This chisel is multi-functional as a cutter and scraper, making it an ideal choice to build upon.
Temporary Tool
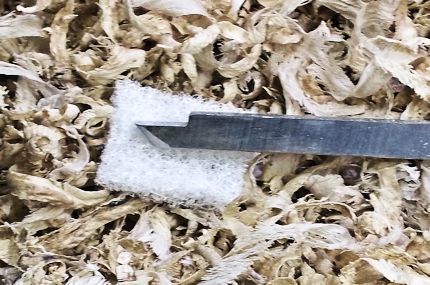
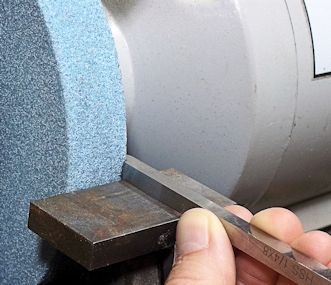
Process – cut a section of dowel and mark the dowel centers on both ends before boring a hole 1/64″ smaller than the cross section of HSS blade. Use progressively larger bits starting from 1/8″ and drill to about a 2″- 2 1/2″ depth (this allows the steel to cut into the wood slightly for a snug fit). Mount the dowel on the lathe with the drilled end placed over a cone center mounted in the tail sock. Remove the sharp edges from the ends with sand paper and sand the dowel smooth to touch. Cut two kerfs at 90 degrees from each other, about one inch back on the hole end, before driving the tool steel into the dowel. Then grind the tip of the blade in a half-moon shape with a bevel between 50-60 degrees as shown in photo 3 (safety note – ensure you grind the step of the blade with the pressure on the front of the wheel while the side only slightly rubs, photo 4). Grind the step between one quarter to one half the thickness of the blade and 3/8″ back from the tip.
“Permanent” Tool
Preparing the handle – prepare a hardwood blank about 1 1/2″ square by 12″ long. Drill a small pilot hole (to ensure the blank is turned concentric with the blade mounting hole) prior to mounting the blank on the lathe with the live center cone placed into the pilot hole. Rough the blank down to its basic shape (see side bar).
Turning a brass ferrule – turn a stepped tenon to fit the plumbing nut, and then thread it on the tenon with a small amount of thin CA for extra security. Take notice of the internal step within the nut and turn a chamfer to accommodate it. Ensuring square shoulders are turned on the tenon requires a delicate shear cut into the corners. Adjust the lathe speed to between 800-1200 r.p.m., then turn down the brass nut using a scraper attitude, with the tip center height, in a series of light cuts on the ferrule until all flats are gone and it is round. Remove all tooling marks with 120-180 grit sand paper.
Finishing the handle – completely turn the handle to its final shape before sanding and applying your finish of choice. I typically sand to about 180-220 grit and apply a lacquer and beeswax finish to my handles. This makes them rather pleasing to touch and also limits the grime on my hands from transferring into the wood fibers and permanently soiling the handle.
Complete the tool – remove the waste on the ferrule end of the handle using a v-block and a hand saw then sand smooth using a sanding block. Remove the scratches in the ferrule from the block with fine paper. Drive the blade into the handle with the blade tip on a hardwood block, stopping after a few raps to ensure it is going in straight before driving it home. Remove the waste on the opposite end and finish as previously for the ferrule. Then round over the top corners of the step (to prevent catching) and the bottom edges along the blade length (to make sliding the tool on the rest easy) using a belt sander and/or hone. Enjoy!
Drop-nose Technique
Peeling/roughing cut (spindle): Rub the bevel and raise the handle
Paring/finishing cut (spindle): Rub the bevel, tilt the tool, and raise the handle
Scraping (spindle and face work): Level to slightly raised handle attitude while stroking the cutting edge
Find more information on toolmaking at The Pragmatic Woodturner
| Photo 1: Materials include a plumbing compression nut, a softwood dowel, a hardwood billet, and a 1/4″ x 1/4″ x 8″ high-speed steel tool bit. | |
| Photo 2: A finished drop-nose chisel. | |
| Photo 3: Close-up of the drop-nose cutting edge and bevel. Strive for a step about 3/8″ long and between 1/4 and 1/2 the blade thickness. Make sure to round the top corners of the step. | |
| Photo 4: Grind with pressure on the front of the wheel and not the side. |






Log in or create an account to post a comment.
Sign up Log in