Part 3: A Violin is Born at Fine Woodworking

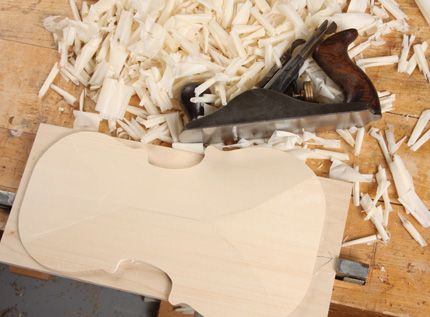
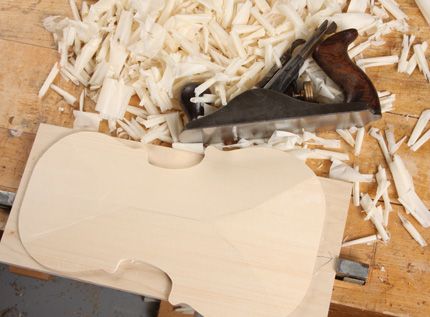
With my violin's top, or "belly" plate, roughly-contoured using a handplane, I'm ready to begin using gouges to achieve the iconic arch top shape.
*NOTE: Click on any image to enlarge.
In the last installment of my ongoing series on building a violin from scratch, I covered construction of the curved rib assembly. In part 3, I begin to tackle the spruce top–from bandsawing it from the blank, through initial contouring with a handplane.
To follow along with the entire series, click on the links at left.
Not All Spruce is Created Equal
When it came time to begin the violin’s top, or “belly” plate, my first inclination was to head to the lumber yard and scout out some quartersawn spruce. Upon further investigation however, I learned that the requirements for an instrument top (known as “tone wood” in the business) are much more stringent than those for furniture. Tone wood goes through a rigorous selection process, it’s graded, and air dried for years. So I hit eBay and ordered up a nice, tight-grained blank.

The shape of the blank forms an elongated triangle. |
While you can order one-piece blanks, the most common way violin belly plate blanks are sold is in two pieces. When glued together, the pieces form an elongated triangle when viewed from the ends. This gives the craftsman a solid starting point for initial shaping of the instrument’s contoured top. By the way, the process for shaping and contouring the instrument’s bottom plate is exactly the same. The only difference is the wood species. Your bottom plate is usually made from highly figured, bookmatched maple (I’m not looking forward to shaping that!).
Purchasing a blank this way is really nothing more than a time-saver. I didn’t need to worry about setting up an angled fence on my bandsaw to resaw the blank myslef. Just one less process to worry about.
Bandsawing the Violin Blank

Outlining the ribs. |

Outlining the overhang. |
Once the belly blank was glued together, it was time to prepare for bandsawing. I set the violin rib form (with rib’s still temporarily attached) atop the flat bottom-side of the spruce blank and traced the shape of the violin onto the workpiece. A violin’s top and bottom plates overhand the ribs by a few millimeters, so I made a second tracing using a washer. By butting the washer up against the rib form, and placing my pencil lead within the inner washer edge, I was able to trace an overhang that was a consistent distance away from the ribs.
The next step was to saw the blank to that recognizable violin shape. Remember, the tracing I made was on the bottom, flat side of the blank. That side obviously needed to remain up during sawing, in order for me to bandsaw to the line. The opposite side of the blank however, is an elongated triangle. I needed to come up with a way to balance the blank on the bandsaw’s table. To do this, I hot-glued some triangular wedges to the side of the blank that would face down onto the saw table. Then I simply sawed to the line and faired the edges using a combination of a spokeshave, block plane, file, and sanding block. Finally, I hot-glued the blank to a plywood scrap. In this way, I could secure the blank effectively between two bench dogs. The dogs secure the plywood to the bench. The glue secures the blank to the plywood.
Contouring the Violin’s Top
Next it’s time to prepare the belly blank for the final contouring that will be done with gouges and tiny luthier’s thumb planes later on.

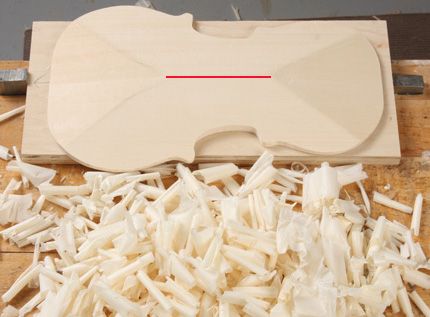
Here you can see the four angled facets that are handplaned before shaping with gouges. |
To do this, I first marked the edges of the blank, 5mm up from the bottom, flat face. I handplaned along each angled “long” edge, making my way down to that 5mm line. Next, I drew out some triangular lines radiating out from the blank’s centered glue line, fanning out towards the blanks front and back ends. I carried out the same procedure, handplaning down to the 5mm line. In the photos, I’ve highlighted the center line in red, as well as the triangular lines. These are the initial contour lines for the blank.
In the next installment, I’ll shape the spruce blank using gouges, then flip it over, map out some depth and counter lines, and hollow out the inner (flat) side of the blank. Fingers crossed!


Comments
I've been enjoying this series, looking forward to more!
Great pleasant change from everyday woodworking, hope we can hear it when finished.
g
Enjoyable series.
If the 'enlarged' pictures were actually large, that would help to view some of the details. Today it's probably safe to assume that people have 1280x1024 displays. The pictures are great, just too small.
What ever happened with the violin?
Log in or create an account to post a comment.
Sign up Log in