Build a Shaker Stool with Hand Tools
Make one in any size—as a footstool, a bench, or even a side table—while honing your hand skills.

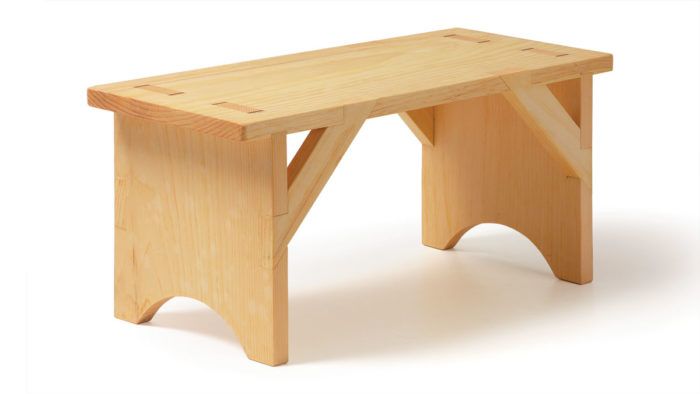
Synopsis: This Shaker piece can be sized as a footstool, a bench, or even a side table, and gets top marks for both looks and strength. The legs have decorative arches at the bottom and are attached at the top with through-tenons. Four dovetailed corner braces add stability. For even more dimensional stability, the legs are seated in a shallow dado cut into the underside of the top. This design is solid and functional in a variety of sizes. Becksvoort makes a bench version that is 11 in. deep by 40 in. wide by 18 in. tall. When building to a larger scale, sketch the design until the overhang and foot arches please you.
The Shakers designed and built a great variety of useful stools and benches. Most had through-mortise-and-tenon joints to prevent racking and help support the top. Some had central stretchers and a few had industrial metal-strap braces. My favorite, for both looks and strength, adds four dovetailed corner braces to the through-tenons.
This sturdy, versatile design can be sized for use as a footstool, a bench, or even as a side table. Maybe the best part is that it can be made using hand tools only.

I make this bench from 3/4-in.-thick white pine, with contrasting cherry or walnut wedges to help fasten the through-tenons. I’ll show you how to build it using hand tools, but I’d suggest using a jointer and planer to flatten the stock and mill it to thickness (or you can start with stock that is premilled at the lumberyard). To save time and increase accuracy, you might also use a tablesaw to cut parts to length and width. If you do mill the stock by hand, be sure to work both faces to make the parts a consistent thickness.
Start by making the legs. Each one has a pair of tenons at the top and a decorative arch sawn at the bottom. First use a compass to lay out the arch, which is about 2 in. high at its peak, and starts about 11⁄2 in. from each edge. Cut out the waste with a coping saw and smooth the surface with a file and sandpaper. Gluing or stapling a strip of sandpaper to the waste piece and sliding it back and forth works well to fair the shape and smooth the surface.
Once the arch is done, turn to the tenons. To lay them out, use a marking gauge to scribe the thickness of the top on both faces (because the tenons will sit in a dado, they will protrude from the top so you can plane them flush later). Then mark the tenon width on the top and both sides of each leg—at 1 in. and 31⁄4 in. from both sides. Cut the tenons and remove the waste.
To keep track of the parts, mark the legs for their orientation in the finished piece: right leg, right side, left leg, left side. Because the wide pine legs might cup, I seat them in a shallow dado in the top’s underside. You can use the legs themselves to help lay out the dadoes and the mortises. Use a marking gauge to scribe a line 11⁄2 in. from each end above and below the top. Now place the leg on this line and knife along its edge to finish marking out the dado. Deepen the scribe lines on the underside to about 1⁄8 in. using a sharp knife. Next, chisel out the bulk of the waste. You can flatten the bottom and get the dado to a consistent depth with careful chisel work, but a router plane is quicker.
Download the plans for this stool from the Digital Plans Library. Plus, browse 100+ other plans available for members only.
For the full article, download the PDF below.
Fine Woodworking Recommended Products

Drafting Tools

Circle Guide

Dividers


Log in or create an account to post a comment.
Sign up Log in