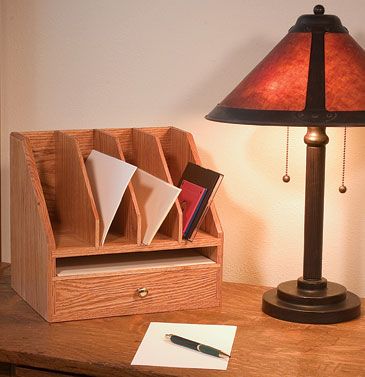
Build a Simple Desk Organizer
This piece helps tame office chaos, and can also serve as a handy kitchen organizer.

DOWNLOAD THE FREE PROJECT PLAN
The vertical dividers are great for sorting bills and coupons, stashing recipes, or for gathering phone messages until you can return a call. Few other projects work as hard and use so little wood. Most of the pieces are made from 1/2-in.-thick oak, with pine or poplar used as a secondary wood for the sides and back of the drawer. This organizer should take only two to three days to complete.
If you don’t have or can’t find a single board wide enough for the sides, glue up panels from narrower stock to make the sides, shelves, and dividers.
Making the sides and dividers
Rip the stock for the case to width, following the dimensions in the free downloadable plan. Once you have everything cut to width, crosscut the pieces to their final length.
Once all pieces are cut to length, use a compound miter saw or a tablesaw to nip one corner off both sides and the front top corner of the three vertical dividers. Then use a router to chamfer the outside edges of the side panels. Remember that the sides are mirror images, not identical. Establish a “right” and “left” side and chamfer only the top and two outside edges. One way to help remember the correct orientation is to tack the pieces together with double-sided tape.
You’ll find it a lot easier to finish the pieces now, before they are assembled into small shelves and tight compartments. If you want to darken the wood or even out different-colored boards, apply a stain followed by two coats of wipe-on varnish.
Install a dado set in the tablesaw and cut the 1/4 x 1/4-in. dadoes for the middle shelf. You can use the same setup to cut the 1/2-in.-wide dadoes for the bottom and top shelves and the rabbet for the bottom, by making multiple passes. Finally, lower the dado set to cut the 1/8-in.-deep grooves for the dividers.
Assemble the case
Do a dry-fit to correct small mistakes, then proceed to the glue-up.
Glue the bottom and both shelves between the sides, gently clamp the case together, then slide in the back pane. Tighten the clamps, then check the assembly to be sure it’s square.
After about an hour, when the glue has dried, plane the top edge of the back piece so that it lies flush with the sides. If necessary, trim the tops of the dividers before they’re glued in place. Once everything fits, apply glue to the grooves in the back and top shelf, then slide the vertical dividers in place.
Building the drawer
The drawer is a rabbeted and dadoed box with a false front glued on. If you prefer something easier, you can make a serviceable drawer by butt-joining the front and back to the sides. Since the bottom is glued in place, a little glue and bamboo skewers on the corners are enough to hold the drawer together. In either case, the dimensions on the cutlist and plan are only a guide. The goal is to fit the drawer to the case, not to make cuts just because a cutlist tells you to.
Using the organizer as your guide to the proper dimensions, rip stock for the front, back, and sides. Test the fit against the case and size it so that the stock slides smoothly into the drawer cavity.
On the front and sides, cut a 1/8-in-deep groove to house the drawer bottom. Instead of grooving the back, raise the blade and trim away the groove completely. Then crosscut the sides so that they are 1/4-in. shorter than the depth of the drawer opening.
Place a single side piece into the opening and use it as a spacer to determine the length of the front and back pieces. Set the drawer front in place and make a small mark with a knife or sharp pencil. After cutting the rabbets (in the front) and dadoes (in the back) on the sides, the front will fit in the opening. As you crosscut the front and back pieces, cut it a hair short. That way, the drawer will have a little room to move from side to side.
Use a marking gauge to transfer the thickness of the drawer front to the front inside face of one of the drawer sides. Adjust the tablesaw to make a 1/8-in.-deep cut and adjust the rip fence so that the blade is cutting along the inside front face of the drawer side. It may take two to three passes to nibble up to the end of the board, but this is faster than switching to a dado cutter. Repeat this cut on the inside front end of the other side piece.
To cut the dado to house the back of the drawer, adjust the fence so that there is 1/4 in. between the fence and the blade, then pass the stock across the blade and make the mirror cut in the other side piece. Move the fence another 1/8 in. away from the blade and take another pass. Sneak up on the proper fit slowly by making small adjustments to the fence.
Dry-fit the drawer sides, front, and back, then measure the dimension of the bottom panel and cut it to fit.
Assemble the drawer
Apply glue to the corners and bottom grooves, then reassemble the drawer and check for square.
To provide extra reinforcement, “nail” each corner with bamboo skewers. Drill three 1/2-in.-deep holes at each corner, apply glue to the skewer, and lightly tap it into place. When dry, trim the skewer flush to the side with a small saw or chisel.
Find the center of the drawer front and drill a pilot hole for the knob. Then cut the false front to the exact size of the drawer opening. Attach the false front to the drawer, then drill from the back of the drawer front through the false front. Attach the knob.
Finishing
Apply a final coat of varnish to all exterior surfaces. Because you’ve prefinished all the parts, focus only on the outermost surfaces. Don’t worry if you can’t reach into all of the narrow drawers and compartments. Wait a day or so, then apply a little paste wax with a small scrap of abrasive pad. As a nice final touch, line the drawer bottom with felt, glued to a piece of cardboard that’s the same size as the drawer bottom.
 Excerpted from: Excerpted from:Furniture You Can Build by Joseph Hurst-WajszczukThe projects in this book are designed to help you improve your skills while enjoying time in your shop.Browse all books and DVDs |
Fine Woodworking Recommended Products

Suizan Japanese Pull Saw


Log in or create an account to post a comment.
Sign up Log in