Quadrant Hinges and a Lock Elevate Any Box
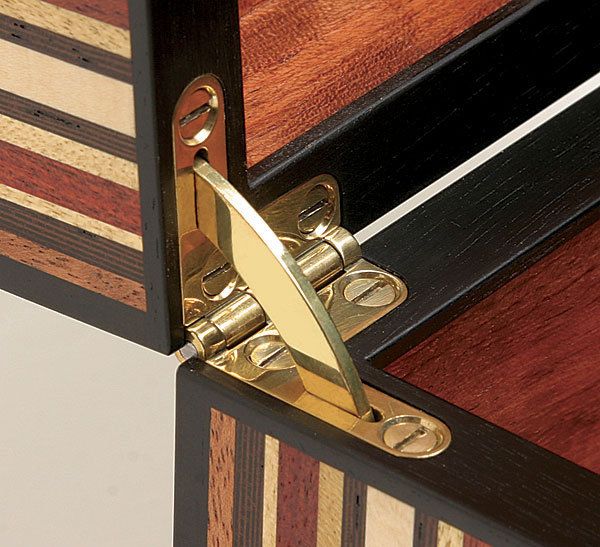
With their built-in stop, quadrant hinges make any box look and function much better.

Synopsis: Install quadrant hinges for the final, elegant touch on Adrian Ferrazzutti’s veneered box. With their built-in stop, quadrant hinges make any box look and function much better. A mortised lock and escutcheon turn this box into a true heirloom.
From Fine Woodworking #207
Perhaps the fussiest aspect of making my contrasting veneer box (see pp. 56-63) is installing the quadrant hinges and, to a lesser extent, the lock. While you could eliminate the lock and substitute a nice pair of butt hinges with a positive stop, it’s worth going the extra mile to make this box the best it can be. With their stop built in, quadrant hinges make any box look and function much better. A mortised-in lock and escutcheon create a true heirloom.
Quadrant hinges reward precise installation: The trickiest part is getting the hinges dialed into position so that the lid closes dead flush on all four sides. With a veneered box, there isn’t much room to flush the lid to the body (or vice versa) without running the risk of exposing the core as the veneer gets too thin. For this reason, while you can install quadrant hinges by hand, I recommend Brusso’s router template (model No. TJ-638), designed for their smaller quadrant hinges (model No. HD-638). The jig and hinges are available at www.brusso.com, where you’ll also find comprehensive instructions. You’ll also need a 1⁄2-in.-outside-dia. bushing guide and a 5⁄16-in.-dia. straight bit.
Use a laminate trimmer or a router to cut the hinge mortises, setting the bit depth to match the thickness of the hinge leaf. But before installing the hinges, check that the leaves align when closed; if they don’t, grind or file them until they do. Otherwise, you’ll have to fuss with modifying each mortise to get the lid to fit flush. Once all four mortises are made, insert the hinges and check their fit, marking which leaf goes in what mortise.
With an awl, mark the holes for the center screws only. Drill for these screws and install the hinges using steel screws of the same size and thread as the brass ones supplied with the hinges. In this way you reduce the chance of snapping a brass screw. Close the lid, checking how it lines up with the body. If the stars are aligned, it will be spot on. If not, there are two things you can do: Locate the screws in the remaining holes off center in whatever direction you need to shift the lid; or, if necessary, grind away some of the leaves so they can be pulled forward in the mortise. Then remove the center screw and try it with the other screws in conjunction with grinding.
Once the lid is fitting well, outline the mortises for the stays with a pencil. Remove the hinges and excavate the mortises with a drill and chisel so that half the stay goes into the body and half into the lid. For the stays to drop in properly, the mortises have to extend almost to the screw holes, well beyond the traced outline. Install the hinges again, checking that the lid closes and the stays aren’t hitting the mortises. If all is good, move on to installing the lock.
For the full article, download the PDF below:
Fine Woodworking Recommended Products

Festool DF 500 Q-Set Domino Joiner

Bessey K-Body Parallel-Jaw Clamp

Estwing Dead-Blow Mallet


Log in or create an account to post a comment.
Sign up Log in