Shopmade Corner Clamps for Boxes
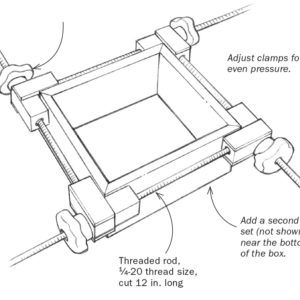
Use two sets of these block clamps when you need extra box-clamping pressure.
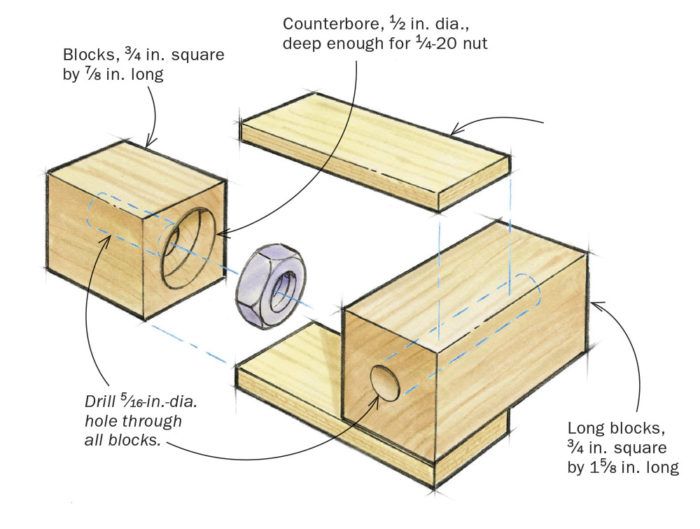
Under most circumstances a mitered box can be successfully glued and clamped using rubber bands or plastic packaging tape to pull the corners tight. But there are times when extra clamping pressure is required. Two sets of these clamps is the perfect solution. You can buy more expensive miter clamps from a variety of sources, but these are less expensive and more satisfying, because you made them yourself.
Start by cutting the blocks to length, and then use a Forstner bit to counterbore the shorter blocks for the hex nuts. Now drill through all the blocks for the long threaded rods. Use epoxy to fix the hex nuts in the counterbores and let the glue dry before gluing the short blocks to the long ones with 1⁄8-in. birch plywood as shown.
The 1⁄4-in. threaded rod is available at most hardware stores. Use a hacksaw to cut it to length, and gently grind or file a chamfer on the ends so they thread easily into the nuts and knobs. I cut the rods roughly 12 in. long, and use threaded coupler nuts to join rods for extra length. The plastic knobs are available online for about $1 apiece. Get the kind that lets bolts pass all the way through.
—Doug Stowe, Eureka Springs, Ark.
Fine Woodworking Recommended Products

Jorgensen 6 inch Bar Clamp Set, 4 Pack

Estwing Dead-Blow Mallet
Bessey K-Body Parallel-Jaw Clamp


Comments
Is this illustration correct? It doesn't seem to work as described and drawn.
How so?
I think the illustration has a problem with a couple of its vertical lines.
The Iso black & white drawing could have had vertical line drawn on the blocks of wood joined by the side pieces. This would have shown the piece orientation better, imho.
There is nothing at all wrong with either the design of the clamping blocks or the drawings. I will be making a set of these.
These drawings are incorrect and missing some important steps. The drawing shows holes drilled through the length in the center of both blocks. However, the black and white drawing shows the threaded rod passing through the width of the longer block then through the nut and the length of the shorter block. And how does the knob tighten the clamp? The threaded rod passes through the knob. Is the knob epoxied to the rod so the rod turns? Something is missing in the instructions.
I agree with user-6284072 that the lines are missing in the drawing that separate the nut block from the slide block.
The assembly could use a double nut or epoxy to lock the nut in place. Make sure the nut end butts at a right angle to the slide block and is attached by the side strips.
Optional spacers would make these work for box joints where you don't want clamping pressure directly on the corner.
Mr. Stowe thank you again! Great Project for some of the left over wood I (we) seem to hoard for too long.
Yes there is something wrong with the black and white ISO drawing. It is missing some vertical lines. Rest assured that if you build it as instructed it will work regardless.
It is confusing because the 1/4 plywood piece makes you think it is glued lengthwise over the long block but really it is glued lengthwise over the short block.
One thing's for sure, it ain't rocket science. The drawing may be a tad confusing to some, but about 4 seconds of tinkering around and it'll explain itself to you. A very quick google search and you'll find about 7 gazillion alternative builds for the same idea.
The drawing is fine. The short block, holding the nut, dead ends into the side of the longer block. The thru holes are sized to pass the rods. Use: pass a rod thru a long block then screw it into the short block where it will stop. Then spin the knob down the rod to tighten this side. Repeat three more times.
Log in or create an account to post a comment.
Sign up Log in