Make a Comfortable Slip Seat
Tips for a quick and easy approach to build or replace a chair seat that's strong and cushy.
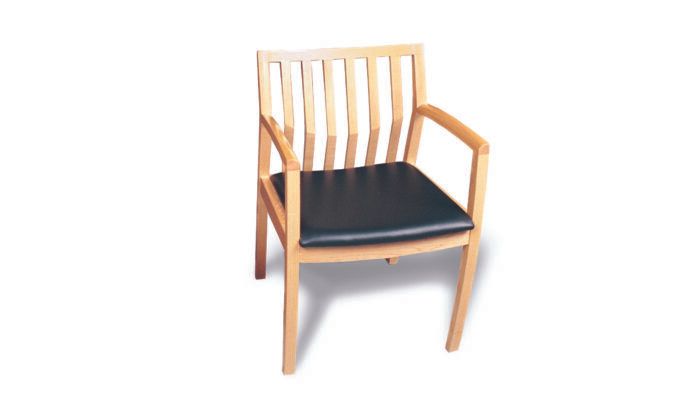
Synopsis: Jim Barefoot says what matters most in making chairs is comfort and strength. He describes how to apply upholstery and advises that beginners be ready to rework it to get the right fit. The seat he explains how to make has a slight curve and doesn’t rest on all the rails, so it has to have strength of its own. In cutting and fitting the core of the seat frame, he laminated the seat in a vacuum press from four pieces of 1/8-in plywood and made a cutout where the tailbone would fall. Then he explains how stretched webbing absorbs and releases energy and eases the load on the foam. Photos shows how to stretch and weave the webbing. He uses foam densities of at least 2.1 lb. per cu. ft. for slip seats and explains how the stiffness is measured and how to order it. Then he lays down some polyester fiber, or quilt batting, over that and stretches the finish cover over it.
I am not an upholsterer, but I design chairs for a living. And I often build and live with the prototypes for several months before finalizing drawings for a manufacturer. As I work out the kinks, what matters to me most is comfort and strength. Whether you’re repairing an ailing antique or building a new chair from scratch, the seat is the point of contact that must absorb considerable stresses.
Many woodworkers are needlessly intimidated by the prospect of applying upholstery. But by using the methods I describe, making a slip seat that is both strong and comfortable can be easier than you might imagine. Remember that you may not get the comfort exactly right on the first try, so it’s important to be willing to rework it. Also, the process will go more smoothly with the right tools and materials.
Cut and fit the core of the seat frame first
The slip seat on the chair I designed shown in the photo above is slightly curved and rests on the front rail, level with the side and back rails. You could just as easily have a flat seat that rests inside the rails all around or on top of all the rails, as it does on many armless side chairs. Keep in mind that you have to be sure you can actually fit the slip seat into place after upholstering it.
Because this seat has a slight curve and does not rest on all the rails, it had to have a strength of its own. So I laminated the seat in a vacuum press from four pieces of -in. plywood and made a cutout in the middle of the seat where the tailbone will fall.
I put corner blocks in the frame of this chair to strengthen it and to provide support for the seat. Using -in. machine screws, I drilled holes in the corner blocks to attach the seat later. I placed the plywood seat on the chair frame and marked it to drill holes for T-nuts to hold the machine screws. I rounded over the sharp front edge with a -in. radius bit so that it won’t cut off circulation to the underside of legs. I also rounded over the cutout edges so that the webbing wouldn’t get cut or worn.
Stretched webbing absorbs and releases energy
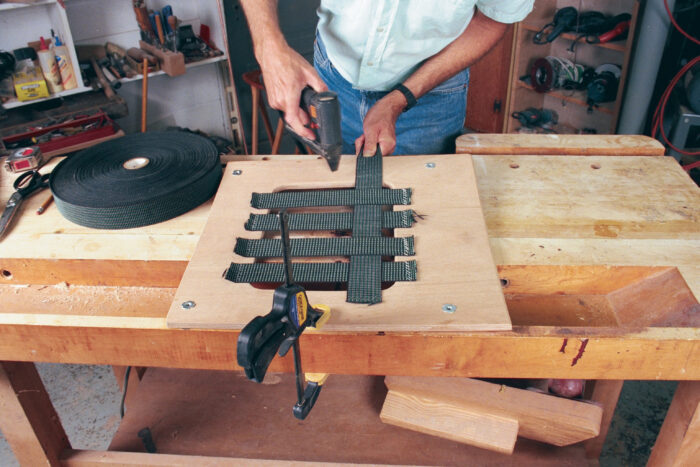
Elastic webbing is the spring system for this seat. I’ve used several brands (Pirelli, Intes, Matrex and Ultraflex) with pretty much equal success. The flexibility in the webbing absorbs most of the energy from sitting down in the chair. This eases the load on the foam, so it lasts longer.
I apply the webbing in a basket-weave pattern, which distributes the load to all the strands, using 2-in.- wide webbing stapled about 3 in. on center. That leaves a gap of about an inch between strands. The foam can easily span that size gap without any problems. You could mark the spacing for the webbing, but I simply eyeball the locations of the first layer and work from there.
Unroll a few feet of webbing, position it on the seat and drive pneumatic staples or tacks into one end. Use enough staples to catch each elastic strand in the webbing. I drive the staples into the webbing at a 45° angle to the weave, using as many as a dozen staples at each end Always clamp the plywood seat to the bench before stretching the webbing, or it can quickly flip up into your face.
Pull the webbing fairly taut until you feel the elasticity stop. Pull the webbing out, then down over the edge to hold it in place. Fasten the webbing with staples or tacks; then release the tension and trim it to length. Repeat across the seat. Turn the seat 90°, and lay the second layer in a basket-weave pattern. Don’t stretch the second layer quite as tight—just enough so it sounds like a drum. You can vary the spring of the seat by adding more webbing or by not stretching it as tightly. Experiment. Try it out by tossing your foam onto the webbing and sitting on it.
For the full article, download the PDF below:
From Fine Woodworking #133
Fine Woodworking Recommended Products
DeWalt 735X Planer

AnchorSeal Log and Lumber End-Grain Sealer
Ridgid R4331 Planer


Log in or create an account to post a comment.
Sign up Log in