Make a Philadelphia Side Chair
Exercise your carving skills as you tackle one of the greatest American chairs.
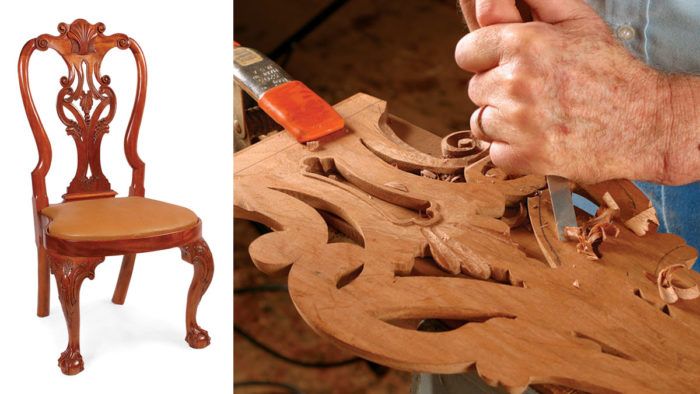
Synopsis: Built around 1760 in Philadelphia, this chair, with its flowing lines and flawless carving, represents the high point of Colonial Queen Anne chair making. From its ball-and-claw feet to the elaborately carved cabriole legs, elegant back splat, and flowing crest rail, everything about this chair conveys a sense of movement. “If you’ve never built a chair or picked up a carving gouge, this is an ambitious place to start, but if you’ve had some experience in either field, I encourage you to tackle this project,” says author and furniture maker Eugene Landon.
Built around 1760 in Philadelphia, this chair represents the high point of Colonial Queen Anne chair-making. The piece has a sense of movement throughout its design, from the ball-and-claw feet to the flowing crest rail with its double volutes. The carving is attributed to a master craftsman whose name is a mystery, but who is known as the Garvan Carver because of several pieces attributed to the same craftsman in the Garvan collection at Yale University.
If you’ve never built a chair or picked up a carving gouge, this is an ambitious place to start, but if you’ve had some experience in either field, I encourage you to tackle this project. Construction is not as hard as it looks and is broken into three phases: the rear formed by the back legs, the crest rail, and the splat; then the front and side rails; and finally the front legs with their attached knee blocks. So find some good straightgrained mahogany, and let’s get to work.
Join the back legs with the keystone; then add the crest rail and the splat
You’ll need mahogany that is 3 1/2 in. thick by nearly 7 in. wide by 37 in. long for a pair of back legs. (If you are building two chairs, you can get four legs out of a 12-in.-wide board.) After you have roughed out the legs on the bandsaw, lay out and cut the blind mortises for the back rail and the through-mortises for the side rails. Shape each leg except for the very top where it will transition into the crest rail.
Cut and tenon the back rail, also known as the keystone because of its shape, and dry-fit it to the legs. Adjusting its shoulders will fine-tune the splay of the back legs. With the distance between the back legs established, you can mark and excavate the three mortises on the underside of the crest rail while it is still a blank. Now bandsaw the crest rail and then carve the shell and the connected spirals, or volutes. As with the tops of the legs, leave the transition areas uncarved until the crest rail is glued to the legs.
The next task is to resaw the curved back splat from a thicker piece and scrollsaw the profile on its face. Although by now the splat is relatively thin, there is still a lot of wood to carve away to give it the maximum three-dimensional appearance. The splat has 1/4-in.-thick by 1/4-in.-deep tenons on the back edge of the top and the front edge of the bottom. The top tenon fits into the crest rail; the other fits into the shoe, a piece of wood attached to the keystone. Neither of the tenons is glued, and the shoe is attached to the keystone with reversible hide glue and a couple of nails. This way, a broken splat can be replaced without damaging the rest of the chair.
From Fine Woodworking #186
For the full article, download the PDF below:
Fine Woodworking Recommended Products

Sketchup Class
Compass
Drafting Tools


Log in or create an account to post a comment.
Sign up Log in