Turn a Windsor Chair Leg
Watch a pro turn this classic leg design, download full-size plans, and build the whole chair using expert advice and how-tos.
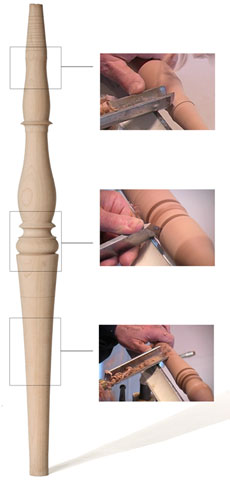
 Watch this video to learn how to turn a Windsor chair leg using a design based on early American examples.
I’ve turned so many legs over the last 25 years that I can turn the vases, coves, beads, etc. by eye using a rough story stick. But since most woodworkers like a precise guide to get started, we’ve published a dimensioned story stick to make things easier. The full-size leg profile is divided into three parts that can be cut out and glued to a backer board.
| Download the Template STEP 1 – Download the PDF STEP 2 – Cut out the strips STEP 3 – Glue to backer board STEP 4 – Story stick is ready to useClick here for the PDF leg template |
Turning by eye
I don’t rely on calipers and dimensioned drawings in turning because I want to train my eye to gauge the shapes and turn curves that appeal to my senses. Freehand turning makes Windsor chairs more individualistic. If you look at original Windsor chairs, the turnings are never identical. Slightly different turnings on a chair are fine. You won’t see the difference.
Wood to use
I hand-split the leg blanks out of a log using traditional methods. I trim them down a bit on the bandsaw and rough-turn them round to fit easier in the lathe. Then I set the blanks aside to dry until it’s time to mount the blank and start turning. Or, you can buy blanks that are already roughed out and dried. Get blanks with a 2-in. diameter.
 Leg design
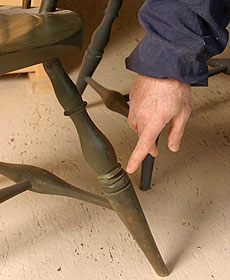
The baluster leg design I use is not the earliest Windsor leg version. They started out with bulbous turnings and a ball at the foot. To cut costs and make the chairs more quickly, chairmakers slimmed down the style and made the lower part of the leg a straight cylinder. Then the design slowly transformed to a straight taper at the end, which made it just a bit more attractive.
Windsor chair history
The Windsor chair was born in England but soon morphed into a truly American style. The earliest colonial design most likely started in Philadelphia with the comb-back chair, followed by the sack-back chair that was introduced around the 1760s. After the Revolution there were fan-back chairs, continuous-arm chairs, and more. The post-Revolution chairs were unique because the industrial era was beginning and production was increasingly streamlined to make things cheaper and faster.
The details of a Windsor’s style give clues to its provenance. For example, the continuous-arm chair was developed in New York and the design wasn’t made farther south, such as in Philadelphia. Leg turnings also give hints about the chair’s origin. Rhode Island turnings, for example, generally had more pronounced curves.
Making the leg and a chair
Use this video demonstration of an early American example to learn techniques for your own baluster legs. As you get more comfortable, you can abandon the story stick and create curves that are pleasing to you. Then you can build a chair from the legs up using other Fine Woodworking articles for the other chair components. Adapt these baluster legs to Harriet Hodges’ Bowback Windsor, for example. Use Dan Faia’s daring recipe for an antiqued milk paint finish. Or learn all about milk paint from Windsor guru Michael Dunbar.
Photos: Matt Berger and Gina Eide


Log in or create an account to post a comment.
Sign up Log in