Modern Adirondack Chair
Tom McLaughlin builds a comfortable, contemporary take on the classic backyard chair.

Synopsis: With solid, reinforced joinery, subtle angles throughout, and an uncommonly comfortable seat, this Adirondack chair is more challenging to build than the traditional version, but it is more than worth it. After all, this is a chair that you’ll be relaxing in for years—not just because it’s built to last, but because it’s built for comfort. Tom McLaughlin uses templates to rout the curved pieces, and several clever jigs to make it easier to cut the joinery.
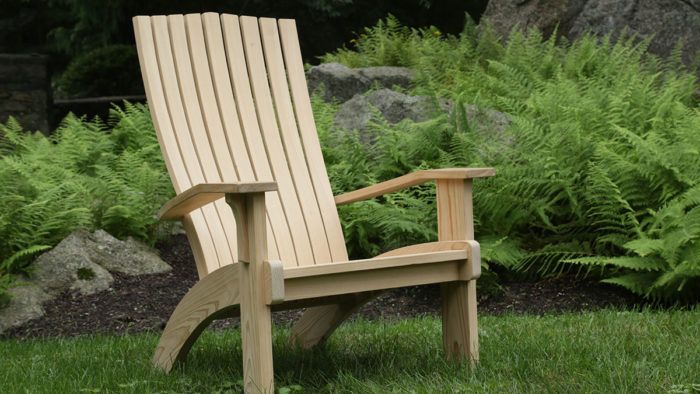
Great for kicking back with a drink and lazing the time away, Adirondack chairs are pretty common on decks and patios and in yards. But they’re often uncomfortable to sit in and hard to get out of, unsightly affairs made either of molded plastic or boards screwed shoddily in place. My version fixes those faults. Built to withstand years outdoors, it’s made of cypress and constructed with solid, reinforced joinery. As for the design, subtle angles echo throughout, including on its arm, which is canted to provide both comfort and a perfect spot for a beverage. And how does it sit? Well, a number of people have remarked, “It’s so comfortable, and I can actually get out of it!”
Detailed digital plans are
available for download here
Start with a full-size drawing and templates
Chairs with curves and angles like this are best made using a full-size drawing, which makes it easy to create accurate templates, precisely locate the mortises, and confirm the various dimensions and angles, which can all shift a bit during a build.
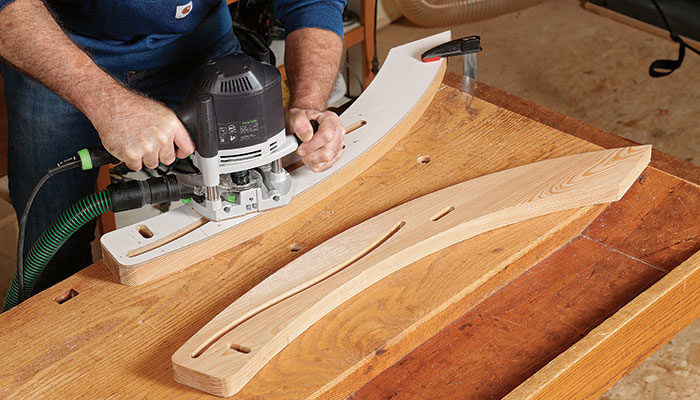
The main routing template is for the side rails, which also serve as the back legs. The template has guide slots for routing the seat rail mortises and the long, curved groove for the seat slats. To rout the guide slots for the rail mortises, clamp a straightedge to the template and use a 5⁄8-in. bit and 3⁄4-in. guide bushing (later, you’ll use a 5⁄8-in. bushing and 1⁄2-in bit to cut the mortises). To plunge-rout the guide slot for the seat-slat groove, make a second, curved template. Tack it to the main template to rout the guide slot.
Curved side rails and front legs use router joinery
The chair’s side rails, which are dadoed into the front legs, each have two mortises for the front and back rails, as well as a winding groove for the seat slats. Before cutting the joinery for these, bandsaw out and fair the parts. Then tack the template to the inside surface of each side rail. Plunge-rout the mortises and slot.

Marking the dado on the front leg where the side rail is let in can be tricky because of the curves, so I recommend using a registration jig that will accurately position and hold the pieces in place. You’ll use the same jig during assembly.
With the parts in place, use a sharp marking knife to scribe the curved shape of the side rail across the inside of the front leg. Rout to just shy of the knife lines. I draw a pen line 1⁄16 in. inside the knife lines to make it easier to see where to rout. Then I chisel cleanly to the knife lines. The top of each front leg is mortised for a slip tenon using a template and plunge router. This tenon will join the leg with the arm.
After routing the mortise, glue and screw the side rails to the legs using rustproof screws and waterproof glue, which you should use throughout the project. The registration jig again helps here.
 To view the entire article, please click the View PDF button below.
From Fine Woodworking #273
More on FineWoodworking.com:
- Classic Woodworking: Contemporary Adirondack Chair (104) by Tom McLaughlin
- Adirondack Chair by Tom Begnal #192–July/Aug 2007 Issue
- The Lutyens Garden Bench – by Tony O’Malley #143–July/Aug 2000 Issue
- 3 Outdoor Chairs–3 designers, 3 approaches, 3 pieces to choose from
by Michael Fortune #212–May/June 2010 Issue


Comments
I have really enjoyed building this project. It is the most comfortable outdoor chair I have ever used and a delight to look at and sit in.
The template work is sufficient to make it well worth planning on a pair of chairs. Mine worked well in Western Red Cedar though care is needed to ensure the grain direction is the same as in the original to avoid splinters!
I did not buy the printed plans as being in New Zealand I did not want to wait for them to arrive. The online plans from Rough Cut and the magazine contain a number of errors though which I hope are not copied into the original.
The ones I notes were the compound angle for the lower back brace - I use 1.4 degrees not 14 degrees and was glad I had made a test piece first! The back slats are 3/4 inch as per the video not 1/2 inch per the cutting list. It is better to fit the seat slats one at a time.
I missed off the rear arm support piece as with 8 decent size screws it seemed surplus to requirements. Here's hoping...
Thank you so much for this great project.
The link to the plans is broken. I'm trying to also figure out my account - I thought plans would be free.
Same for me, I am trying to see where I could get the full size plan for this chair. Is there somebody reading/answering to those comments. If somebody is able to tell me where I can get the CD of the show and the full size of the plan, it would be appreciated. Thanks
We had to take them down because of the lawsuit. You might want to look on Tom McLaughlin's website.
Did you put them back up? I have printed off copies of the plans and the article.
Greg Slaton -Atlanta GA - I could not find the plans here but they are available at http://www.epicwoodworking.com click on plans and you can order just the plans ($27.00) and/or access to the video for an additional fee.
Maybe mention the plans aren't available here?
I had a good time building this design. The chair is really comfortable. Be careful, because the plans do not completely agree with the FW article in terms of dimensions. Makes it a little more challenging. For future versions, I think I will change the way the slats are attached (pinned with nails). I don't like using that technique for outdoor furniture.
I have spent the afternoon drawing up full scale plans based on the images in the PDF and m stuck with the curved slot(s) for the seat slats. I began trying to make a 600% enlargement of the side profile. This seems exactly right for creating a 2" x 2" grid pattern. The height of the front legs and the front to back length (overall) also looks correct. The difficulty is the overall length of the curved slot of the seat slats. The enlarged photocopy measures our to about 17 3/4" rather than the 16 13/16 indicated on the drawing. Anyone know what is screwed up? - The drawing or the dimension on the drawing?
Horizontally, the groove does measure at 16-13/16 as per the plan. If you measured generally along its length (straight line from one end to the other) it is more like 17-1/2 in. I would expect as long as your seat slats don't come out the front or run into the back rest you should be fine.
Thanks for this response and you are dead on. Now I'll feel safe (at least reasonably safe) making sawdust from some beautiful low country cypress.
Being in western Canada I chose to make this out of local cedar. As another poster mentioned, a bit of fun blowing up the drawing to the right scale. And some parts of the free plans, well, look at them three times, measure twice, cut once, but I didn’t find any errors and mostly went from the magazine article. Really amazing they can pack in all the measurements and details, kudos to the team. I ordered enough wood for three so can enjoy the efficiency of having the templates at the ready. Very rewarding to put it together finally and sit in it. I decided to put an oil stain on it, looked too nice to let it weather away.
We need a "like" button. That's beautiful, da3thoms. I'm not sure I'd put that outside if I had it. Excellent work.
I built this chair according to the plans and find the end product beautiful to look at. However, it was not nearly as comfortable to sit in get out of as I expected. Had a couple of friends come over who agreed with me that the design needed more tweaking. After a bunch of trial and test sits we all agreed that the front needed to be raised by about 1" and the rear need to go up by 2". We have now built 3 of these modified design versions for sale through the Habitat for Humanity ReStore. Our group of volunteer woodworkers are now struggling to keep up with orders. If you've made one of these with the plans in FWW, place 1" and 2" blocks at front and back then try it for yourself. The difference in feel is amazing while the look is almost identical.
Log in or create an account to post a comment.
Sign up Log in