Filling Pores
Applying grain filler on hardwoods will result in a smoother finish.
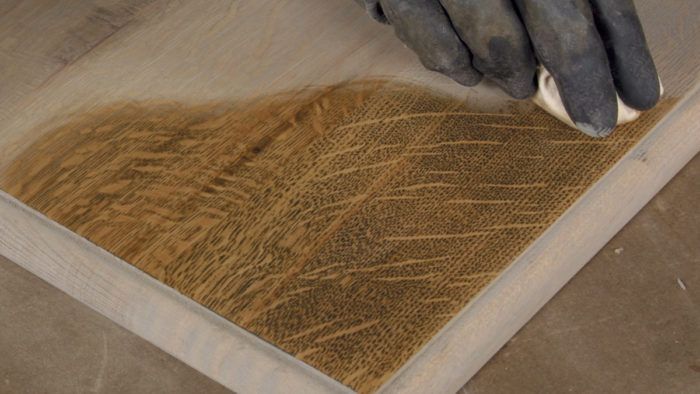
When finishing hardwoods, you have the option of leaving the pores open or filling them. Although it’s an optional step, filling the pores can create an elegant, glass-smooth surface in the final finish. In this section, I’ll discuss the aesthetics of pore-filling and the various techniques involved in achieving the look you want.
 To Fill or Not to Fill
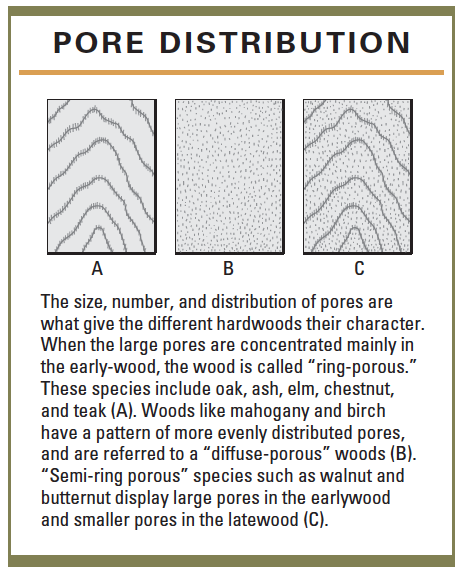
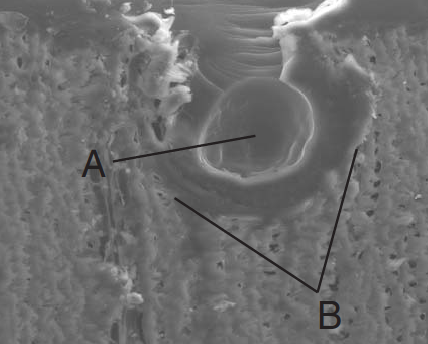
Pores are the result of vessels that conduct sap in a living hardwood tree. (Softwoods are “nonporous.”) When a board is milled from a hardwood tree, these vessels are cut open at various angles, exposing the channels we call pores. Finishers generally differentiate between hardwoods by calling them “open-pored” or “closed-pored” woods. Open-pored woods such as oak and ash exhibit large-diameter pores that result in a rough texture on the surface of the board. Closed-pored woods such as maple and cherry have a smoother texture, although pores are distinguishable if you look closely. The distribution of the pores also has an effect on the appearance of the wood.
You certainly don’t have to fill wood pores for finishing. An open-pored finish has a natural, unsophisticated look that is perfectly fine if you want to retain the sharp, crisp delineation of the pore outlines. (See the sidebar below.) However, a filled-pore surface adds a refined, elegant look to a piece of furniture. Plus, if you want a mirrorlike buffed-gloss finish, you’ll have to fill the pores; otherwise the tiny craters break up the surface, preventing the smooth, flat plane that defines a true gloss finish. You can also use thinned pore filler to partially fill the pores, creating an appearance somewhere between the other two.
| Open-Pored Finishes
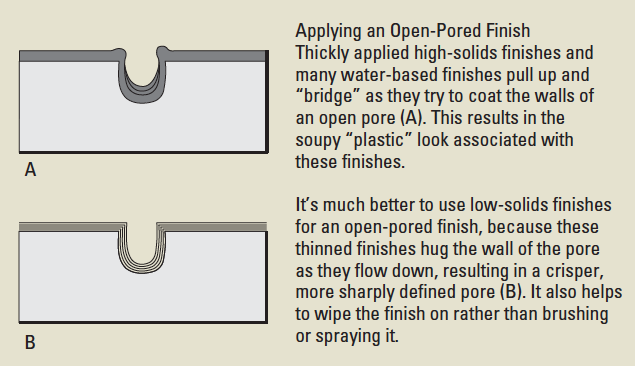
You don’t have to fill the wood pores for an attractive finish. In fact, many woodworkers prefer the “natural” look of an open-pored finish for some projects. In these cases, the choice of finish is critical to achieving a nice crisp look around the edges of the pores. Open-pored finishes are best created by wiping on the finish, which pushes it into the pores. The best open-pored appearance is obtained by using thin finishes such as oil, an oil/varnish blend, or shellac. If you choose to spray instead, it’s wise to work with low-solids finishes, like shellac and lacquer. High-solids finishes like conversion varnish or most water-based products tend to “bridge” the pores, creating the look of an incomplete fill. If you want to use these high-solids products, you can usually improve their appearance by thinning them, adding a retarder, or applying a lighter coat. When using water-based finishes, it can also help to apply a “slush fill” of thinned water-based filler to the pores beforehand.
|
There are two approaches to filling pores. One is to apply several coats of a suitable finish, then sand the surface flat. The other is to fill the pores with paste wood filler before finishing.
Filling with Finish
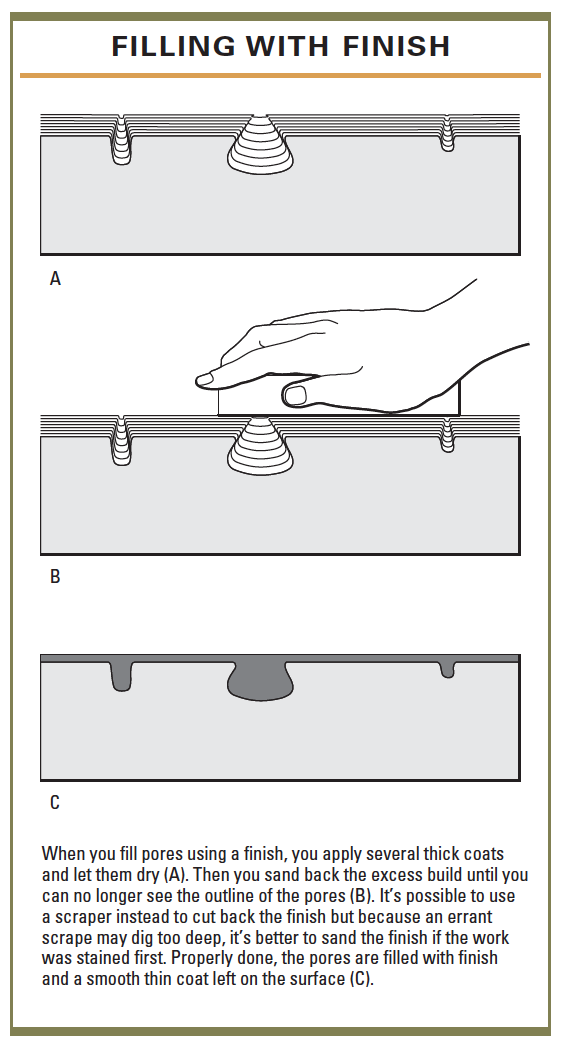
Filling pores with finish involves applying enough coats of an appropriate finish to fill the pores. There’s no need to sand between coats. After the finish dries, sand it level until the surface is uninterrupted by pore craters. Although you can use a scraper to cut back the finish, it’s safer to sand a stained surface rather than risk cutting through to bare wood with an errant stroke of the scraper.
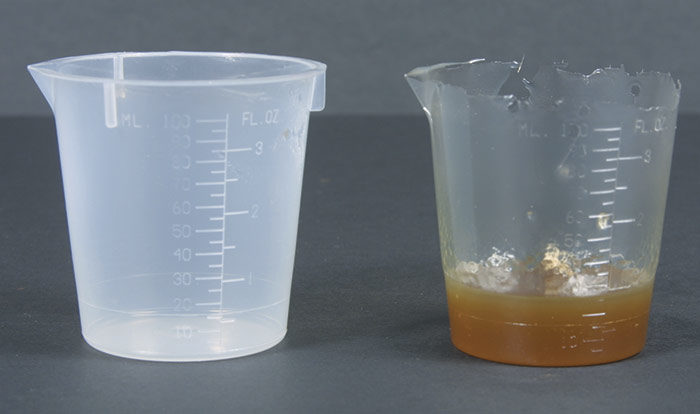
Only certain finishes work well for pore-filling. In years past, filling pores with low-build finishes like lacquer and shellac was very time-consuming. To make matters worse, these finishes invariably shrank down into the pores over time. Fortunately, modern high-solids finish resins allow faster fills with minimal shrinkage. The best products to use are tough thermosetting resins like polyester, urethane, and epoxy. Of the two, polyester and 2K urethane are typically used for spraying and are available from specialty suppliers. Polyester works best because it is nonshrinking and the hardest of all the finish resins. After sanding, it can be top-coated with other finishes. It is also heat-resistant, so it won’t be softened by the heat generated from buffing out the final finish. That said, conversion varnishes, catalyzed lacquers, alkyds, urethanes, and thermosetting acrylics can also be used.
Filling with Paste Wood Filler
Instead of filling pores with finish, many shops use paste wood fillers. These products are widely available, easy to apply, and well suited to use by both professionals and novices. Paste wood fillers are available in various formulations, although all are used in a similar manner. They are applied to the surface of the wood and worked into the pores. Afterward, the excess is removed by wiping and/or sanding. Because paste wood filler doesn’t always fill pores completely, it’s often necessary to apply several coats of finish on top of the filler to completely fill the surface before applying top coats of finish.
The ideal paste wood filler would work easily into the pores and not dry too fast. You would be able to easily wipe the excess from the surface without removing the filler from the pores. The final product would become as hard as a rock without shrinking. But that’s asking a lot. At best, most paste wood fillers compromise some features in favor of others, as I’ll discuss. The various formulations of paste wood filler can be divided into two basic categories: oil-based fillers and water-based fillers.
Oil-Based Paste Wood Fillers
Oil-based paste wood fillers are composed of binder, a bulking pigment, and solvent. The oil or alkyd binder determines the filler’s handling characteristics and drying time. It’s also what locks the filler into the wood pores. The translucent bulking pigment, which prevents shrinkage, consists of fine silica or a quartz-silica mineral. It constitutes about 65 percent of the filler’s total weight. Solvent adjusts the viscosity of the filler and affects how soon the product can be wiped clean. Colored fillers additionally contain colored pigment.
I typically prefer oil-based fillers because they’re easier to control than their water-based cousins, especially in subtle coloring situations like matching a finish. Oil-based fillers are commercially available in either “natural” or colored versions. “Natural” is actually an off-white, putty color to which you can add your own colorants.
Preparing Oil-Based Fillers
Not all paste wood fillers are ready to use straight from the container. Some may need to be thinned, and some may require additional color to suit your purposes.
For proper application, a paste wood filler should be the consistency of heavy cream. If necessary, thin a premixed filler with mineral spirits or naphtha. Naphtha will make the filler dry faster, which may be desirable for a small project. However, if you’re likely to need more “open” time in which to apply and wipe off the filler, use mineral spirits. Always thoroughly stir filler immediately before use, as the bulking agent and pigment tend to settle to the bottom of the container.
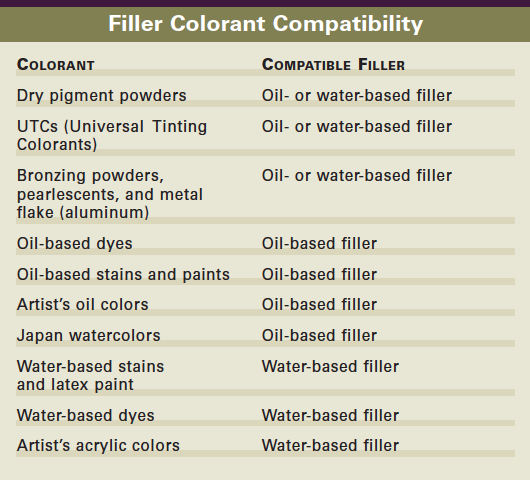
If your workpiece is to be stained, you also have the option of adding oil-based stain to the filler in order to simultaneously fill and stain your project. However, because liquid stain will thin the filler, it’s best to use a concentrated colorant, which won’t affect its consistency. You can use any colorant that’s compatible with the filler—dry pigment powder, artist’s oil colors, UTCs, or Japan colors. Simply stir the color into the filler. When using thick, pasty colorants like artist’s colors, thin the color with a bit of mineral spirits or naphtha first.
Applying Oil-Based Fillers
You can apply the filler to bare wood or sealed wood. In many cases, it’s fine to apply it to bare wood, rubbing it into the surface, then wiping away the excess as described below. However, sealing the wood before filling it can result in a surface with a more distinct contrast between the filled pores and the intermediate wood. Sealing before filling also provides more control over filler application, because filler will wipe more easily and evenly from a sealed surface. The amount of sealer you apply also helps control the amount of color imparted to the surface when you’re using colored filler. For example, a thick sealer coat will completely seal off the wood surface, allowing filler into only the pores. On the other hand, a thin sealer coat will allow some of the color from the filler to stay on the surface.
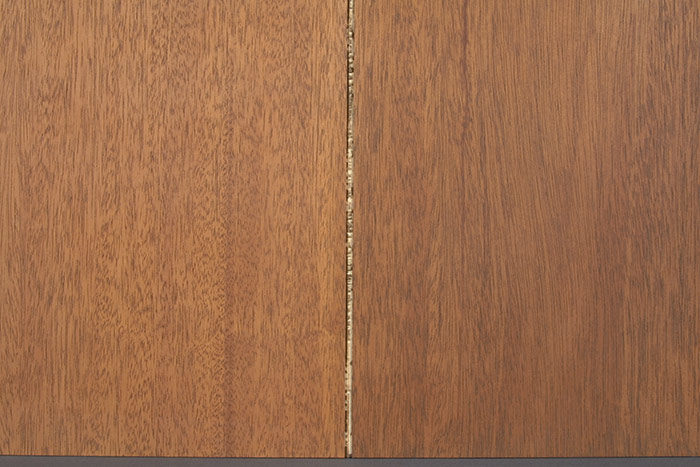
You can use any sealer as long as it’s compatible with both the filler and top coat. Dewaxed shellac is one of my favorites because it’s widely available, compatible with all finishes, dries fast, and seals well in a thin film. It can also be used as a sealer and barrier coat when you’re using oil filler with water-based top coats. Thinned lacquer works for lacquers. Specialty sealers like vinyl work for conversion varnishes and lacquers. If you’re in doubt, a thinned version of your finish will work.
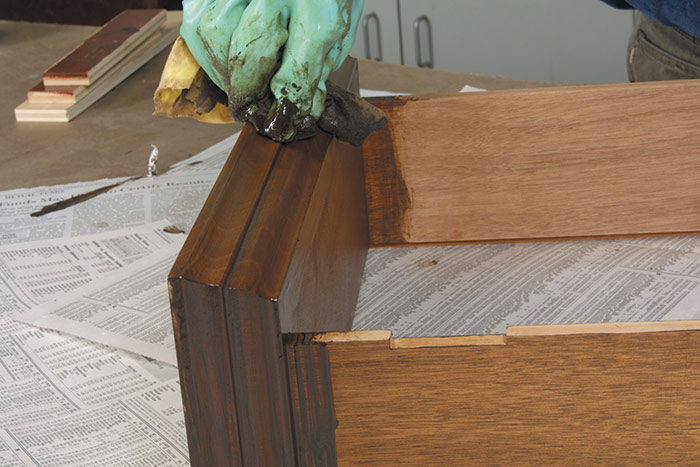
When preparing the sealer, I like to aim for a solids content ranging from 7% to 10%. For shellac, this means mixing up a 1/2-lb. to 3/4-lb. cut. I’ll typically cut sanding sealer or vinyl sealer 50-50 with thinner. Apply the sealer with a brush or spray gun. After it dries, lightly scuff-sand it smooth with 320-grit sandpaper.
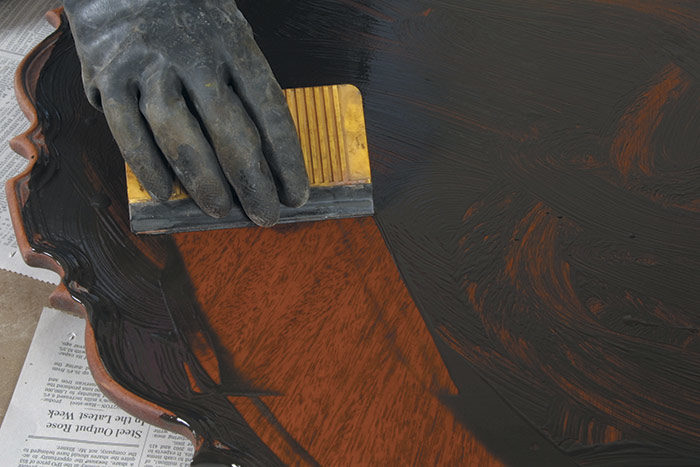
Although you can spray filler, I find it easier to apply it with a brush, packing it into the pores using a coarse cloth like burlap. Alternatively, you can push it into and across the pores using a squeegee or rubber scraper. The idea is to drive the filler into the pores at the same time that you are removing the bulk of the excess.
Wait until the residual filler on the surface turns hazy, which indicates that the majority of the solvent has flashed off but the surface residue is still moist enough to wipe. Using a clean cloth or piece of burlap, lightly wipe the surface to remove all traces of residue while leaving the pores filled. Allow the filler to dry overnight, then perform a second application if necessary. After filling the surface as described, I sand it with 320-grit sandpaper before applying a finish.
TIP: On some coarse woods like mahogany, you may get better results from filler by initially applying a “slush fill” of highly thinned filler for the first coat, then following up with an unthinned coat.
Most oil- or solvent-based finishes can be applied directly over oil-based paste wood filler without a problem. However, when using a water-based finish, it’s wise to first apply a sealer coat of dewaxed shellac over the filled surface to prevent adhesion problems. If you’re using lacquer as a top coat, avoid applying it too thickly, as its solvents can soften and wrinkle the dried filler. To counter this when applying lacquer with a brush, seal the surface first with shellac. If you’re spraying the lacquer, simply apply the first several coats as light “mist” coats. When you use conversion varnishes, catalyzed lacquers, and other two-component finishes, you may apply a vinyl sealer coat over the filler to prevent any possible adverse reactions with the top coat.
Water-Based Fillers
Water-based fillers have the same basic constitution as oil-based fillers, except that the solvent and the oil-based binder in the latter have been replaced with water and a water-compatible resin. Water-based filler formulations allow the manufacture of totally transparent fillers, as well as “natural” off-white and pigmented fillers. Several formulations are available as a transparent gel that will dry water-clear.
Water-based fillers have both advantages and disadvantages when compared to oil-based fillers. On the plus side, you can use solvent-based stains like alcohol dyes and NGR stains over a dried water-based filler, whereas this isn’t possible with oil-based fillers, because the stain doesn’t bite into the oil-sealed surface. Water-based fillers are also much easier to sand and can be top-coated with any finish without risking adhesion problems.
On the downside, water-based fillers dry so fast that it’s very difficult to apply the filler and wipe it off cleanly in time. These fillers also stick to sealer coats, so it’s impossible to remove them from the surface of sealed wood without removing the sealer. And finally, because they are water-based, they may raise the grain of the wood in use.
Applying Water-Based Fillers
Because of its fast dry time and its habit of adhering to sealers, the best way to handle a water-based filler is to brush it directly onto bare wood, then quickly wipe off as much of the excess as possible with a rag or a squeegee, and let the filler dry thoroughly. Afterward, sand the excess filler level to the surface of the wood. The filler is dry enough to sand when it powders easily. Humidity extends the dry time, but at 50% to 60% relative humidity (RH), water-based filler should be dry enough to sand in two hours.
Most water-based fillers are ready to go from the can, but you can add small amounts of water, up to 10%, to adjust the viscosity if necessary. This speeds up the dry time. To slow the dry time down, add retarder, if available from the manufacturer, or propylene glycol. (Five percent is a good starting point.)
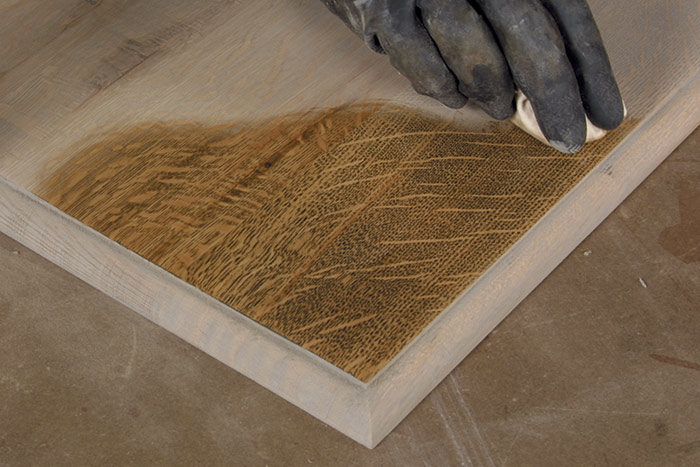
You then have the option of staining, as long as you do it within 12 hours after sanding and use a stain that is based on alcohol or glycol ether. This includes alcohol and NGR dyes, fast-drying pigment wiping stains, and many water-based stains, provided they contain solvents in addition to water. To see if the stain will take, wipe some on the dry, filled surface. If the filler changes color or deepens, it indicates that the stain has enough “bite.”
Colored versus Natural Fillers
To achieve certain effects you need to use the proper filler—whether colored or “natural.” And particular special effects require the right choice between water-based or oil-based fillers. Keep in mind that the finish you put over the filler affects the look. Following are some general guidelines.
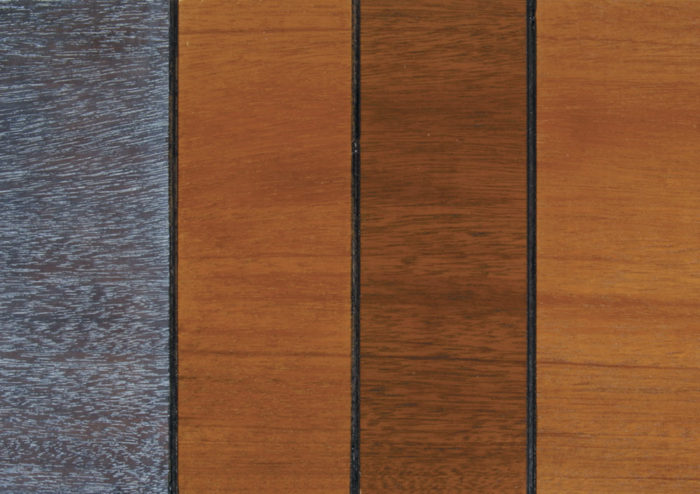
Colored oil-based fillers
To make the wood natural looking, apply natural filler to the bare wood. The wood color will deepen from the binder, much as it would if you applied an oil-based product. The binder may yellow over time, so it may not be advisable to use natural filler on very light woods like ash.
To stain the pores and the wood at the same time, apply filler mixed with stain to the bare wood. This takes some trial and error to get the color right, and you’ll have to practice on samples. This technique usually accentuates the pore structure.
To de-emphasize the pores by making them the same color as the rest of the wood, seal the wood, then apply filler that matches the natural color of the wood in the intermediate areas between the pores.
To accentuate the pores by contrasting them with the color of the wood, first stain the wood to the color you want, or leave it unstained. Seal the wood, then apply a colored filler that creates either a lighter or darker contrast with the wood.
The photo below shows the effects of the above techniques.
Colored water-based fillers
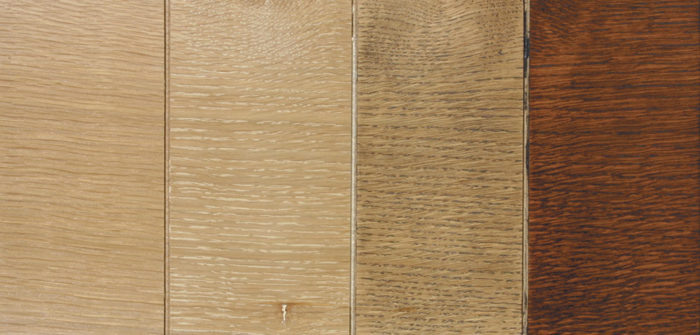
To blend in the pores with the surrounding wood, apply natural filler or filler colored to match the wood. Natural water-based fillers dry to a chalky, off-white color that may have to be tinted on light woods, as well as darker woods like mahogany and walnut.
To make the wood look completely natural, use transparent filler. To make the pores darker than the color of the wood, apply a dark brown filler and sand off the excess when dry.
To color both the pores and the intermediate areas, use a solvent-based dye (alcohol or NGR) to color the wood. The dye will deepen the color of the filler while staining the nonporous areas of the wood.
The photo below shows the effects of the above techniques.
 Sprayed Polyester
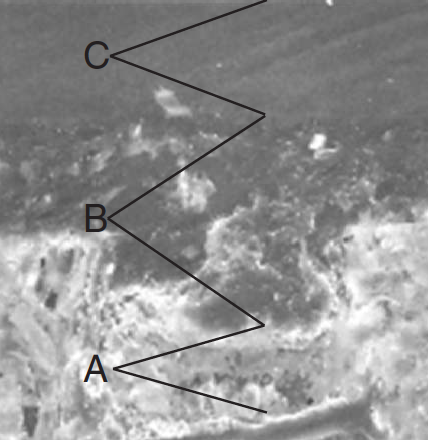
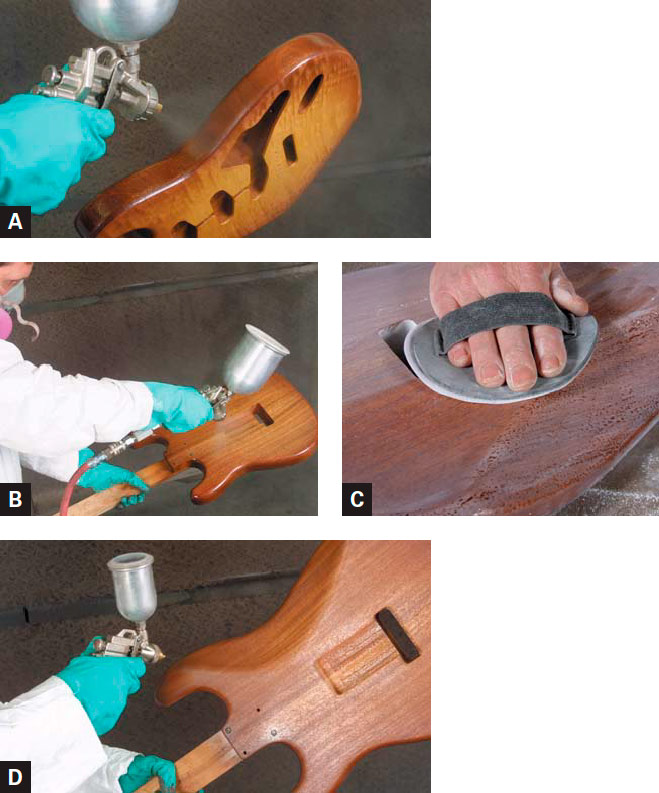
Over a stain or certain woods, it’s advisable to first apply a catalyzed urethane barrier sealer called an isolante. Spray the barrier coat, let it dry about two hours, then apply your first polyester coat (A). Spray in a cross-hatch fashion.
Polyester is sprayed “wet-on-wet,” meaning you apply each subsequent coat before the prior coat has cured. Touch the previous coat with your finger. If it’s still liquid, wait. If it feels sticky and you can see a fingerprint, you’re ready to shoot another coat (B). After three applications, most surfaces should be filled enough to sand back the excess.
Wait 12 hours, then sand the polyester until the outlines of the pores are no longer visible (C). Sand-throughs are common with this technique. Correct them by using a small touchup gun to replace color (D).
 Clear Varnish
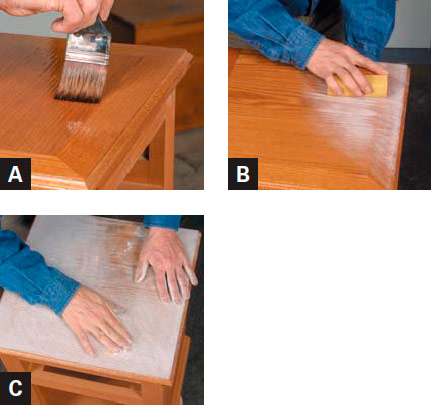
If you want to apply finish by hand to fill the pores, the best low-tech method is to use a varnish with a solids content that exceeds 40% of the finish by weight or volume. Brush on three to five coats, waiting for it to dry between coats (A). After the last coat has dried enough for the sandpaper to powder it, you can sand the surface level, using a flat block (B). After several passes with the block, switch to a folded piece of sandpaper (C). You’re done when the outlines of the pores are no longer visible in backlighting.
 Filling and Staining Simultaneously
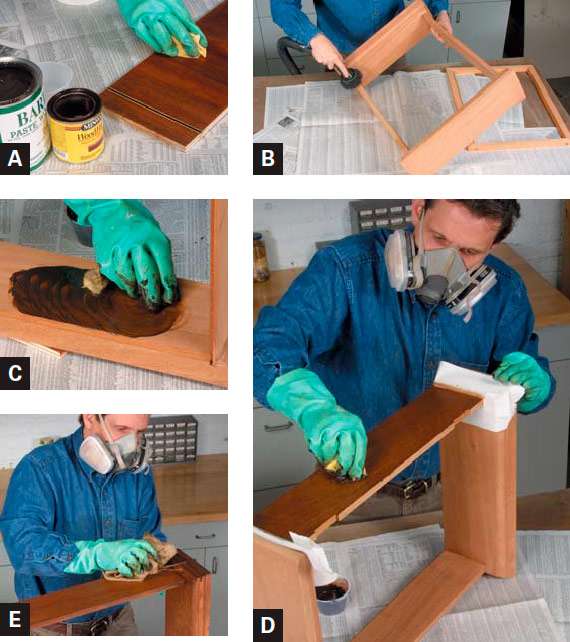
If you wish, you can simultaneously stain and fill the wood pores by applying colored filler to bare or washcoated wood. To get a redder tone, add a compatible premixed stain to the filler (A).
Remove all dust from the pores of your project (B). Then use a piece of cloth to “pad” the filler into the pores using a circular motion (C). On small workpieces, it’s possible to apply the filler all at once, but if the filler is drying too fast, you can always tape off more manageable sections (D). As soon as the filler hazes, use a piece of burlap to clean the residual filler from the surface (E).
 Filling after Staining
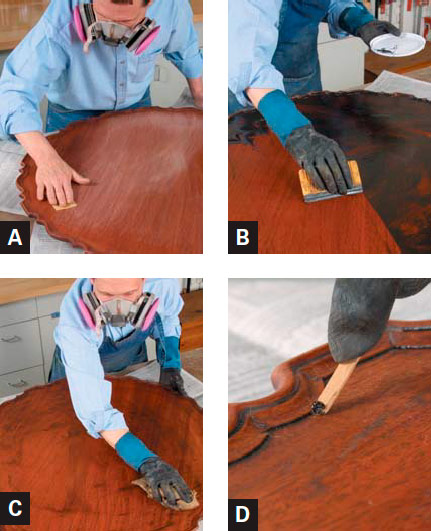
Stain the wood, then apply a sealer to lock in the stain and to prevent the filler from coloring the wood. Lightly sand the filled surface (A), then remove the dust. Next, apply the filler evenly with a brush, then immediately take a rubber squeegee, credit card, or piece of cardboard and scrape the excess filler off, moving in the direction of the grain (B). Scrape the filler off the edge and periodically clean the excess filler off the squeegee blade. After the filler hazes, wipe any remaining filler off the surface of the wood with a piece of burlap or cheesecloth. Wad the burlap and wipe the surface, moving across the grain this time (C). For moldings and intricate areas, use a piece of soft wood to pick out the filler (D). When you’ve removed all the excess filler, wipe the surface in a figure-eight pattern. Sand it lightly with 320-grit sandpaper.
 Water-Based Pigmented Filler
Because of its fast dry time, it is best to apply water-based filler to bare wood and sand the excess. Using a brush, roller, or spray gun, apply the filler liberally to the surface of the wood (A). Immediately squeegee the excess off, moving in whatever direction you want (B). (It’s not necessary to scrape in the direction of the grain.) Then wipe off as much of the filler as possible using a clean rag dampened with water. The filler is ready to sand in several hours, or when it powders easily when you sand it. If it gums up, let it dry longer. I sand flat parts using 220-grit sandpaper on a random orbit sander (C) and sand moldings by hand (D). You’re finished when you can see clean grain but also see filler in the pores.
[VARIATION] If you don’t want the filler to color or change the natural appearance of the wood, use a transparent water-based filler.
 Plaster of Paris Filler
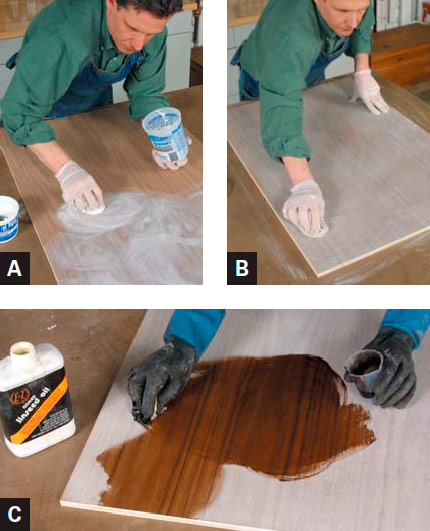
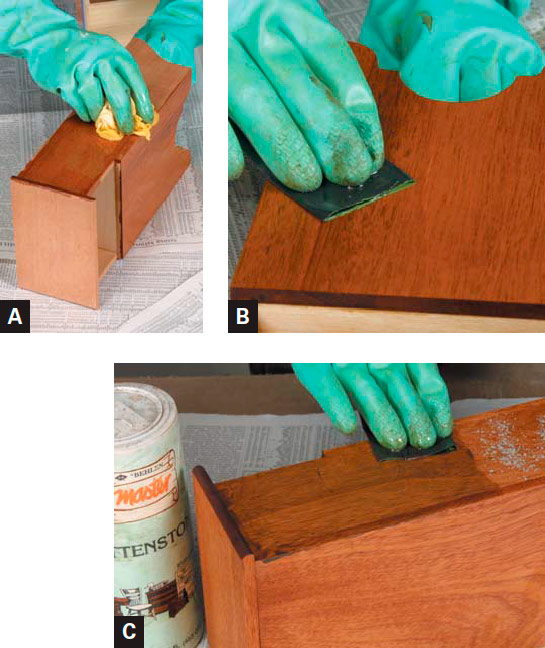
Plaster of paris is a great low-tech product you can use to fill pores. It’s the traditional method used in Britain for French polishing. Make up the filler by mixing water and plaster of paris until you have a fairly stiff consistency. Work it into the pores of the wood with a cotton cloth using a circular motion (A). Once you’ve covered the entire surface, let the plaster sit until it feels dry, then wipe off some of the excess with a dampened cloth (B). Let it dry overnight, then sand it with 220-grit sandpaper. You can then apply clear boiled linseed oil, or color the oil with dye to darken it, if desired. Note how the chalky surface turns translucent with the application of oil (C).
 Oil Slurry Filler
An easy and classic way to create a partially filled surface is by wet sanding an oil-type finish into the pores. Begin by wiping a generous coat of boiled linseed oil, tung oil, Danish oil, or an oil/varnish mix into the wood (A). Wipe it off after 15 minutes or so, and let it dry overnight.
The next day, apply another coat, this time wet sanding it in a circular motion with 600-grit wet/dry sandpaper (B). The idea is to create a slurry of sawdust, dried finish from the previous day, and new finish, and work it into the pores. Wipe the excess off after it has set for 30 minutes but before it becomes too tacky to remove. If you want to add just a hint of color to the pores, you can sprinkle some rottenstone on the surface and wet sand it into the pores along with the oil (C). You can add more coats if you like, or stop here for a natural look. If you wish, you can top-coat with a harder finish that has been thinned. For example, you can use a 1-lb.-cut of shellac, a thinned lacquer, or a varnish cut 50-50 with thinner.
 Slush Fill
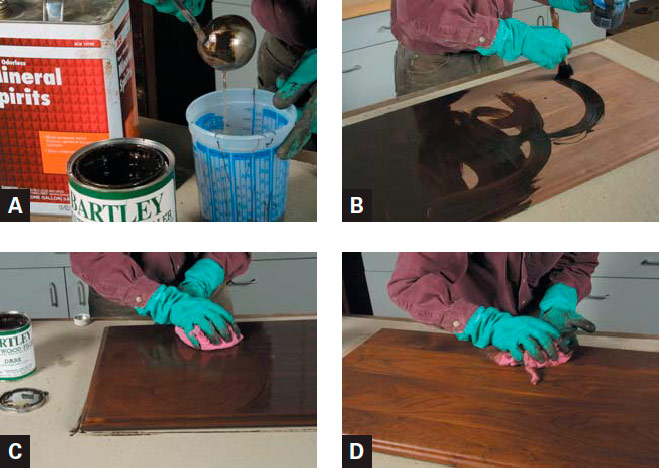
A single application of thinned filler will create a partially filled appearance. If you use a dark filler and don’t want to color the intermediate wood surface, seal the wood first, then sand it with 320-grit sandpaper. Thin the filler to the consistency of cream using mineral spirits or naphtha (A). (This is typically a one-to-one ratio of filler to solvent.) Work the filler into the wood pores using a brush (B). Then pad the filler into the pores using a rag and working in a circular motion (C). The filler will haze in 15 to 30 minutes, depending on the thinner used. At that point, clean the excess off the surface with a clean wadded rag (D).
Fine Woodworking Recommended Products
Diablo ‘SandNet’ Sanding Discs
Osmo Polyx-Oil




Log in or create an account to post a comment.
Sign up Log in