Dress Up Your Furniture with Surface Carving
Learn the right tools, techniques, and patterns to use when adding carving to a piece of furniture.

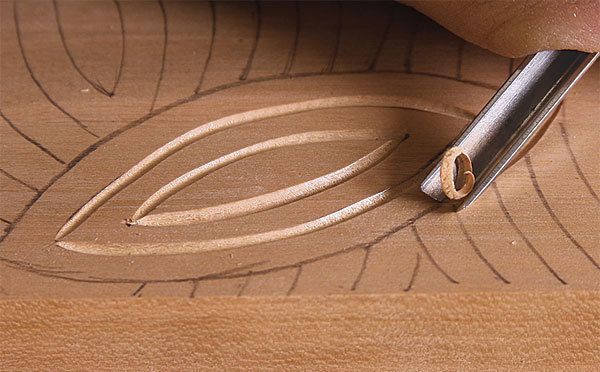
Synopsis: Walk past a piece of furniture with surface carving, and the light dances on and off the carved surface, creating highlights and shadows that are in motion from every vantage point. That’s the allure of carving for Michael Cullen, who uses it on his furniture. Drawing inspiration from the world around him, he favors simple, repetitive patterns that mimic raindrops, ripples in the sand, and plant leaves. Here, he explains the right tools, techniques, and patterns to use when adding carving to a piece of furniture.
from Fine Woodworking #221
Surface carving adds depth and richness to any piece. But what intrigues and excites me most is repetitive patterns and texture, and the dynamic quality they bring to furniture. Walk past a piece with carving, and light dances on and off the carved surface, creating highlights and shadows that are in motion from every vantage point. Although this may sound dramatic, the effect tends to be subtle: It intrigues and suggests, inviting the eye to further inspect and enjoy the piece.
What draws me to this particular style of carving, as opposed to more traditional period designs, is the informality of both the execution and the product. Surface carving is simultaneously irregular and regular. Inconsistency is apparent in the individual cuts and yet the overall pattern is predictable and consistent. I’ll take you through my process, from design to finishing. I’ll cover a clear finish in this article, and you can turn to Finish Line (pp. 90-93), to learn how I enhance the carvings with milk paint.
A good design is simple but not perfect: My inspiration comes from observing everything in the environment: an old fence, the bark on a tree, even the pattern in a box of nails. Beyond inspiration is whether the pattern will translate well to surface carving. Simple patterns are best because the repetition is easily discerned. If a pattern is overly complex or “muddy,” the eye becomes confused.
Another aspect of a successful pattern is a combination of irregularity and regularity. Inspect a pine cone, and you’ll see that the shapes of the individual segments and the spaces between them are unique, yet the whole pattern appears uniform, with both flow and life.
The right tools and materials: Good carving woods are those that render crisp lines, don’t tear out, and hold together under the force of the gouge. Avoid open-grain woods such as oak and ash since that characteristic can compete with the pattern.
Whether you intend to paint or add clear finish to a carving plays a role in wood selection: Woods best suited for clear finish have even color and little grain. Pear, maple, mahogany, and many of the exotic woods are excellent candidates.
If you’ll be adding milk paint to the carving, mahogany and walnut are at the top of the list. Both carve well in all directions and the grain is almost nonexistent. I choose hard woods such as maple or some of the exotics when the pattern has fine details or tightly curved cuts that push the strength of the material to the limit. On soft woods, such as cedars and some of the pines, carving is almost effortless but the tools need to be razor-sharp or the results will be poor. Basswood is a bit soft for furniture, so best confined to smaller items.
For the full article, download the PDF below:


Log in or create an account to post a comment.
Sign up Log in