What’s the Best Tool for Accurate Layout?
For accuracy and efficiency, you'll need both a pencil and a knife.

Synopsis: Like any task in woodworking, accurate layout depends on using the right tool at the right time. The lines most critical to tightly mating joinery definitely should be made by a knife edge. But for marks that don’t require hair-splitting precision, a pencil is quicker, easier to handle, and makes for visible lines. In this article Christian Becksvoort explains when to reach for each of these tools.
Like any task in woodworking, accurate layout depends on using the right tool at the right time. It’s easy to think that if a knife marks more precisely, it’s better to always use a knife and never pick up a pencil. This isn’t necessarily so. The lines most critical to tightly mating joinery definitely should be made by a knife edge. But for marks that don’t require hair-splitting precision, a pencil is quicker, easier to handle, and makes more visible lines.
The trick to being both accurate and efficient lies in knowing when to reach for each of these tools.
Draw your first lines with a pencil
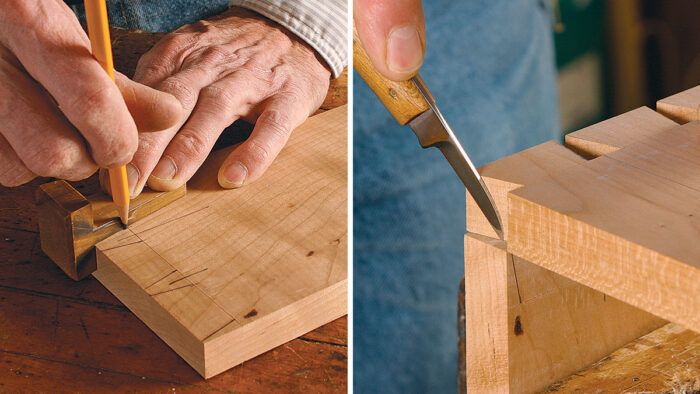
I use a pencil when I make initial layout lines such as those for cutting case sides to length or for locating dividers or doors. I also mark with a pencil in the first steps of laying out joinery such as dovetails or mortises. These are all lines to which something else eventually will be fitted, so the need for greatest accuracy will come later. In the meantime, a sharp pencil produces a clean, visible line more quickly and easily than a knife.
Pencil lines are also erasable. If you scribe your initial layout with a knife, you’ll have to hit the line exactly when cutting or else spend time paring the waste to make the line disappear. If you miss a pencil line by a whisker, you can erase it and move on.
There are lots of pencils on the market, and you may wonder which to use. Regular pencils come in five degrees of hardness, from a No. 1, which is very soft and dark, to a No. 4, which is very hard and light. The softest pencils dull too quickly—a freshly sharpened No. 1 will lose its fine line almost immediately on harder woods, producing a 1⁄16-in.- wide line after just 6 in. to 10 in. of drawing. In most cases, your best bet for sharpness and visibility is the widely available No. 2, or the No. 21⁄2 pencil.
A wooden pencil’s conical point can be modified to fit into a corner or trace along another board. Use 120- or 150-grit sandpaper to flatten the tip of the pencil so that the lead is shaped like a wedge or knife edge, instead of a point. For short distances, this works almost as well as a knife.
Mark with a knife when cutting to fit
Ultimately, the fit of a two-part joint depends on how precisely the second part is cut. Even a fine pencil line can be 1⁄32 in. or wider. If all of your dovetails have that much slop, you’ll have a disaster on your hands. That’s why I switch to a knife for marking out the second part of such joints and for fitting dividers, backs, door parts, shelves, drawer parts, and moldings.
From Fine Woodworking #179
For the full article, download the PDF below:
Fine Woodworking Recommended Products

Estwing Dead-Blow Mallet

Olfa Knife

Stanley Powerlock 16-ft. tape measure


Log in or create an account to post a comment.
Sign up Log in