Box Joints on the Tablesaw
Lon Schleining shows how to cut quick, reliable box joints with a handy shop-made jig.
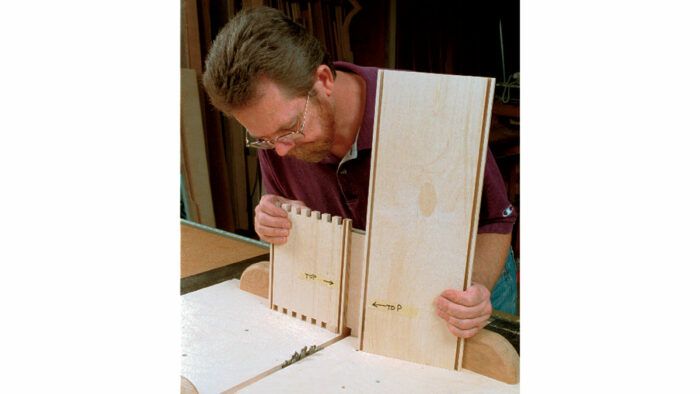
Synopsis: Lon Schleining offers a lesson on cutting box joints with a handy shop-made jig that attaches to a tablesaw crosscut sled. Find project plans to build the jig and follow his step-by-step instruction to create strong, attractive box joints. Schleining explains how to modify your crosscut sled and how to set up the jig. In cutting box joints, cut the first joint, and then make your cuts on adjacent pieces. Last, he explains how to put the sled back to normal use. Also included are instructions for making a basic toolbox.
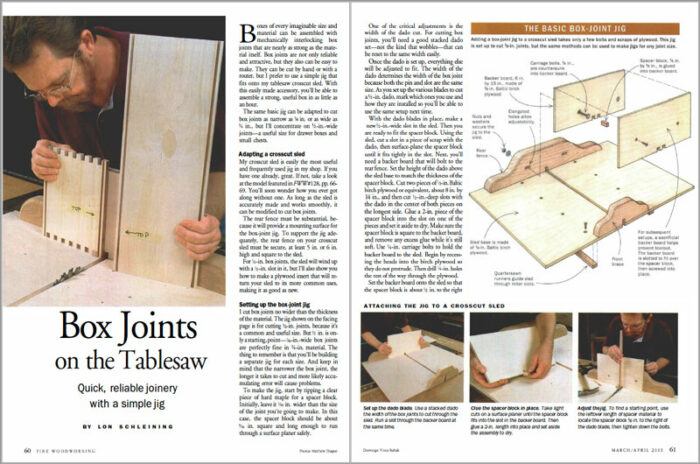
Boxes of every imaginable size and material can be assembled with mechanically interlocking box joints that are nearly as strong as the material itself. Box joints are not only reliable and attractive, but they also can be easy to make. They can be cut by hand or with a router, but I prefer to use a simple jig that fits onto my tablesaw crosscut sled. With this easily made accessory, you’ll be able to assemble a strong, useful box in as little as an hour.
The same basic jig can be adapted to cut box joints as narrow as 1/8 in. or as wide as 3/4 in., but I’ll concentrate on 1/2-in.-wide joints—a useful size for drawer boxes and small chests.
Adapting a crosscut sled
My crosscut sled is easily the most useful and frequently used jig in my shop. If you have one already, great. You’ll soon wonder how you ever got along without one. As long as the sled is accurately made and works smoothly, it can be modified to cut box joints.
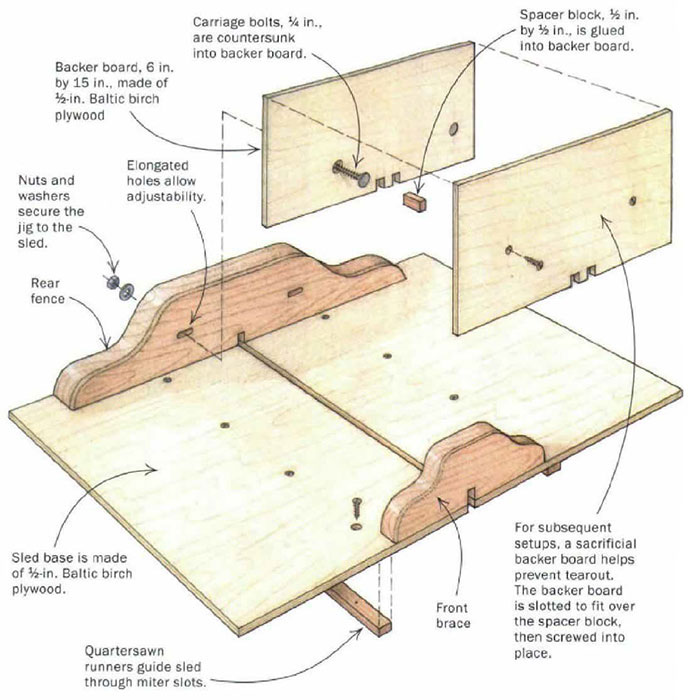
The rear fence must be substantial, because it will provide a mounting surface for the box-joint jig. To support the jig adequately, the rear fence on your crosscut sled must be secure, at least 5 in. or 6 in. high and square to the sled.
For 1/2-in. box joints, the sled will wind up with a 1/2-in. slot in it, but I’ll also show you how to make a plywood insert that will return your sled to its more common uses, making it as good as new.
The basic box-joint jig
Adding a box-joint jig to a crosscut sled takes only a few bolts and scraps of plywood. This jig is set up to cut 1/2-in. joints, but the same methods can be used to make jigs for any joint size.
Setting up the box-joint jig
I cut box joints no wider than the thickness of the material. The jig shown on the facing page is for cutting 1/2-in. joints, because it’s a common and useful size. But 1/2 in. is only a starting, point— 1/8-in.-wide box joints are perfectly fine in 3/4-in. material. The thing to remember is that you’ll be building a separate jig for each size. And keep in mind that the narrower the box joint, the longer it takes to cut and more likely accumulating error will cause problems.
To make the jig, start by ripping a clear piece of hard maple for a spacer block. Initially, leave it 1/16 in. wider than the size of the joint you’re going to make. In this case, the spacer block should be about 9/16 in. square and long enough to run through a surface planer safely.
Photos: Matthew Teague
Drawings: Vince Babak
For the full article, download the PDF below:
Fine Woodworking Recommended Products

Olfa Knife
MicroJig Matchfit dovetail clamps
Woodriver Circle Cutting Jig



Log in or create an account to post a comment.
Sign up Log in