Miter Your Dovetails
Strong, elegant dovetail joinery allows a decorative edge.

Synopsis: The joinery in this small dresser mirror combines dovetails and miters in an innovative way. The author explains how to do two versions — a frame joint that has great mechanical strength and is great for small frames that are too thin for a standard mortise-and-tenon joint, and a set of mitered half-blind dovetails that allows for solid case construction with a molded profile around the front.
Among my favorite things about making this small dresser mirror is the joinery—two different combinations of dovetails and miters that are strong, look great, and allow me to cut molded profiles on the edges and faces of the piece.
On the case, the lap of the half-blind dovetails enables me to cut a continuous ovolo edge detail around the top. The miter at the front of the joint also lets me cut a molded profile on the front of the case.
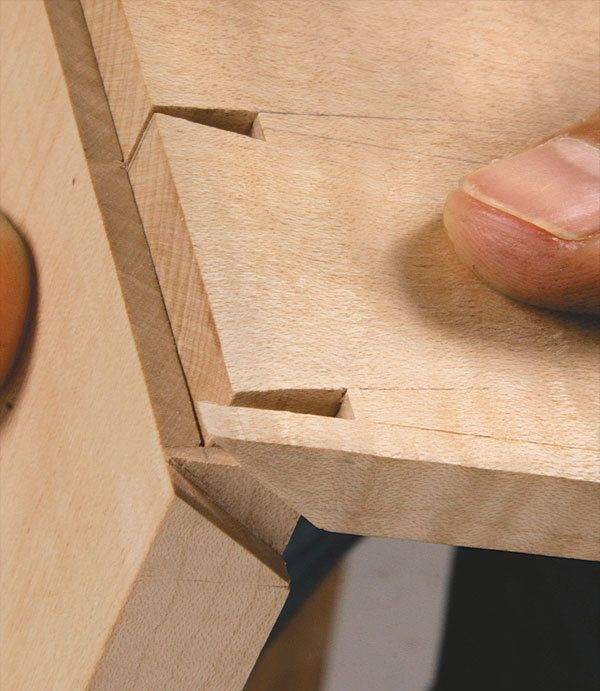
I wanted the same molding details on the edge and face of the mirror frame, and I wanted its joinery to visually echo the dovetails on the case. The joint I use—a dovetailed through-tenon with a miter in front and a half-lap in back—is challenging but fun to execute, and the results speak for themselves.
The frame version
This joint can be used in a variety of applications, such as mitered cabinet doors or picture frames. It works especially well for small frames that are too thin for a standard mortise and tenon. the joint has great mechanical strength and it clamps easily across the face to ensure the best bond. however, it’s not an easy joint to cut. Visualizing it can be confusing, and the sawing and fitting must be accurate. also, the dovetail layout is a little out of the ordinary. the dimensions of the joinery make it very awkward to transfer the layout from one workpiece to another, so Metcalf lays out the tail and socket separately using the same gauge settings for each. still, with careful layout and saw work, the result is strong and pretty.
Add a miter to half-blind dovetails
The dovetails for the case are, for the most part, ordinary half-blinds. However, the mitered front complicates the layout and joinery slightly. To begin with, you’ll need to dimension the top piece so that it is the full length of the case, to allow for the miter at the front. And before laying out for the tails, you’ll need to remove a narrow band of stock so that the tails will come up short of the end of the case.
On this case, the top and sides were also of different thicknesses. This meant the miter wasn’t 45°, requiring different bevel-gauge settings to create the mating angles.
From Fine Woodworking #213
Learn how to build a beautiful box with mitered dovetail joinery in a Fine Woodworking video workshop.
For the full article, download the PDF below:
Fine Woodworking Recommended Products

Pfiel Chip Carving Knife

Starrett 4" Double Square

Veritas Standard Wheel Marking Gauge


Log in or create an account to post a comment.
Sign up Log in