A Well-Organized One-Man Shop
Plan machine and bench layout around logical workflow and convenient storage.
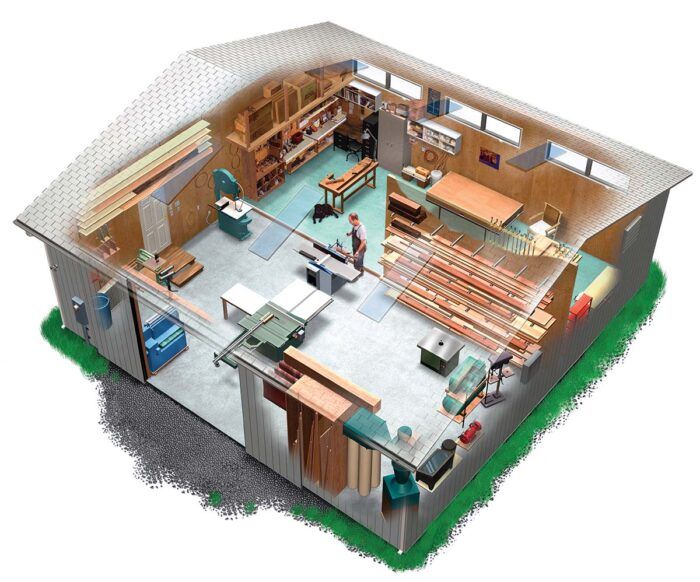
Synopsis: Draw it first, then pick up a hammer, advises Ross Day, who had the luxury and challenge of building a shop from a 36-ft. by 36-ft. shell. He designed a space for maximum efficiency, keeping clutter to a minimum and adding lots of light. Scale layouts of the floor space and machines helped him try different combinations and workflow patterns. The article also explains the hassles and merits of building a shop to code.
Last year, my wife and I decided to leave the city for the country. Our goal was to buy a house, a shop building and land so that we would no longer be at the mercy of downtown Seattle landlords and a real-estate market that had gone totally nuts. We found what we needed about an hour outside Seattle.
The shop building was a bare shell: concrete pad, open stud walls, no windows and a lightbulb or two. It was large enough at 1,300 sq. ft. with a 12-ft. height from floor to trusses.
Having worked in a number of shops, I had a good idea of what I wanted: a design that maximized available space and efficiency in every way possible. To do that, I needed to think about workflow and storage and remember that floor space is precious. I aimed to keep the shop as uncluttered as possible, and that affected my choice of machinery. I also designed the shop with plenty of light, both natural and electric.
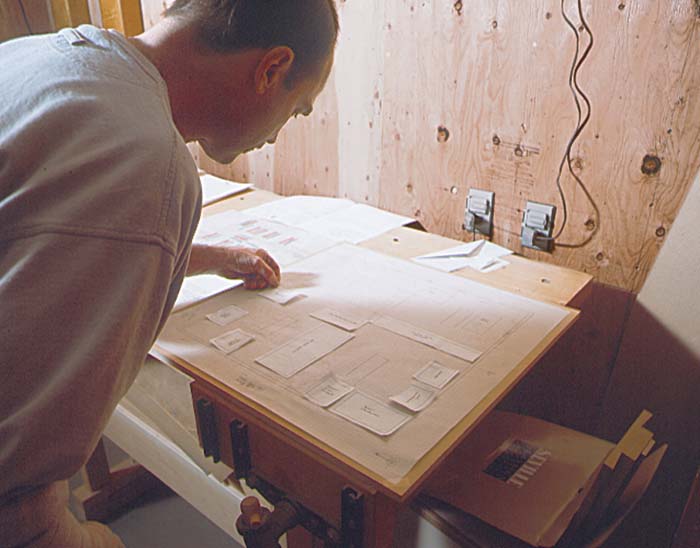
Draw it first, then pick up the hammer
I made a scale layout of the shop using -in. graph-paper sheets taped together to represent my shop’s 36-ft. by 36-ft. footprint ( in. = 1 ft.). Then I made scale footprints of all machines and benches—and whatever else would take up floor space—on separate pieces of paper. Moving around these paper footprints let me try different combinations, locations, and workflow patterns, allowing me to visualize several workflow and storage combinations.
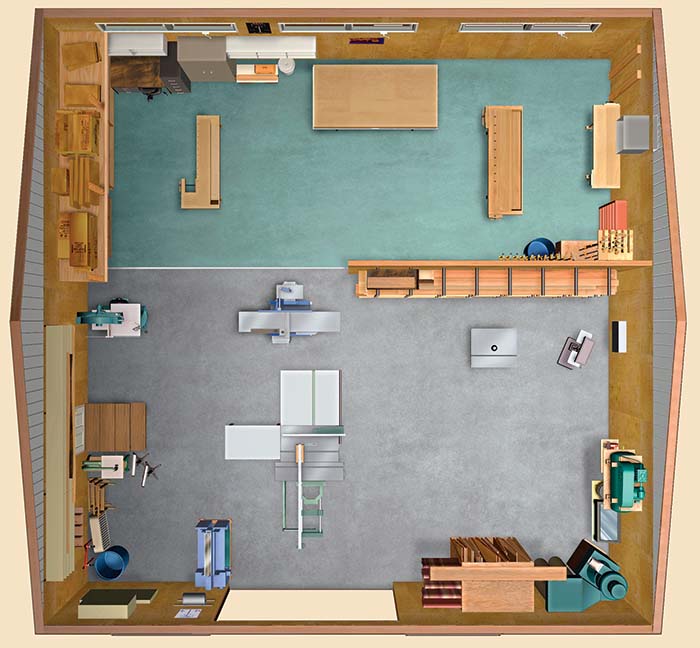
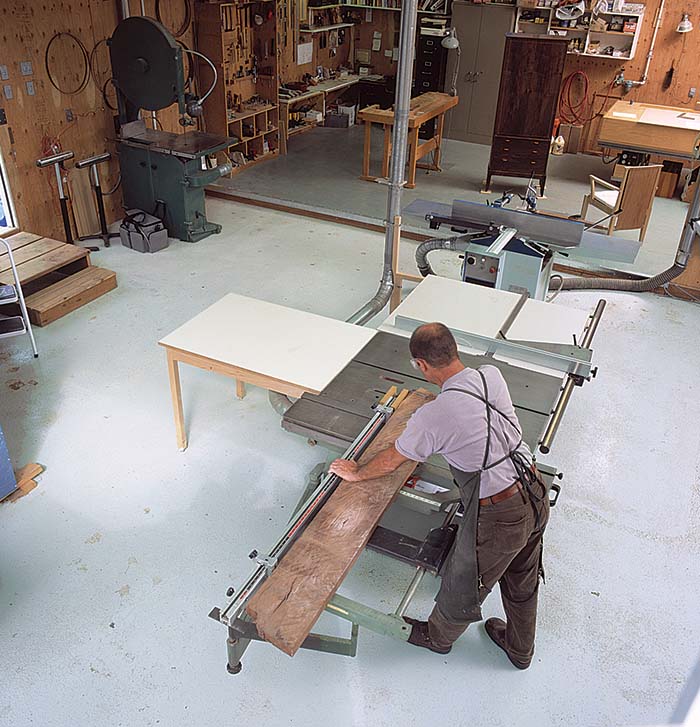
I prefer a shop that is divided into separate areas for machine work and for benchwork (see the drawing on p. 52). However, I didn’t want to lose the sense of spaciousness that this new building offered. My solution was twofold. The bench room received a raised wooden floor and was partially separated from the machine area by a floor-toceiling partition wall.
Machine and bench rooms use space efficiently
The shop is divided approximately in half between the bench and machine rooms. I chose my machines for their efficiency and space-saving attributes. For example, I have a 12-in. short-stroke sliding tablesaw, which allows me to rip and crosscut on one machine. My 16-in. combination jointer-planer-mortiser uses only the floor space of one large machine. Switching between functions takes less than a minute.
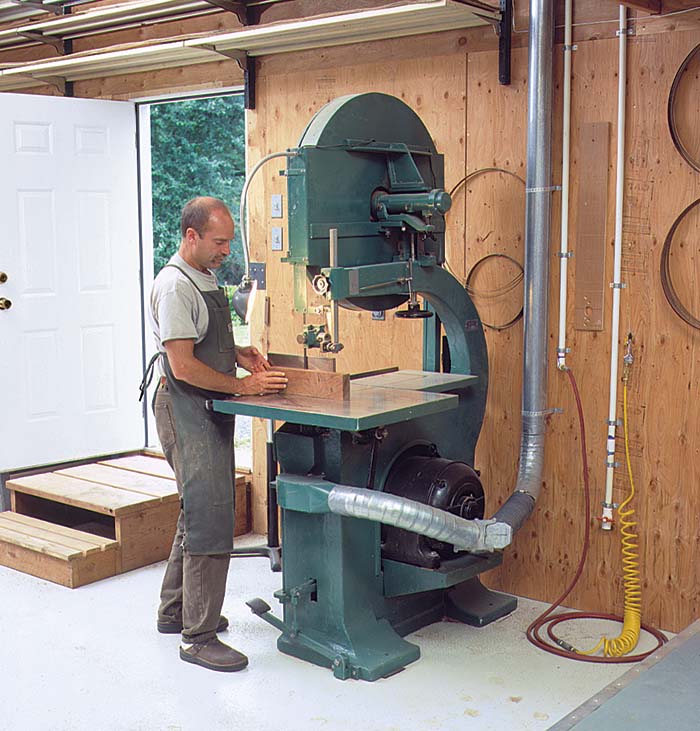
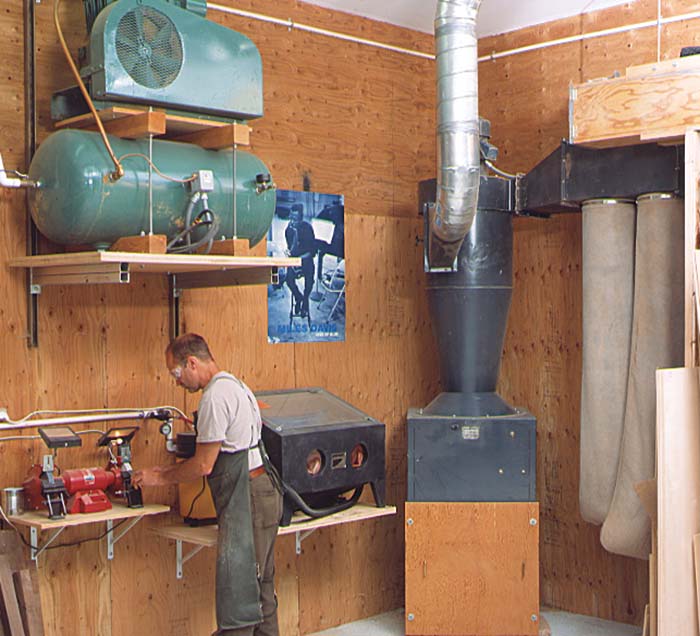
I also have a 32-in. bandsaw, a 24-in. thickness sander, a shaper router table combo, a drill press, and an air compressor. I mounted the air compressor high on a wall so that I could use the floor space below for a sharpening station.
Every machine is hooked up to a central cyclone dust collection unit, which I prefer over portable units that tend to get in the way and take up more floor space. The dust and electrical systems are interconnected through a sensor in the main electric panel. When a machine is turned on, the dust collector starts automatically. All dust-collection hoses and pipes are off the floor, which is safer and also makes it much easier to sweep up debris.
To keep cables off the floor, I cut a groove through the floor slab (a very messy task) and buried an electrical conduit to reach tools in the center of the room. Then I sealed and painted the floor with a light gray epoxy floor paint to reflect light to make the room brighter. Crushed walnut shells (available at paint stores) were mixed with the paint to make the floor surface nonskid.
The furniture I build requires a lot of handworks. That’s why the bench room takes up half the shop. This room includes two workbenches, hand tools and machines, a 4-ft. by 8-ft. vacuum press, a desk, a sharpening station, and plenty of room for assembly.
A wood floor is a lot easier on the legs and back. It’s also a lot kinder on dropped tools. I used pressure-treated 2x4s for the sleepers, then overlaid them with -in.-thick tongue-and-groove plywood. The floor was painted with epoxy floor paint.
Electrical systems require careful thought
While all of the different areas and systems in a shop must be designed to work together to be effective, the electrical system requires as much, if not more, planning. There are many critical things that must be considered. I really underestimated the cost and time involved in wiring my shop.
Plan for all of your current needs and add enough extra capacity for future needs. Do as much work as possible while the walls are still unsheathed. It is much more expensive and time-consuming to add things outside the walls later.
A list of all current and future needs combined with a scale electrical layout of the shop is the best way to do this. Obviously, you should check your local code when diving into this area, and don’t do anything with which you are uncomfortable or unfamiliar.
I realized my electrical work was more than I could handle alone. Luckily, my friend Roland has a master electrician’s license in three states and really sunk his teeth into this project. He took my scale electrical-layout sketch and converted it into a workable plan. Among the things, he tackled included figuring out the exact panel scheme, phase conversion, and wire and breaker sizes.
Once we were ready to go to work, I ran a lot of the wire and hooked up receptacles while he worked inside the panel, doing the more skilled work. I was amazed at the amount of wire and parts required for the job. The attic space of the shop looked like a spaghetti factory.
Make sure there’s plenty of light
When I was a student at the College of the Redwoods, I loved the quality of light in the shop. It was so open and airy with the combination of natural and artificial light. I vowed that if I ever built my own shop I would try to reproduce those lighting conditions.
For my shop, I had six skylights installed (three in the bench room and three in the machine room). And three wide windows were installed across the wall in the bench room. Then I added 8-ft. fluorescent fixtures, flush-mounted to the ceiling, as well as task lighting at the workbenches.
Paint is also an important factor in creating a well-lit area. The ceiling and skylight wells were painted white for maximum light reflection. On a sunny day, I can work by natural light alone, saving on electricity.
Radiant panels are an efficient way to heat the space
To work year-round in my shop, I needed to heat it. I settled on radiant electric panels from Solid State Heating Corp. in Old Saybrook, Conn. (800-544-5182; sshcinc.com). They are compact and lightweight (a 1-in. by 2-ft. by 8-ft. panel weighs only about 20 lbs.) and mount directly to the ceiling. They are more efficient than forced-air heat and don’t take up floor space.
Buttoning up the shop with proper insulation, weather stripping, and sheathing is very important for maximum energy efficiency. I used insulation batts in all exterior walls and wrapped the skylight wells with insulation. The attic has blown-in insulation. All windows and skylights are double-pane, gas-filled, low-E glass. The wood floor in the bench room has rigid-foam insulation between the joists. The side entry door is weather-stripped to help keep out drafts.
The sliding barn doors proved to be a challenge. Because they were both slightly warped, there were gaps of up to 1 in. wide that required sealing. After a lot of scrounging at hardware stores, I figured out the answer: -in.-wide weatherstripping designed for the bottom of roll-up garage doors. I tacked the stripping onto the edges of the walls and the header over the doors, overlapping the doors. I also tacked on a strip between the doors.
Stock is stored near appropriate machines
Plan as much storage space into your shop design as possible. It is amazing how fast it fills up. In addition to the cabinets and shelves we all have, here are some other storage solutions I used.
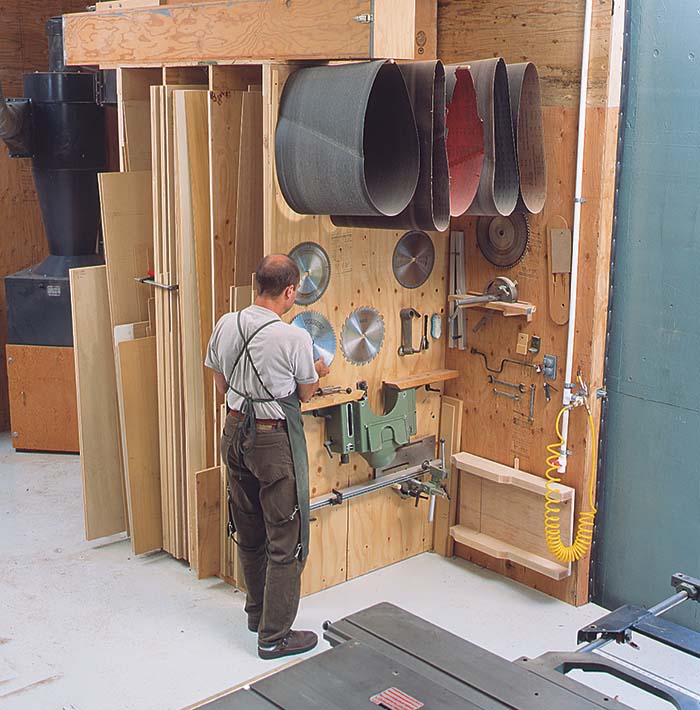
I store sheet goods in a shop-made open-faced plywood cabinet with three compartments. It is only a few steps away from the tablesaw. The sides of the cabinet hold thickness-sander belts, tablesaw blades and tools, and shaper accessories. The top of the cabinet provides more storage space.
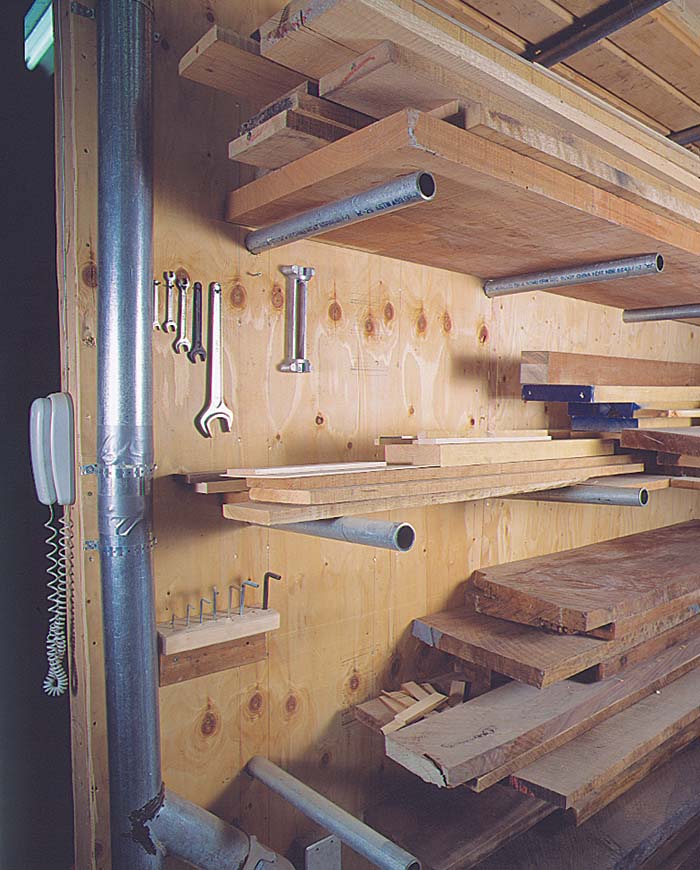
Lumber is stored on a pipe rack installed on the machine-room side of the interior wall between the machine and bench rooms. Lumber is heavy, and the storage system must be engineered accordingly. The wall studs are tripled up on 16-in. centers. The wall frame is lag-bolted into an exterior wall stud and tied into the roof trusses with truss clips. The entire framework was then glued, sheathed within.-thick CDX plywood and nailed off. Holes were then drilled on 32-in. centers to accept the 2-ft lengths of 2-in. outside diameter (O.D.) iron pipe. For efficient workflow, the jointer-planer-mortiser is close to the lumber rack.
Various jigs and general storage area in a loft just above one end of the bench room. Because all of the walls were sheathed with plywood instead of drywall, I can drive a screw or nail anywhere I wish to hang a tool or shelf.
My three-phase converter and air compressor are also hung on walls to maximize floor space. My electrician introduced me to a very innovative system to support such equipment. B-Line Systems Inc. in Highland, Ill. (618-654-2184), manufactures and markets a modular system to support equipment or storage by utilizing metal strut channels with various universal attachments. The system can satisfy just about any support need you may have.
A good plan ensures success
Involving the expertise and help of others will speed up things and give you a better result. My friends Gary and Robert did the windows and skylights, Richard and Carissa helped with carpentry, and Roland was the electrical mastermind. They helped light the end of the tunnel when it seemed like there was just too much to do. With their generous assistance, I now have a shop that is a pleasure to work in.
Paying attention to details while keeping the big picture in mind helps you stay out of hot water. Plan your project as carefully as possible to avoid making major mistakes or oversights, and you’ll end up with a shop you are proud of.
Get the Most Out of the Available Space
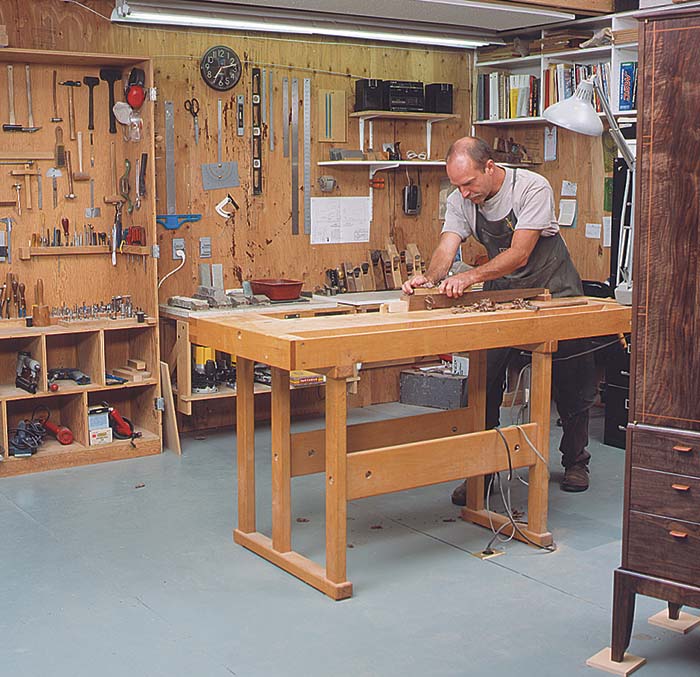
Through his years of experience working in a number of different shops, Day grew accustomed to having separate rooms for machines and benchwork. The partial wall In his shop separates the machine room from the bench room without closing It off entirely and making the modestly sized building feel cramped. That wall also adds significantly to the efficiency of the shop, providing plenty of storage space. Because floor space is always precious, Day went so far as to mount the compressor up high, out of the way, so that the area below could be freed up for a sharpening station.
 |
 |
 |
 |
 |
 |
 Building to Code Requires Some Patience but Brings Peace of Mind
Many small shops aren’t built or operated with commercial buildings and electrical codes in mind. I’ve worked in some. But for my latest shop, I decided to go by the book. At times the whole thing had me ready to pull out what little hair I have left, but I figured it would be worth the headaches in the long run. I didn’t want some inspector who happened to drive by one day shutting me down. Trying to satisfy code after the fact could be a nightmare. I wanted to sleep well.
Building to commercial code was expensive and time-consuming. Surveys and site plans had to be created, submitted, and approved, myriad permits procured, and meetings, inspections, and checkoffs had to be scheduled. My processes with the building and electric departments were reasonably straightforward, though I thought they were overly strict in some areas. All of my hang-ups were through the health department of all places. Go figure.
After experiencing this entire process, I would strongly recommend scheduling a meeting with the supervisor of any department that will affect your project (especially electric). This way you can meet the person face-to-face, discuss the nature of your project and compile a list of what needs to be inspected.
The city said my shop had to have a separate electric service from the house, which meant having to dig a ditch 100 ft. long and 3 ft. deep. All of the machines had to be on separate breakers, with any wire coming out of the wall encased in the dust- and waterproof conduit. All switches and receptacles needed to be dust-proofed. Lights, heat panels, and dust-collection pipes had to be mounted against the ceiling. (The explanation was that nothing should be suspended because dust would collect there and pose a fire hazard.) Home shops and many small, noncode professional shops don’t meet many of these requirements.
The city also told me that an exhaust fan had to be hardwired into the wall (no portables), and it had to have enough power to change the air in the shop a minimum of six times a minute. My fan creates a veritable hurricane when I fire it up, but boy does it ventilate! It all seemed like too much of a hassle at times, but now that it’s all said and done, I have a much nicer, safer shop as a result.
From Fine Woodworking #153
For the full article, download the PDF below:
Fine Woodworking Recommended Products

Woodriver Rechargeable Desiccant Bag
WoodRiver Router Bit Storage Case


Log in or create an account to post a comment.
Sign up Log in