Pattern Cutting on the Tablesaw
Duplicate parts quickly and safely using templates.
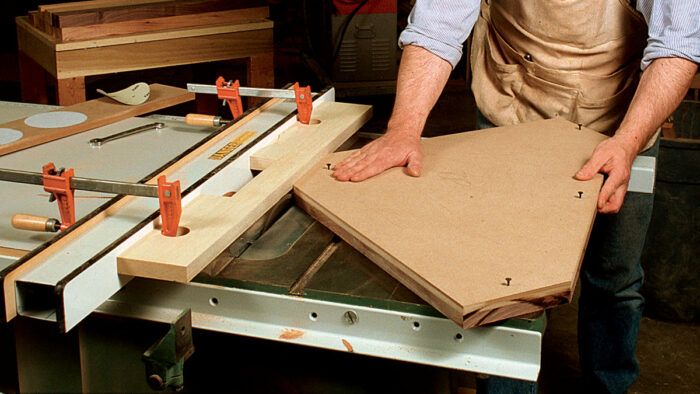
Synopsis: There are times when a tablesaw can be used just as effectively as a router or shaper as a pattern-cutting tool, especially when the parts don’t involve curves. It’s a great way to cut oddly shaped pieces or trim a door for an exact fit to a case. In this article, Steve Latta uses his tablesaw to cut large and small pieces using patterns, and shows how this technique makes short work of odd parts. He explains why pattern cutting on the tablesaw can be a safer and clean alternative to using other power tools.
When you mention pattern cutting to most woodworkers, they think of routers or shapers with bearing-guided cutters. But there are times when a tablesaw can be used just as effectively as a pattern-cutting tool, especially when the parts don’t involve curves. Tablesaw pattern cutting is a great way to cut oddly shaped pieces or trim a door for an exact fit to a case. I pattern-cut parts large and small, square or with multiple angles, stuff that you just wouldn’t normally cut on a tablesaw unless it was outfitted with a good, adjustable sliding table. The six-sided shelves of a corner cabinet are a prime example of what I’m talking about. Pattern cutting makes short work of these oddballs and leaves a cleanly machined and consistent product.
I know what you’re thinking: This doesn’t sound safe and sane. But because only a minimal amount of material is removed and an auxiliary fence covers the blade, this technique is no more dangerous than many tablesaw procedures. For my buck, I think it is safer than using a router table. A tablesaw is built for supporting large stock. Most router tables tend to scoot around when you lean on them.
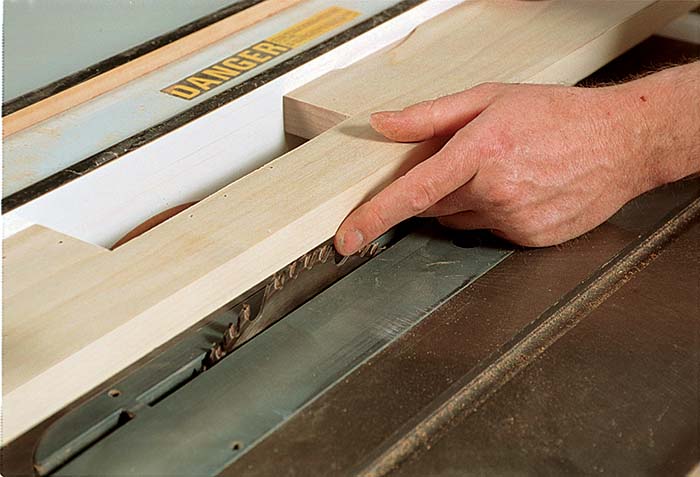
The template follows the raised auxiliary fence, which also protects the operator
All pattern cutting involves the use of a template and a guide. In this method, a full-sized pattern is used for the template, and a shopmade auxiliary fence acts as the guide. Use 3⁄4-in.-thick stock—medium-density fiberboard (MDF), poplar, whatever’s available—for the parts.
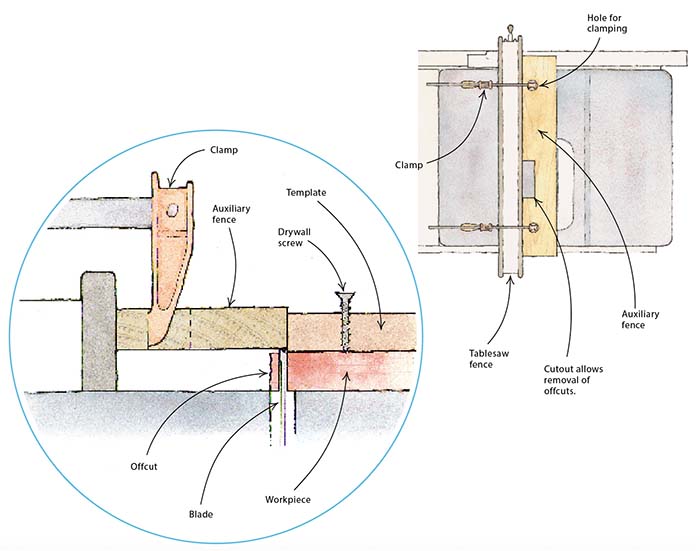
The fence consists of a piece of stock roughly 3⁄4 in. thick by 5 in. wide by 24 in. long. Make a cutout so that you can keep an eye out for debris building up under the fence, and drill two large holes for clamping points. Clamp the auxiliary fence to the saw’s rip fence about 1⁄8 in. or so higher than the workpiece. (The workpiece should slide freely beneath it.) Then move the entire fence assembly so that the auxiliary fence is flush with the outside teeth of the blade. Turn on the saw and slowly raise the spinning blade until the teeth are cutting slightly into the underside of the auxiliary fence.
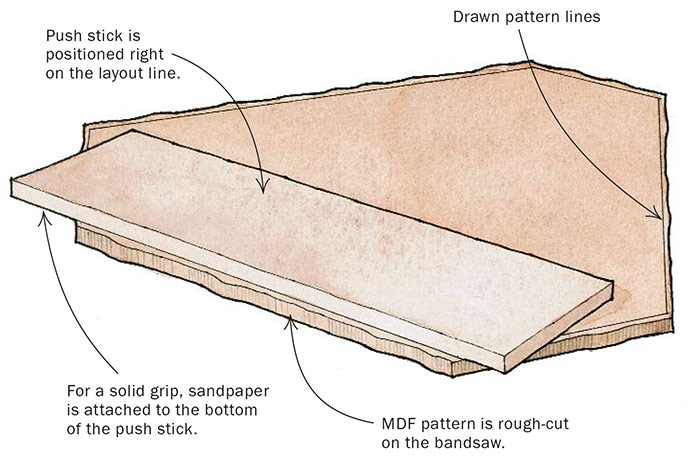
MDF is ideal for pattern stock
For parts like a corner-cabinet shelf, a full-sized fixed pattern makes the most sense. Begin by laying out the dimensions on a piece of 3⁄4-in.-thick MDF. Next, rough-cut the pattern on the bandsaw, staying about 1⁄16 in. off the line. Then make a long MDF push stick, which will double as a guide for making the tablesaw cut. The push stick is long and wide enough to grip the workpiece safely. Attach sandpaper to the underside to get a good grip on the workpiece. You could also use screws; just keep them away from the cut line.
Place the push stick directly on a layout line of the pattern, then make the cut by running the push stick against the auxiliary fence. Push the stock through the blade, maintaining firm downward pressure. Because you’ve left only 1⁄16 in. of material on the pattern, the offcuts will be stringy pieces of stock that won’t kick back. Those stringy parts may collect in a mass under the auxiliary fence, so periodically check the cutout for accumulation. If a buildup occurs, turn off the saw and remove the material with a stick or a blast of compressed air. Once the pattern has been cut, check it for accuracy. Fine adjustments can be made with a handplane.
Use the pattern to trace the shape onto the workpiece. Then rough-cut the workpiece on the bandsaw, staying a heavy 1⁄16 in. off the line. Before using the pattern, apply some sandpaper to the bottom side or drive some screws through it until the points just protrude and provide a solid grip on the workpiece. Place the pattern on the workpiece and make the final cuts on the tablesaw. If everything has been set up properly, the pieces should be clean and identical.
Pattern cutting is a great way to trim doors to fit a case
When sizing doors to fit large cases, I make an adjustable jig that allows me to fine-tune individual doors to the case opening. On large cases, openings can shift a tad out of square, and this jig is especially handy if a case opening is slightly off. The jig consists of a piece of MDF with two adjustable pieces of hardwood mounted on each with battens. The combined assembly should be about 3⁄4 in. shorter than the height of the opening. The adjustable hardwood sections should be slightly narrower than the main section so that they won’t interfere with the case opening when making adjustments.
Place the jig into the door opening and place shims to account for the door gap above and below the jig. I use a couple of pieces of Formica (you can get free sample squares at most home centers). With the MDF body of the jig held tightly against the case frame member that will receive the hinges, adjust the upper and lower portions of the jig with a screwdriver until you get a snug fit.
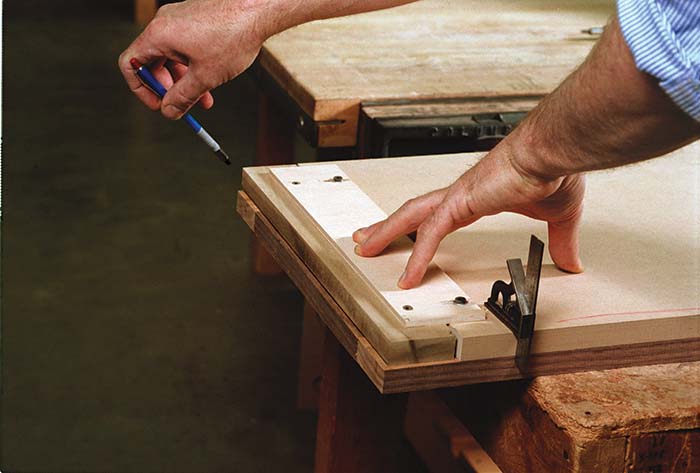
Lay the jig atop an assembled door, which you’ve built slightly larger than the case opening. Place the jig flush with the hinge stile and position it so that the same amount of material will be removed from the top and bottom rails. With a sharp pencil, trace along the outside of the door frame using the jig as a guide. Score the edges and undersides of the stiles with a knife to avoid tearout.
Don’t use the jig as a cutting guide. Instead, use an MDF push stick with sandpaper on the underside. Lay the push stick directly on a layout line and make a cut by guiding the push stick along the edge of the auxiliary fence. Cut the door top and bottom this way. With any luck, you should have a great fit. A scraper and a little sandpaper will remove the saw marks on the top and bottom. After hinging the door, plane the far stile until you have a good fit.
Double doors are a little trickier only because the rails of both doors must match in width. After fitting the first door, take care to position the jig on the second door in such a way that you end up with rails of equal width. The eye will easily spot the unbalanced look of adjoining doors with mismatched rails. After hanging both doors, plane the center stiles for a consistent gap (for more on hanging doors, see FWW #142, pp. 72-77).
Once you understand this technique, you will find other uses for tablesaw pattern cutting. Just remember to rough-cut the workpiece on the bandsaw first, leaving only a small amount of material to remove on the tablesaw.
An auxiliary fence guides the template
The auxiliary fence is clamped to the saw’s rip fence and serves as both a guide and guard. The workpiece, held by a template, slips under the fence and is trimmed by the sawblade. A cutout lets you see whether offcuts are collecting under the fence. Remove them only after the sawblade has stopped spinning.
Creating a pattern


Fitting


From Fine Woodworking #162
For the full article, download the PDF below:
Fine Woodworking Recommended Products

Stanley Powerlock 16-ft. tape measure
Ridgid EB4424 Oscillating Spindle/Belt Sander

Shop Fox W1826







Log in or create an account to post a comment.
Sign up Log in