A Smart Cart for Scraps
Build a rolling bin for storing and sorting your scrap pile.
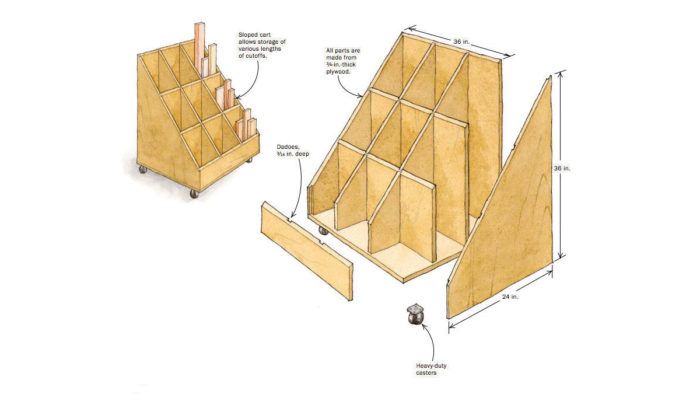
There are two great things about a woodworking scrap pile. First, a scrap pile is easy to come by – even for a novice woodworker; make just a couple of projects, and you’ll have the beginnings of a good one. Second, and more seriously, a scrap pile provides the raw material for a lot of important creative stuff – testing ideas, tinkering, building mockups and jigs. It’s also where you can discover the perfect stock for that small project.
The trouble is that, by it’s nature, the scrap pile is kind of a mess. And sorting through a tangle of mismatched offcuts is no way to spend your creative energy.
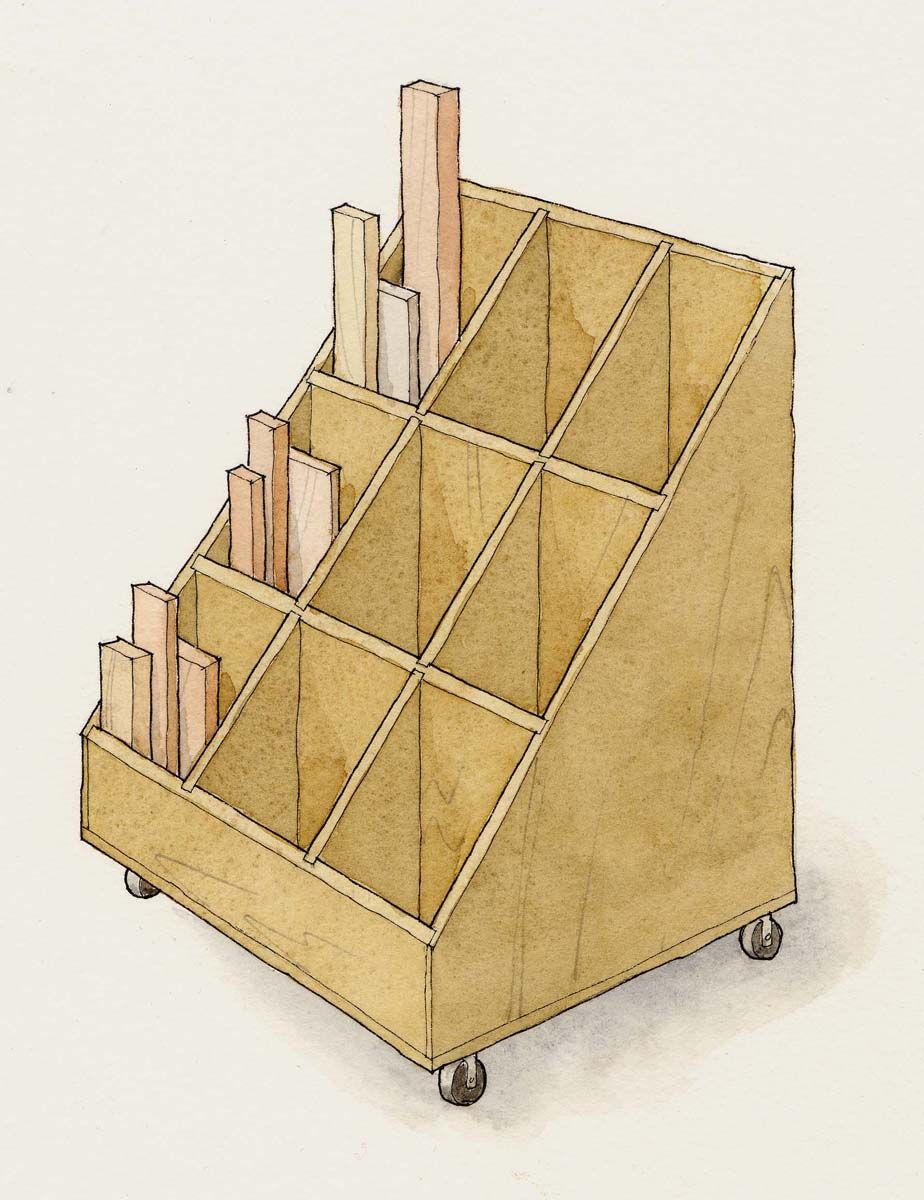
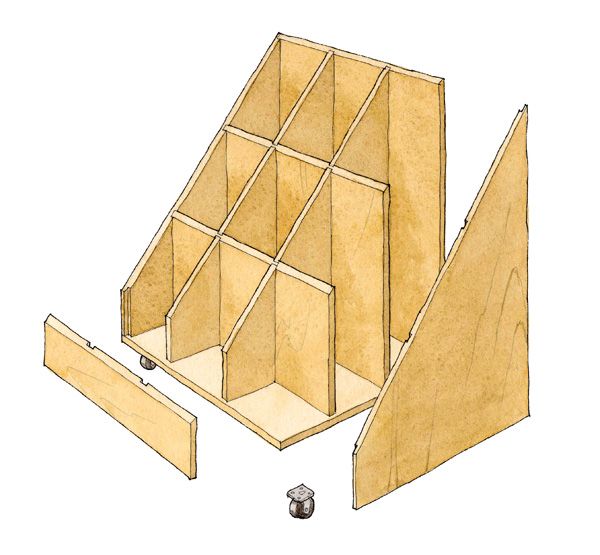
Reader Will Moore tackled that problem head-on by building a super functional bin for storing and sorting varying sizes of scrap. It’s a smart way to turn a rat’s nest into an accessible, organized resource.
Also, for a variety of different lumber storage solutions, check out Andy Beasley’s article in issue #181.
Fine Woodworking Recommended Products
WoodRiver Router Bit Storage Case

Woodriver Rechargeable Desiccant Bag



Comments
I built this ages ago. Second only to my drill-press table as the most useful shop-thing I ever built.
I am thinking of a slight modification of having the two cross pieces only go 24", allowing the third column to be one open column, accommodating wider pieces of scrap. If I lay this out, I need one 4x8 sheet of plywood plus an 8x54 piece of plywood. Anyone have some ideas to play with the design to only require one 4x8 sheet? (or correct me if I made a layout error!)
I thought long an hard about modifications and initially came up with several variations to accommodate wider pieces of plywood. In the end I built it as is, only slightly longer. I decided I would dedicate this to hardwood scraps and relatively thin plywood scraps and am happy I did. After I completed the project I almost filled it up immediately with all the scraps I had in my shop (extremely satisfying). I used bb ply. One challenge is making the angle on the tops of the horizontal dividers match the sides. If you stick to 45 degrees or less (so the tilt angle you need to set on your tablesaw for cutting the horizontal piece ends is 45 degrees or less, assuming your saw has a max 45 degree tilt) it will be easier to cut the pieces on your tablesaw to match. I cut the side dados first, then cut the side angles with my circular saw.
Where can I find detailed instructions for this bin? I am loosing sleep. Love to build it but i would rather follow less general directions that the PDF. I want mine to be 36x 20 or 18" wide and 24" deep.....thanks
Any suggestions on how to connect the 90 degree sides, back,and front to the base? Just glue? Drywall screws into the ends of the plywood?
I built this and made it a little deeper to hold some sheet goods behind the back. Just used a bungee stretched from side-to-side to hold them in place. The ability to organize the pieces by length and see them all in one place has been wonderful.
A few notes:
1. Getting a Fine Woodworking subscription doesn't give you a more detailed plan for this. The mobile design gave me that impression.
2. This works really nicely with two sheets of plywood (one and a half is all you need).
3. You will need to do some trimming to make everything work. This seems obvious in hindsight, but I blindly followed the dimensions of 3' wide minus 3/16" trimmed on each side to fit in the 3/16" deep dados. As a result the top didn't fit neatly on the base, which I had cut to be 3' wide. I should have cut off 15/16" on each side to account for the depth of the side pieces as well as the dados.
4. I assembled the width (3' wide) pieces by attaching to the sides with screws, then attached that to the base, and then put the six smaller depth pieces in last. This is a beginner's mistake, but I should have added some shims to my dado blades when cutting those grooves. I was banging away trying to get the last pieces to slide into place; it was much harder than it needed to be.
5. I used BC plywood and didn't pay attention to which face was going to show. No big deal for the basement I suppose, but it's a quirk.
6. If you shop at Harbor Freight, one of their moving dollies might give you four casters, nuts, and bolts for cheaper than buying everything separately.
7. This cart cleaned up a massive mess in my basement and shows my scrap pieces really well. I think I'm going to really appreciate having it around.
8. I wish I could attach images! I made a diagram that helped me cut the plywood; would love to pass it along.
user-7157390, I'd love to get your diagram for the scraps smart cart.
Can you email me at blackhorse161@gmail.com?
Thanks
What diameter casters are recommended for "cart of scraps"? I used 2" on different project only to later replace them with more expensive, 4" casters because the originals did not roll smoothly. They did a lot of skidding on the concrete floor of my shop.
I would use 3” minimum. 4” should be just fine.
Log in or create an account to post a comment.
Sign up Log in