Build A Shooting Board that Handles 5 Jobs
Simple, versatile design excels for trimming end, edge, and face grain.

Synopsis: With its long base and two-part fence, this multi-purpose shooting board can handle five different planing jobs. Like most of its kind, it’s good for trimming end grain and miters. But it also works great for shooting the edge of a board and serves as a planing stop, handling both thin and thick parts. Timothy Rousseau demonstrates how to make it, and then shows you how to use it for all of these tasks. From issue #267—Mar/Apr 2018
As an instructor at the Center for Furniture Craftsmanship, I have seen many different shooting boards through the years. After using them at the school, I often made versions of the best ones for my own shop. They really started to pile up, which bugged me, because I am by nature a distiller, constantly evaluating my tools, machines, jigs, and techniques to find the cleanest and simplest solutions.
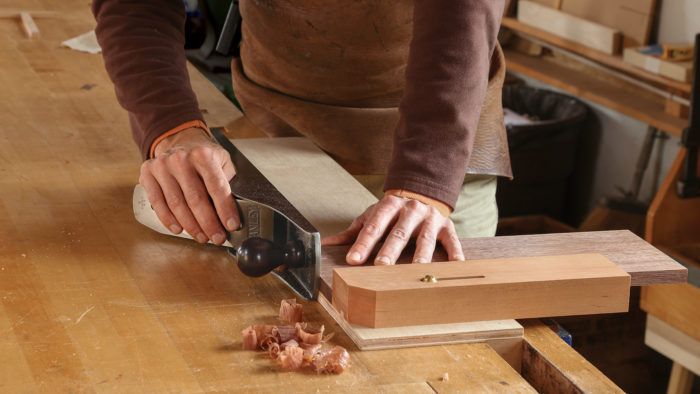
The shooting board shown here retired most of the others. Made from one piece of plywood and three pieces of solid wood, it is simple but amazingly versatile, as it can be used for five different planing jobs.
Like most shooting boards, it’s good for trimming end grain and miters. But it also works great for shooting the edge of a board and serves as a planing stop, too, handling both thin and thick parts. I’ll show you how to make it, and demonstrate how I use it for all five tasks.
The base of the shooting board is made from 1⁄2-in. plywood. Beneath it is a hardwood cleat that runs the length of the base and fits your bench vise. On top is a two-part fence: A low, narrow stop is screwed into a dado and a tall, wide fence fits over the stop.
Start with the base. Cut a shallow rabbet in the bottom of the base along one edge. This will register the cleat and ensure that it’s parallel to the base. Spread glue in the rabbet, clamp the cleat in place, and then drive in some brad nails.
After letting the glue dry, take the base to the tablesaw and cut a shallow dado at one end for the low stop. (Leave the blade height set for now. You’ll use it again.) For a right-hander like me, the dado should be at the left end of the base. If you and your bench are lefties, put it at the right end. Next, drill the counterbore and through-hole for the T-nut. This nut receives a bolt that helps hold the tall fence in place. Knock the T-nut into the hole. Fit the low stop into the dado and then screw it into place.
See Tim’s shooting board in action in his video.
For the full article, download the PDF below.
More on FineWoodworking.com:
- A shooting board for case miters – Build a shooting board that allows you to rough out case miters on the tablesaw and then plane them to perfection
- Veritas Shooting Board Track – Shooting plane and guid track are an awesome pair
- Mike Pekovich’s Go-To Work Holding Jigs – Essential bench jigs in use
Fine Woodworking Recommended Products

Starrett 12-in. combination square

3M Blue Tape

Tite-Mark Marking Gauge


Comments
Assuming that the bench underneath (as seen in Tim's long grain shooting image) is anything but flat (community shop) - one should add a subbase underneath the noted base for the plane to ride on top of?
Yes, if your bench isn't a "trusted friend", I would put a piece of plywood or MDF as the base.
Thanks Ben!
If you do add a sub-base don't forget to add a small dust relief channel at the intersection where the sole of the plane meets the sub-base.
The shooting board has all appearances of being built with a cabinet saw and aftermarket miter gauge the combo of which is capable of cutting almost glass-smooth dead square ends and spot on miters at any angle you would ever need. If I owned the saw being used to make the board, I wouldn't need the board.
Log in or create an account to post a comment.
Sign up Log in