The North Bennet Street Toolbox Project Plan
Learn what the students learn as you build a handsome home for your hand-tool collection.

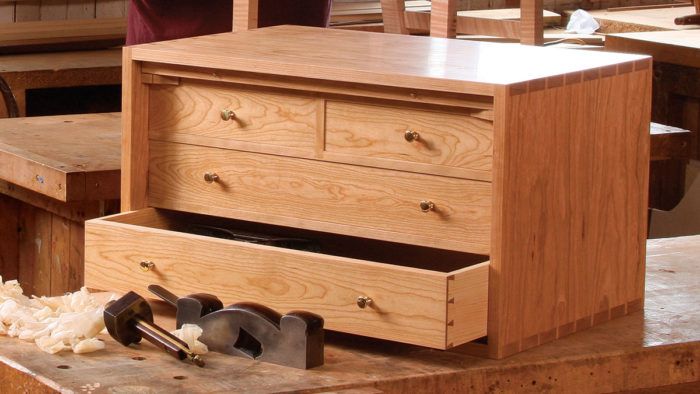
Synopsis: This tool chest is the first major project for students studying cabinet and furniture making at Boston’s North Bennet Street School. Though simple in design and appearance, it has valuable lessons to teach. Students are limited in the size of the box and the materials they can use, so they focus on the craftsmanship and not the overall design and dimensions. Here, instructor Steve Brown gives details on machining the dadoes and rabbets, fitting and installing the horizontal dividers, cutting and fitting the vertical dovetailed partition, and installing the lid and its hardware. Not designed to be portable, the chest looks great on a countertop, or fits neatly under a typical workbench.
Originally conceived simply as a place to put your tools, the tool chest project has become a familiar step in the two-year Cabinet and Furniture Making curriculum at the North Bennet Street School. Though simple in design and appearance, it challenges our students in genuine and surprising ways. They learn the value of planning the order of tasks; fitting the actual pieces, not just working from the drawing; and choosing between various methods and techniques.
This tool chest is the students’ first major project, so we’ve narrowed the parameters to make sure that the focus stays on the craftsmanship and not the overall design and dimensions. Primary woods can be maple, cherry, walnut, or mahogany. Choices for secondary woods are soft maple, poplar, and pine (for drawer parts only). We allow students to use highly figured woods only for the panels. This tool chest (16 in. deep by 24 in. wide by 14 in. tall) is at the small end of our size range, but students can build them up to 18 in. deep by 30 in. wide by 17 in. tall. Drawer size and configuration is another place where individual designs vary, and so is the frame-and-panel lid.

The typical chest starts with a drawing, scaled or full-size, and consists of a through-dovetailed carcase with dovetailed drawers running on mortise-and-tenoned divider frames.. The lid provides a means of locking the box as well as an introduction to setting a full-mortise lock. Above the top divider is a space to put the lid when the box is unlocked.
Although every aspect of building this tool chest—from the dovetails to the shiplapped back—creates a valuable learning experience, I can’t go into all of it in one article. Here, I’m going to focus on machining the dadoes and rabbets, fitting and installing the horizontal dividers, cutting and fitting the vertical dovetailed partition, and installing the lid and its hardware. Not designed to be portable, the chest looks great on a countertop, or fits neatly under a typical workbench.
 From Fine Woodworking #216
For the full article, download the PDF below:
Fine Woodworking Recommended Products

WoodRiver Router Bit Storage Case

Woodriver Rechargeable Desiccant Bag


Log in or create an account to post a comment.
Sign up Log in